
Table of Contents:
Last Updated on December 7, 2025
Most companies handle leave requests through email chains or spreadsheets. This creates confusion, lost requests, and constant back-and-forth.
Power Apps offers a better solution inside your existing Microsoft 365 setup.
You can build a complete leave request system that connects to SharePoint, sends automatic approvals, and tracks balances in real time.
What to expect from this guide:
This article walks through creating a demo leave request app using Copilot. Think of it as a framework showing what’s possible, not a rigid set of rules.
Your company’s needs are different from everyone else’s. Feel free to adapt the process, skip sections that don’t apply, or add features not covered.
Use Copilot to Build Your Leave Request App
Copilot in Power Apps creates your entire app from a simple description. You don’t need to build everything from scratch anymore.
Microsoft’s AI assistant generates the data structure, creates the form interface, and sets up the basic functionality. You just describe what you need in plain English.
Start with a Simple Description
Open your browser and go to make.powerapps.com. Sign in with your work account and then look for the Copilot creation box on the home page.
It looks like this:
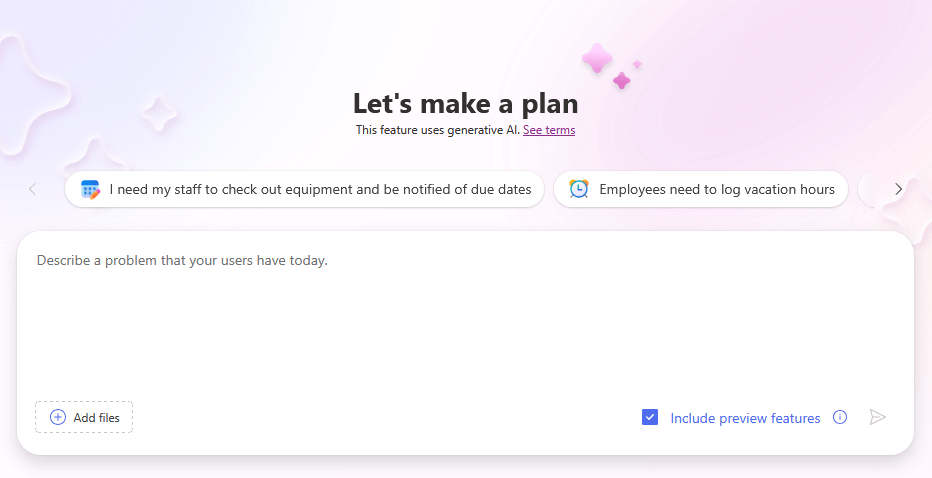
Type something like this:
Create a leave request app where employees can submit time off requests with start and end dates, leave type, and reason. Track how many days each employee has available and used.
Copilot processes your description and creates a plan first. You’ll see a document that outlines the business problem, user requirements, and proposed data structure.
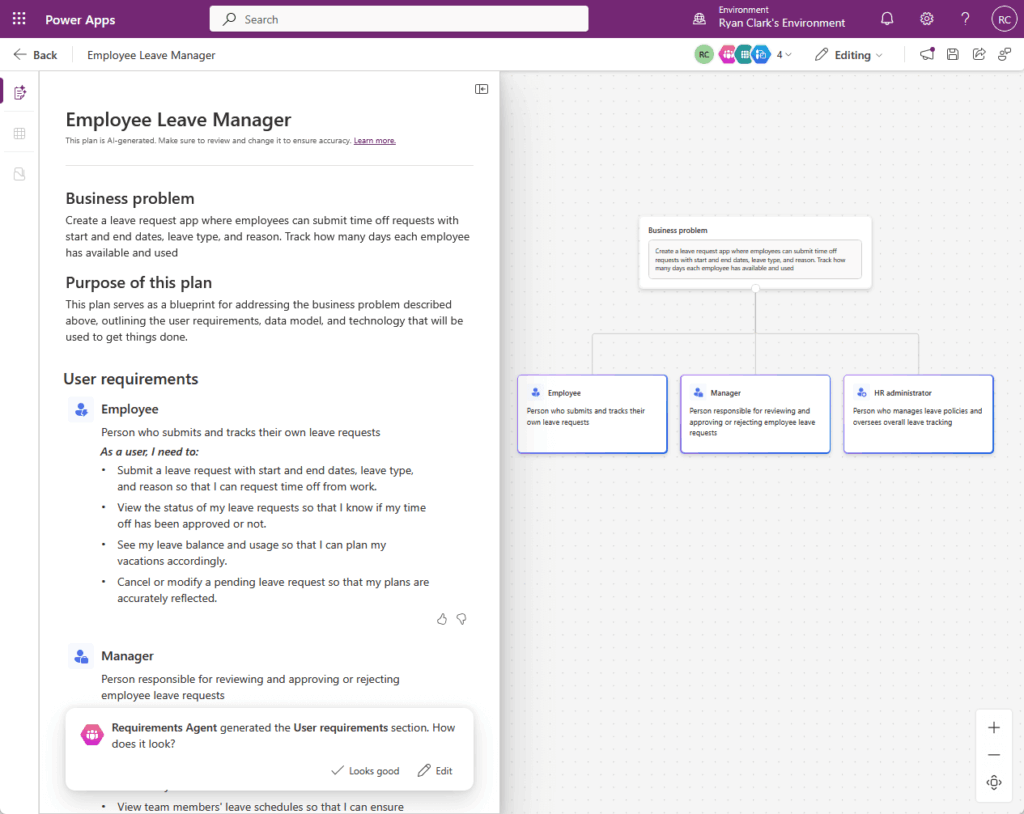
The plan shows different user roles like employee, manager, and HR administrator. Each role has specific requirements listed out.
Review this plan carefully. You can provide feedback or ask Copilot to modify sections before it builds anything.
Review the Business Plan
After reviewing the plan, you can approve it or request changes. Look for buttons like “Looks good” or “Edit” at the bottom.
If something needs adjustment, tell Copilot what to change.
You might say “Add a column for emergency contact” or “Include tracking for different leave types like sick leave and vacation.”
Click “Looks good” to move forward. Copilot then generates the data structure.
Review the Data Model
Copilot shows you the actual data tables it created. This is the “Data model” section.
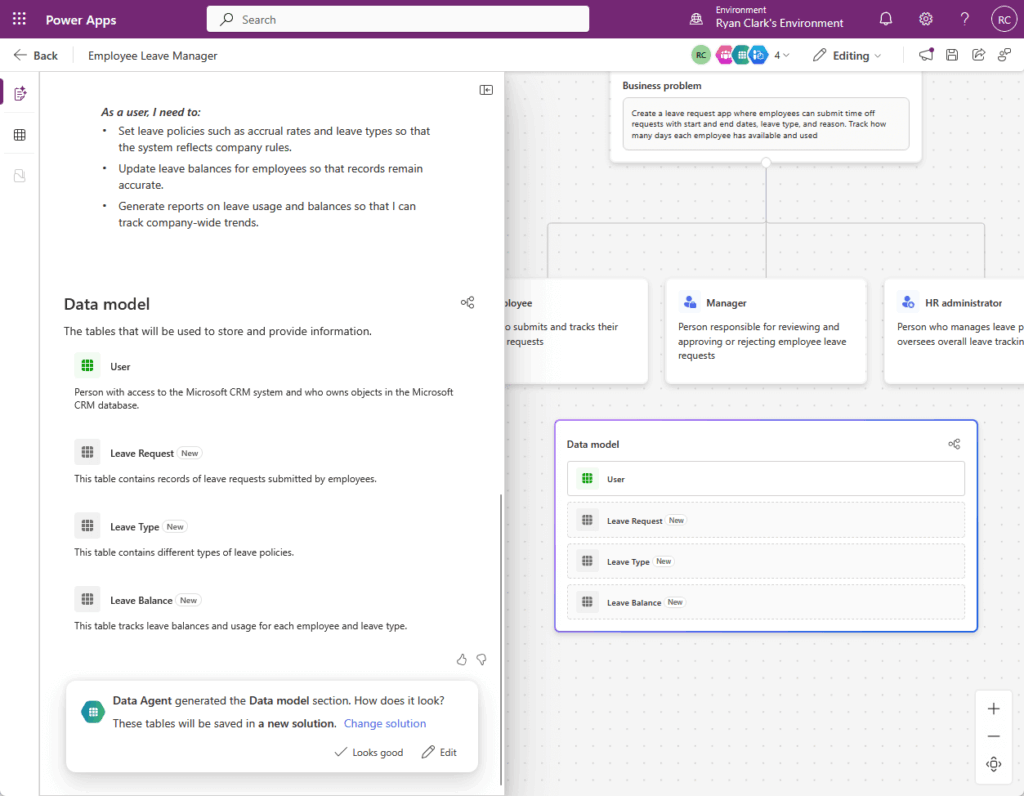
You’ll see tables like User, Leave Request, Leave Type, and Leave Balance. Each table has a brief description explaining what it stores.
The Leave Request table holds records of employee submissions. The Leave Type table stores different leave categories like annual or sick leave.
The Leave Balance table tracks how many days each employee has available and used. All these tables work together to power your app.
Click “Looks good” again to continue to the next step.
Review the Technology Components
After approving the data model, Copilot shows you all the apps and flows it will build. This is the “Technology” section.
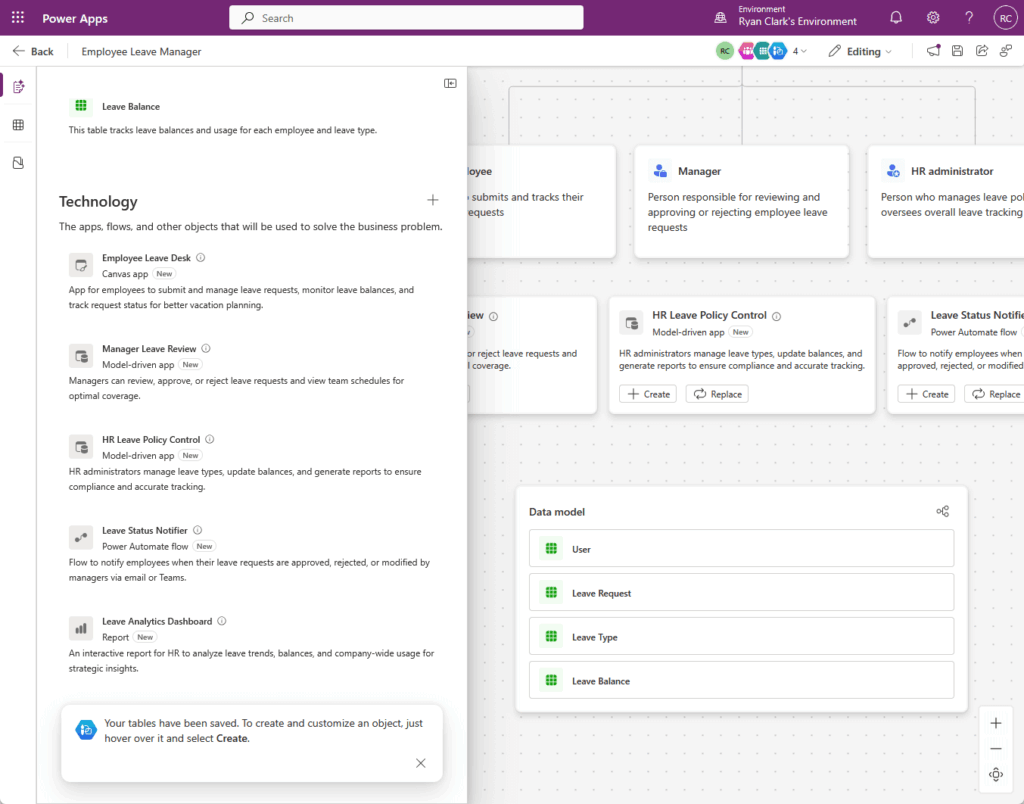
You’ll see several components listed:
Employee Leave Desk – A canvas app where employees submit and track their leave requests. This is the main interface employees will use.
Manager Leave Review – A model-driven app for managers to review and approve requests. Managers see all pending approvals in one place.
HR Leave Policy Control – A model-driven app for HR administrators. They can manage leave types, update balances, and generate reports here.
Leave Status Notifier – A Power Automate flow that sends notifications. Employees get emails when their requests are approved or rejected.
Leave Analytics Dashboard – A report for HR to analyze leave trends and balances across the company.
Copilot creates all of these automatically based on your original description. Each component serves a specific purpose in the complete system.
Review what Copilot plans to build. Click “Looks good” if this matches your needs.
Click “Edit” if you want to remove components or add new ones. You might not need all five pieces depending on your company size.
Create Your Apps
After approving the technology components, Copilot saves your data tables.
You’ll see a message: “Your tables have been saved. To create and customize an object, just hover over it and select Create.”

Now you choose which apps to actually build. Hover over the “Employee Leave Desk” canvas app.
Click the “Create” button (the circle button with a plus in the center) that appears. Copilot starts building the app based on your data model.
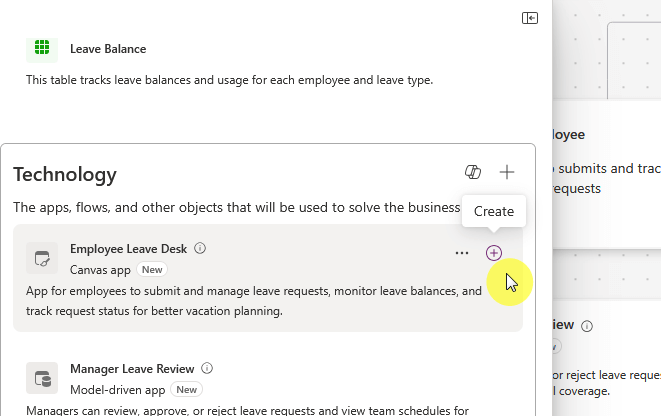
This takes a few minutes. Copilot generates screens, forms, and navigation automatically.
For most organizations, start with just the Employee Leave Desk app. You can create the other components later as needed.
The Manager Leave Review and HR Leave Policy Control apps are optional. Many companies handle approvals through Power Automate flows instead of separate apps.
What Copilot Generates Automatically
Copilot opens Power Apps Studio with your completed app. You’ll see multiple screens already built in the left panel.
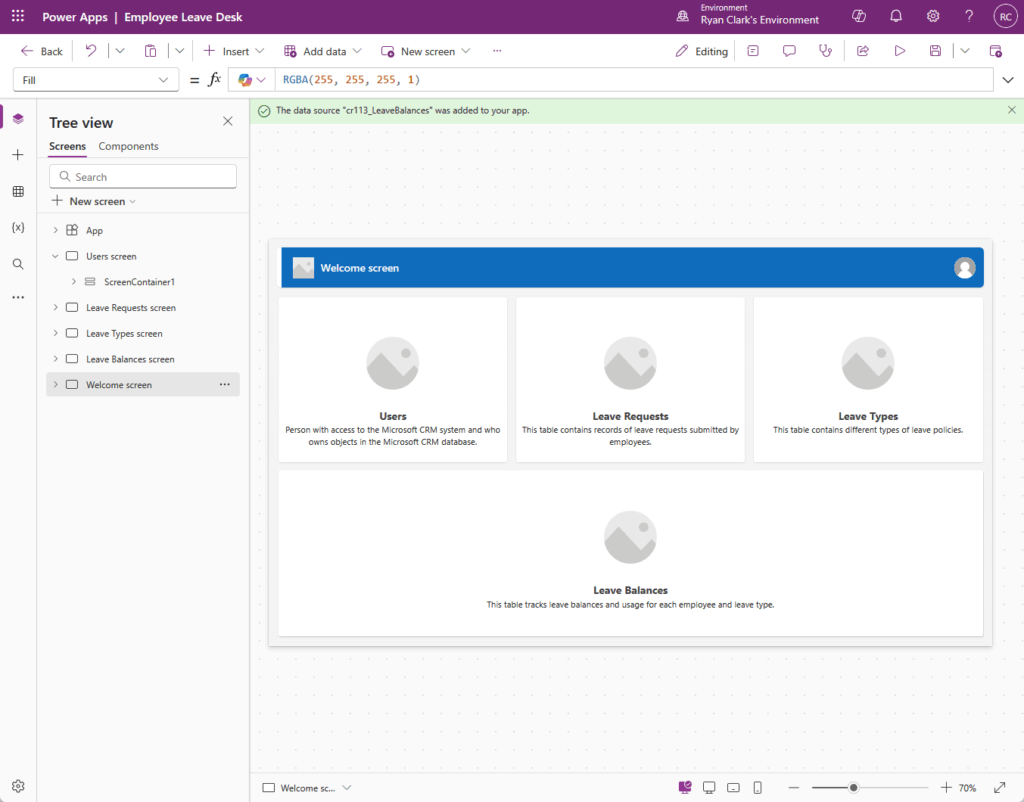
The app includes:
Users screen – Shows people with access to the system. This connects to your organization’s user database.
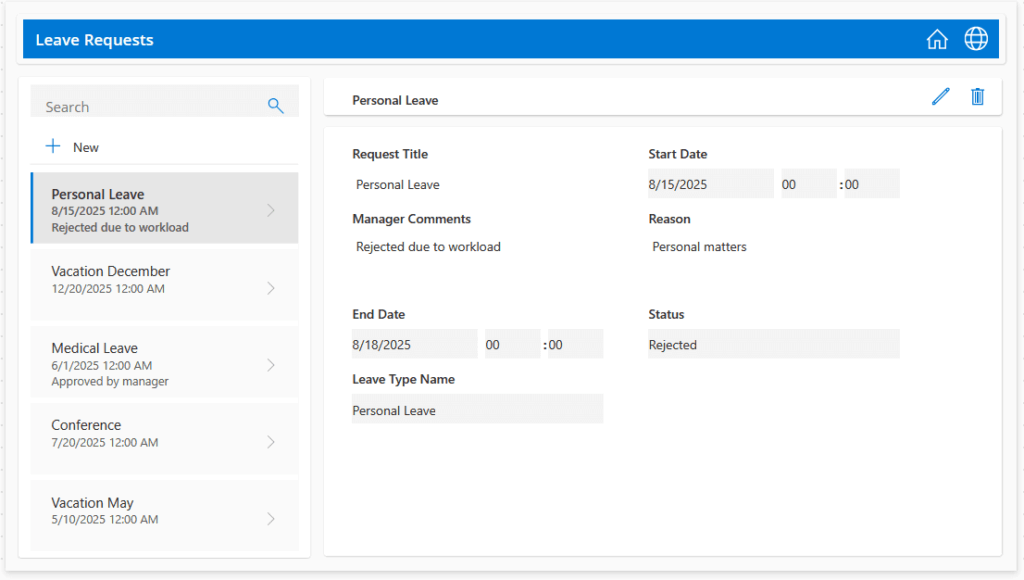
Leave Requests screen – The main screen where employees submit new requests and view existing ones. Forms and galleries are already configured.
Leave Types screen – Displays different leave categories like annual leave, sick leave, and unpaid leave. Employees can see what options are available.
Leave Balances screen – Shows how many days each employee has available and used. The calculations are built in.
Welcome screen – An overview screen that introduces the app and shows the data structure. This is what displays by default.
All the data connections are set up. Notice the green notification at the top confirming data sources are connected.
The app is functional right now. You can test it immediately or customize it further.
Sign up for exclusive updates, tips, and strategies
Add Business Day Calculation (Optional Advanced Customization)
The app Copilot creates works immediately. It calculates the difference between start and end dates automatically.
However, it counts total days including weekends and holidays. Most companies only count business days for leave requests.
This customization requires editing formulas in the app. If you’re comfortable with that, follow these steps.
Create a Holidays List First
You need a list of company holidays before the calculation works. Go to your SharePoint site and create a new list called “Company Holidays.”
Add two columns:
- Holiday Name (text)
- Holiday Date (date)
Fill in all your company’s holidays for the current year and next year.
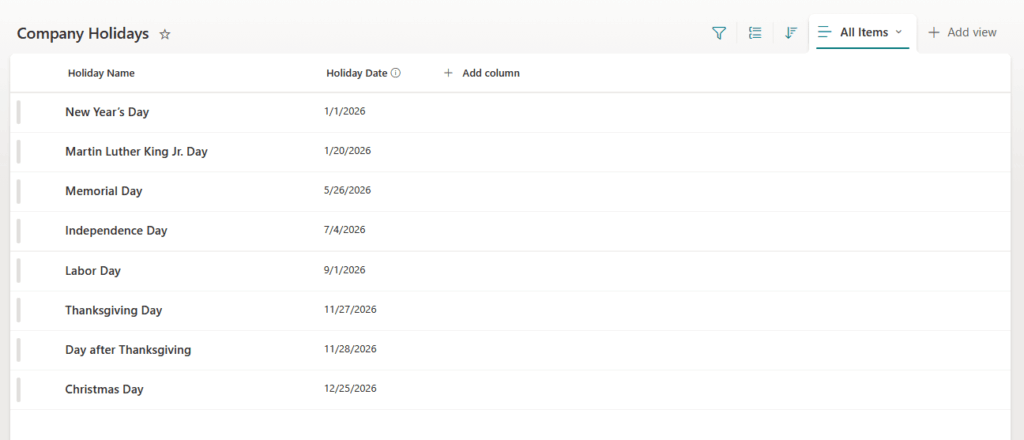
Include dates like New Year’s Day, Independence Day, Thanksgiving, and Christmas. Add any other holidays your company observes.
This list helps the app know which days to skip when counting business days.
Connect the Holidays List to Your App
Open your Power Apps canvas in edit mode. Look for the Data panel on the left side (it shows a grid icon).
Then:
- Click “Add data” at the top of the Data panel.
- Type “SharePoint” in the search box.
- Click on the SharePoint connector when it appears.
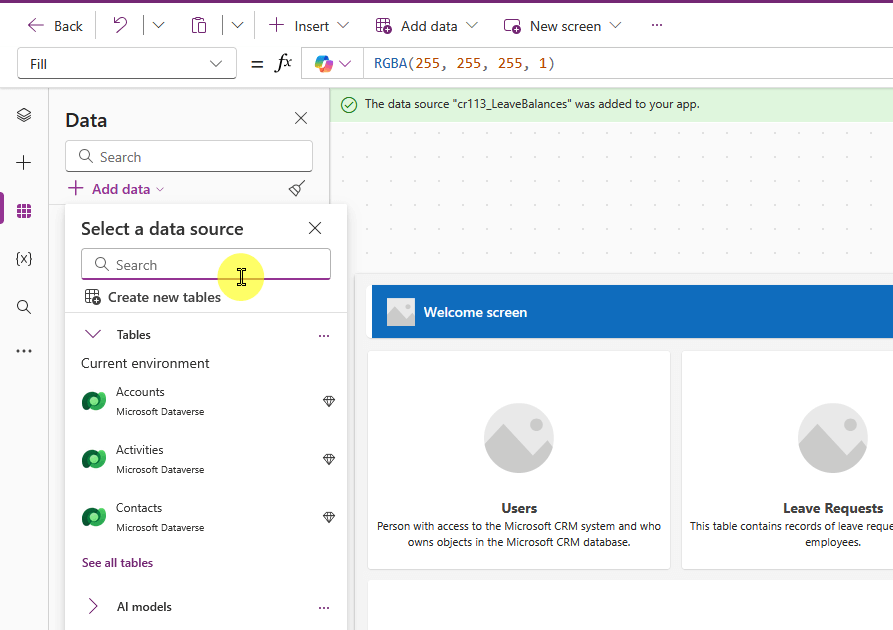
A panel opens on the right asking how you want to connect. Select “Connect directly (cloud services)” since your SharePoint is in Microsoft 365.
Enter your SharePoint site URL or select from the sites:
- Find your Company Holidays list.
- Check the box next to “Company Holidays” to select it.
- Click “Connect” at the bottom.
Power Apps adds the connection. You’ll see a green notification confirming “Company Holidays was added to your app.”
The Company Holidays list now appears in your Data panel on the left. The app can access this data for calculations.
Use Copilot to Create the Approval Workflow
Power Automate handles approvals automatically. Copilot can build the starting structure for your workflow.
Open Power Automate and type a description like:
When someone creates a leave request in SharePoint, send an approval email to their manager. If approved, update the status and deduct from their balance. If rejected, update the status and notify the employee.
Copilot generates a basic flow structure. You’ll see a trigger for “When an item is created” in SharePoint and a condition action.

Click “Keep it and continue” to open the flow designer. Now you need to configure the specific details.
Select your SharePoint site and the Leave Requests list in the trigger. Add actions for getting the manager’s email, sending the approval request, and handling the response.
This is where Copilot gives you a head start but not a finished product. You’ll need to add the specific approval actions and configure how the flow updates your data.
For detailed step-by-step instructions on building the complete approval workflow, check out my guide on tracking employee leave with Power Automate.
Customize the App Interface
Copilot creates a functional app that works immediately.
Once you’re comfortable with the basics, consider these optional improvements:
- Calculate business days – Modify the duration field to exclude weekends and company holidays from leave calculations (requires formula editing)
- Display balance on the request form – Add a label showing available leave days so employees know their balance before submitting
- Color-code request status – Use green for approved, orange for pending, and red for rejected to make status clear at a glance
- Sort requests by date – Show newest requests first so employees see recent activity without scrolling
- Add form validation – Disable the submit button when required fields are empty or balance is insufficient
- Customize colors and fonts – Match your company branding by adjusting the theme and visual elements
- Add help text – Include tooltips or instructions for fields that might confuse employees
Start with the app Copilot generates and add these features gradually based on user feedback. Test the basic version with a small group first to identify which customizations matter most.
You can always refine the interface later. The important thing is getting a working system in place quickly.
Test Your Complete System
Before rolling out company-wide, test with a small group to catch issues early.
Here’s what to verify:
- Test successful approvals – Submit a request, approve it, and confirm the status updates correctly
- Test rejections – Reject a request and verify the employee gets notified with the reason
- Check the mobile experience – Download the Power Apps mobile app and test on your phone
- Verify data accuracy – Make sure dates, leave types, and balances display correctly
- Test edge cases – Try submitting on weekends, during holidays, or with invalid date ranges
- Confirm notifications work – Check that approval emails arrive promptly for managers
Run through these tests with 3-5 people from different roles. Fix any issues before announcing it to everyone.
Once testing is complete, you have a working system that eliminates manual leave tracking.
From Manual to Automated Leave Management
You just transformed email chains and spreadsheets into a digital system. Copilot did most of the work, and fortunately at that.
Employees submit requests in under a minute. Managers get automatic approvals with all the details they need.
The system tracks balances in real time and prevents requests that exceed available days. Everything runs on your existing Microsoft 365 tools with no expensive software.
By the way, always test with a small group first, then roll out company-wide. Don’t forget that.
Do you have questions about creating a leave request form with Power Apps? Drop a comment below and I’ll help you out.
For any business-related queries or concerns, contact me through the contact form. I always reply. 🙂





























Is there a way that once approved, the leave is added to the person’s calendar and the time blocked as out of office?
I could see this being adapted for travel requests as well.