
Table of Contents:
Last Updated on July 25, 2025
Struggling with manual document approvals?
In this guide, let’s talk about how you can build powerful workflows in Power Automate from start to finish.
Let’s get started.
Automated workflows succeed with a strong foundation, like a well-made SharePoint document library.
The library acts as the central database for the approval process, tracking status, logging history, and providing metadata.
To construct this data source, you will create three critical columns to manage the process:
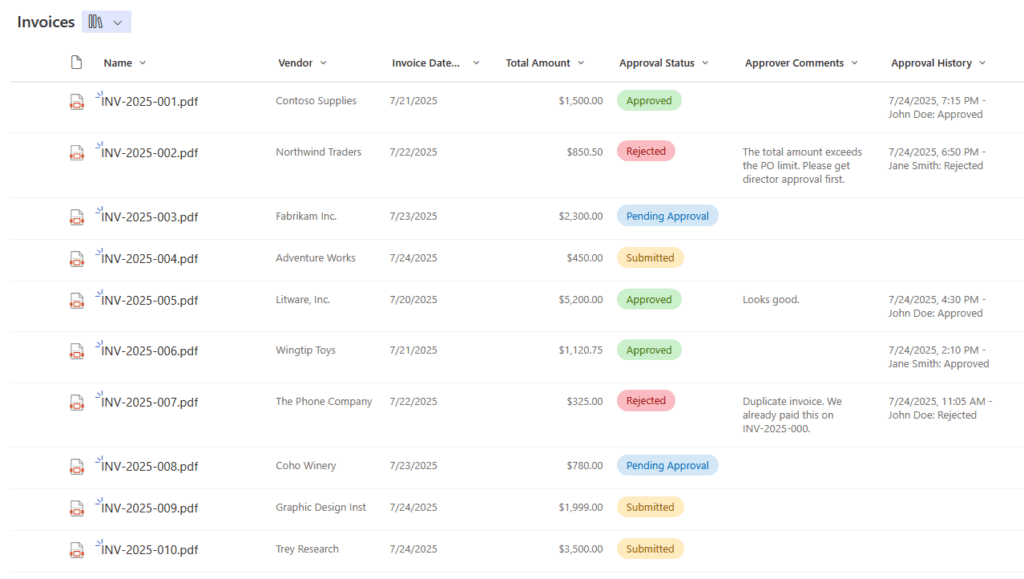
Approval Status
This is a Choice column, typically named Approval Status.
It’s the most important field for tracking a document’s position in the workflow, providing at-a-glance visibility for all stakeholders.
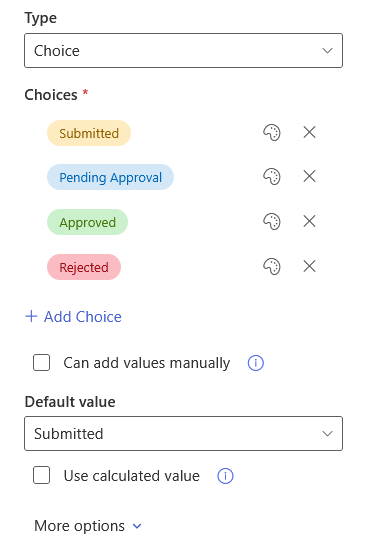
I recommend the following choices:
- Submitted
- Pending Approval
- Approved
- Rejected
Set the default value to “Submitted.”
This makes sure new documents enter the process with the right status, so nothing gets missed.
Approval History
To maintain a transparent audit trail, this Multiple lines of text column is critical.
Unlike in a SharePoint List, the “Append Changes” feature is not available in a SharePoint document library.
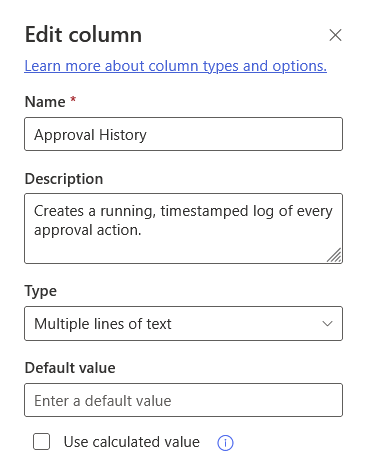
Power Automate will build the history log.
It will do this by reading existing history and adding new entries with each approval.
Approver Comments
This Multiple lines of text field will store feedback from approvers.
This is critical for rejections as it gives the submitter clear feedback on what to correct.
It breaks the frustrating cycle of “reject-resubmit” without context.

Logging this information directly prevents confusion and cuts down on follow-up emails.
Additionally, a folder strategy can further organize the process.
Using folders like “Incoming Invoices” and “Reviewed Invoices” separates documents clearly.
This can also trigger different workflows if needed.
Sign up for exclusive updates, tips, and strategies
Getting Started with Power Automate Copilot
The introduction of Microsoft 365 Copilot into Power Automate provides a powerful new entry point for workflow creation.
Copilot translates natural language into a functional approval flow to automate approval processes.
This speeds up development and makes it easier for citizen developers to get started.
Creating the Perfect Prompt
The quality of the AI-generated flow is directly proportional to the quality of the input prompt.
Vague instructions will lead to a generic and incomplete flow.
A well-crafted prompt is:
- Specific
- Uses keywords for Microsoft services
- Clearly outlines the trigger, actions, and outcomes
Here’s an example prompt for a document approval workflow:
"When a new file is created in the 'Incoming Invoices' folder of the 'Documents' library on the 'Finance Site' SharePoint site, start an approval process. Assign the approval to ''. If the approval is successful, move the file to the 'Approved Invoices' folder. If it is rejected, send an email to the person who created the file."
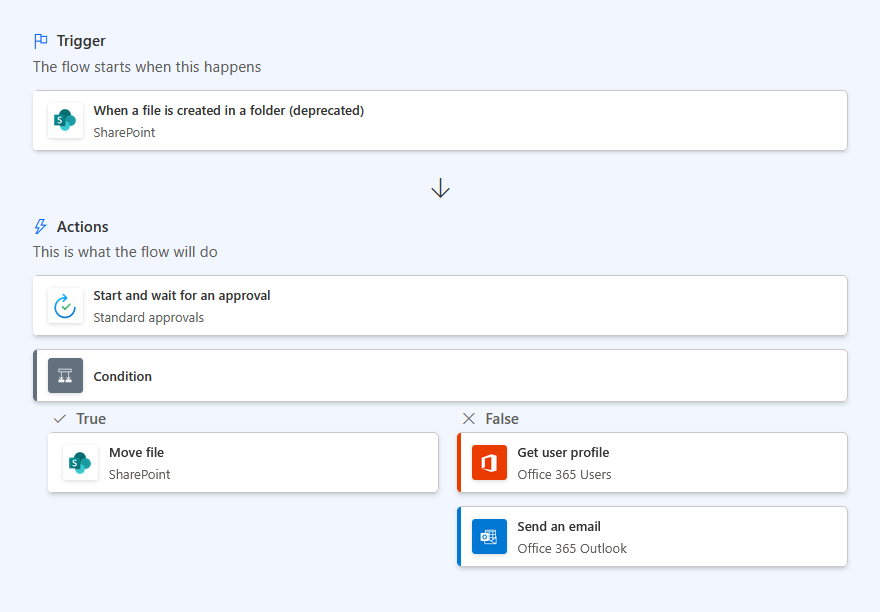
This prompt effectively defines the trigger, location, action, parameters, and conditional logic for success and failure.
Refining the Copilot-Generated Flow
After entering the prompt, Copilot will generate a workflow that provides a solid logical skeleton.
However, to make it fully functional and align it with our SharePoint setup, we need to make a few critical changes.
Here’s how to refine the initial flow:
- Replace the Deprecated Trigger
The generated flow starts with When a file is created in a folder (deprecated). This trigger is outdated.
You should delete it and add the modern When a file is created (properties only) trigger.
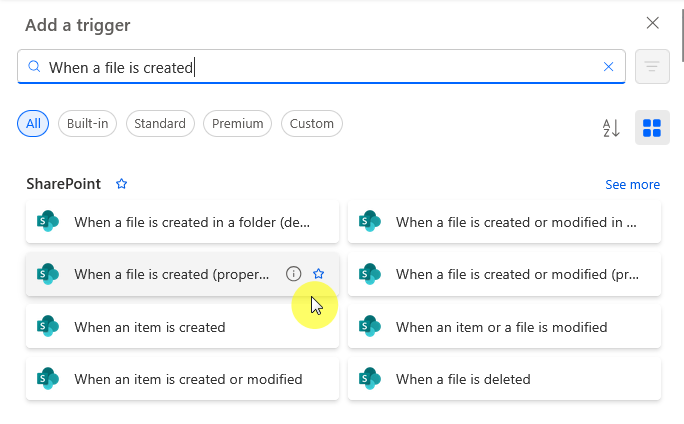
Configure it with your SharePoint Site Address, Library Name, and the specific folder to monitor.
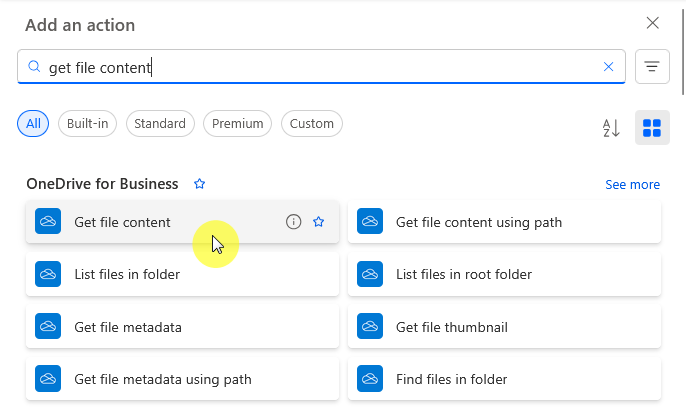
- Add the Get file content Action:
The new trigger is more efficient because it doesn’t get the file’s content.
You must add this step manually.
Immediately after the trigger, add the SharePoint action Get file content.
In the File Identifier field, use the Identifier dynamic content from the trigger.
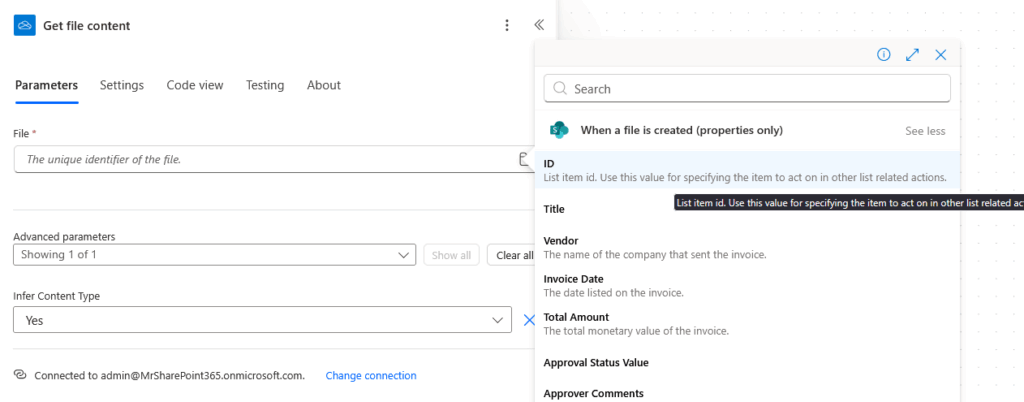
This makes the actual document available to be attached to the approval request.
- Update the “True” (Approved) Branch:
The generated flow moves the file but fails to update its status in SharePoint.
Before the Move file action, add an Update file properties action.
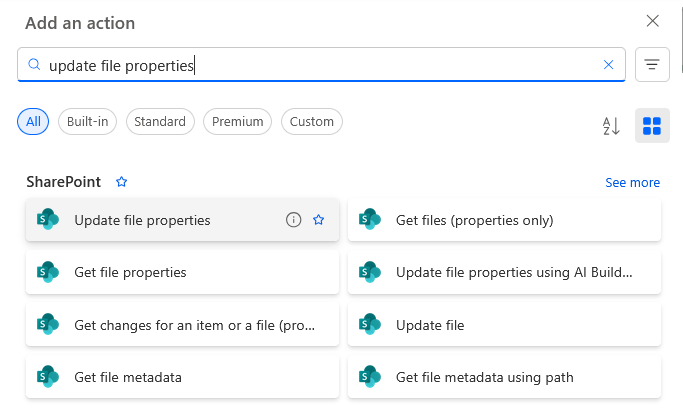
Use it to set the Approval Status column to “Approved”.
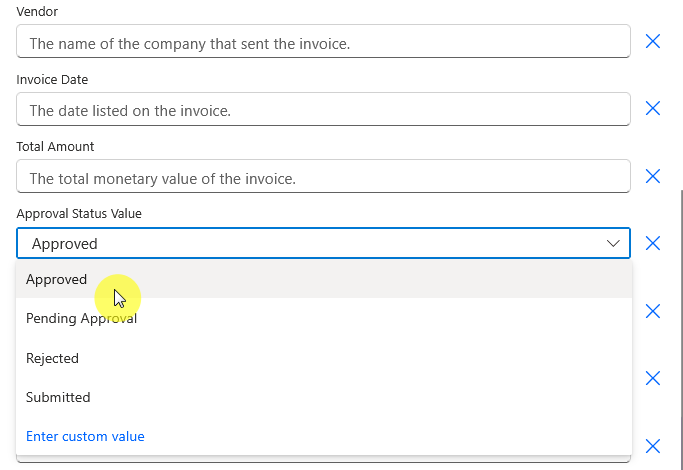
That’s to manually build the Approval History log as described earlier.
- Update the “False” (Rejected) Branch:
Similarly, the “False” branch needs to log the outcome.
Before the Get user profile or Send an email actions, add an Update file properties action.
Use it to set the Approval Status to “Rejected” and to log the rejection details in the Approval History column.
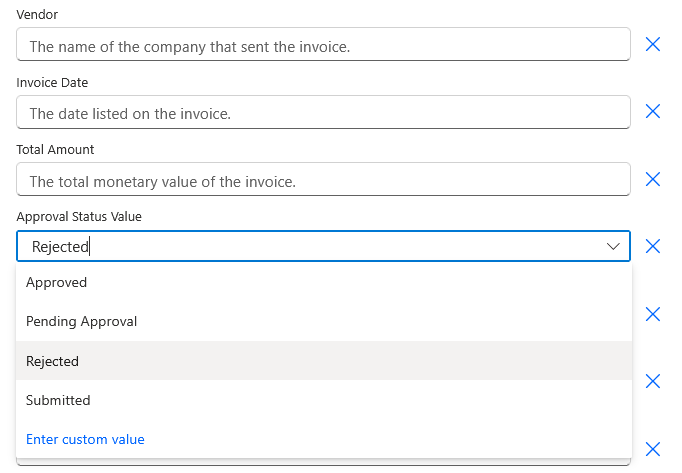
These changes make the AI-generated flow robust and work correctly with your SharePoint library.
The Trigger and Data Gathering
The trigger initiates the workflow, and the choice of trigger has significant performance implications.
This part covers initial actions that gather necessary information before the approval process starts.
Trigger
Configure the When a file is created (properties only) trigger.
It requires three parameters:
- The Site Address
- The Library Name
- The specific Folder (e.g., /Incoming Invoices)
This trigger is strategically superior because it only fetches file metadata, making it lightweight and fast.
For ultimate control, you can add a trigger condition in the settings to prevent the flow from running on folders:
@equals(triggerOutputs()?['body/{IsFolder}'],false)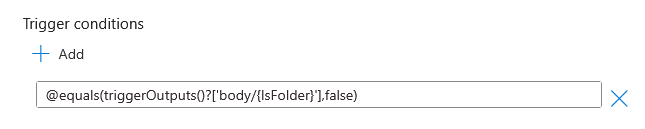
Get File Content
This SharePoint action is the essential companion to the “properties only” trigger.
It retrieves the binary content of the file using its File Identifier.
The Identifier dynamic content from the trigger must be used here.
The output, File Content, is then used to attach the document to the approval request.
Get User/Manager Info (Optional)
To avoid hardcoding approvers, use the Get manager (V2) action.
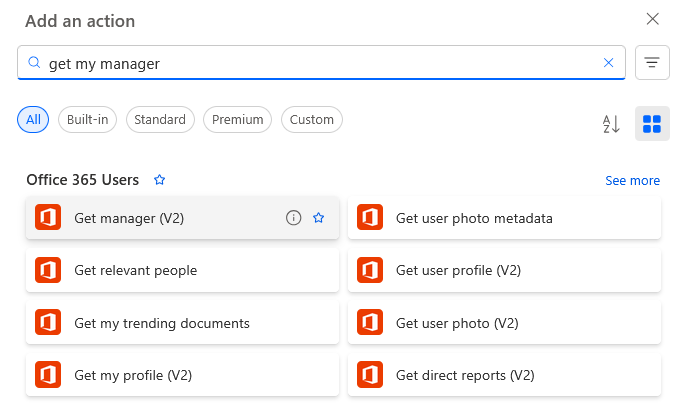
By passing the Created By Email dynamic content from the trigger, this action returns the manager’s profile.
Their email address (Mail) can then be used in the Assigned To field of the approval action.
The Approval Action
This “Start and wait for an approval” action is the centerpiece of the workflow, used to send approval requests.
It creates and sends the approval request, then pauses the flow until a decision is made.
This synchronous behavior is ideal for most standard approval scenarios.
Key Parameters
Configure these parameters correctly as they’re important for creating a clear and effective approval request.
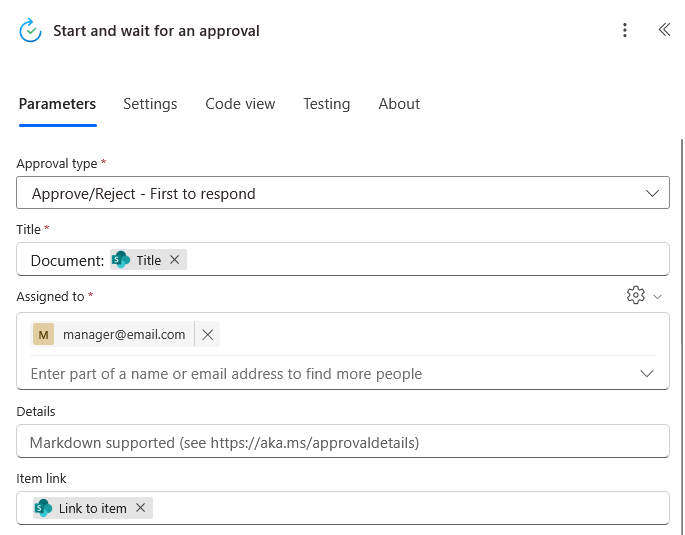
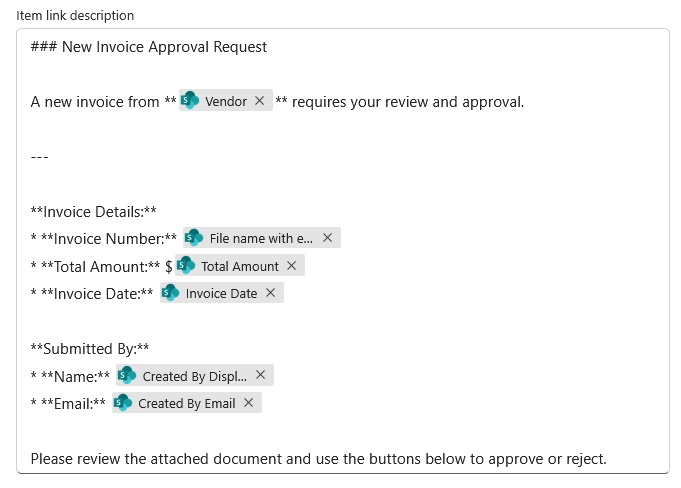
For the details, you can use my example below directly in the “Details” field.
Don’t forget to replace the bracketed text with the actual dynamic content from the panel on the right.
| Parameter | Description | Expert Tip / Configuration |
| Approval type | Defines the core logic of the approval: who needs to respond and how the outcome is decided. | Choose the type that matches your business process exactly, such as First to respond or Everyone must approve. |
| Title | The subject line of the approval request that appears in emails and Teams. | Make the title clear and informative. Include the filename using dynamic content for immediate context. |
| Assigned To | A semicolon-separated list of email addresses for the approvers. | Avoid hardcoding emails. Use dynamic content from actions like Get manager (V2) to make the flow maintainable. |
| Details | The body of the approval request, which supports Markdown for rich text formatting. | Use Markdown to structure information and highlight key data points, making the request easier to parse. |
| Item Link | A URL to the item being approved, which appears as a clickable link in the approval card. | This is a crucial UX feature. Use the Link to item dynamic content from the trigger for a one-click path to the document. |
Thoughtfully filling these fields gives approvers the context they need to make quick, informed decisions.
This improves the user experience and increases the overall efficiency of the process.
Handling the Outcome
After the approval action completes, the flow needs to branch based on the result.
The Condition control is used for this, creating a closed-loop process.
Condition Control
From the prompt, there’s already a Condition action after the approval step.
Configure it to evaluate the Outcome dynamic content from the approval.
The standard check is if Outcome is equal to Approve.
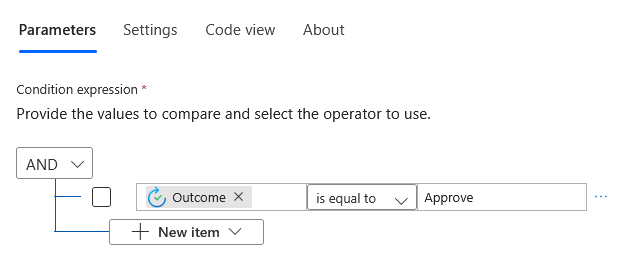
This is case-sensitive and creates two paths: If yes and If no.
The “If Yes” Branch (Approved)
Use the Update file properties SharePoint action to perform two crucial updates:
- First, set the content Approval Status column to Approved
- Second, update the Approval History column.
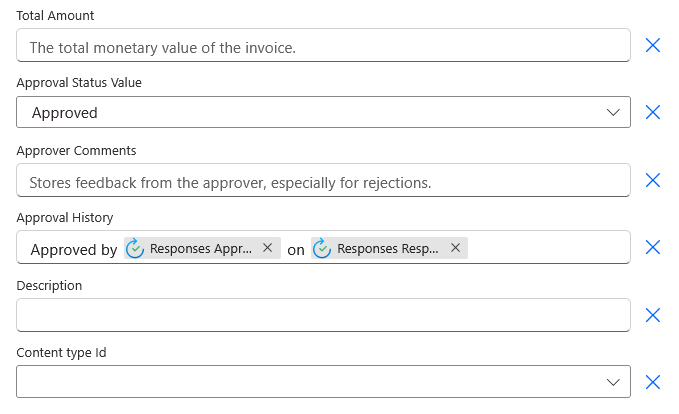
That’s done by creating an expression that adds the new status (e.g., “Approved by [Approver Name] on [Date]“) to the existing history from the trigger.
This manually builds the audit trail.
Finally, use the Send an email (V2) action to send a confirmation email to the file creator (Created By Email).
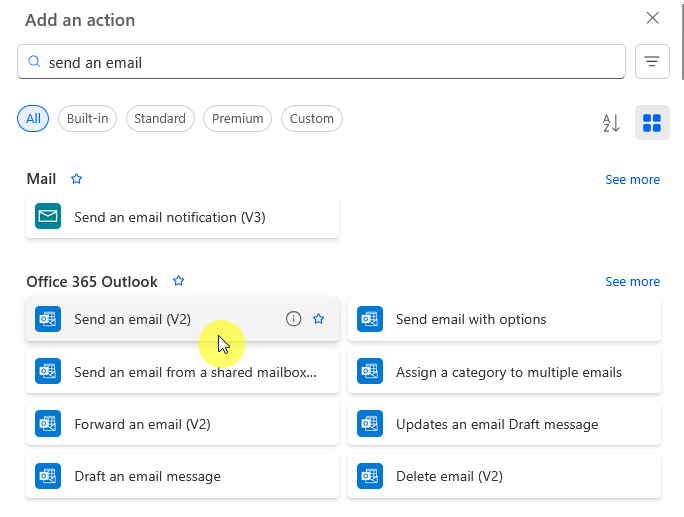
Here’s an example:
Subject: Approved: Your document [File name with extension] has been approved.

Body:

Hi [Created By DisplayName],

Good news! Your submitted document, [File name with extension], has been reviewed and approved.

No further action is needed from your side. You can view the approved file here: [Link to item].

Thank you, The Finance Team
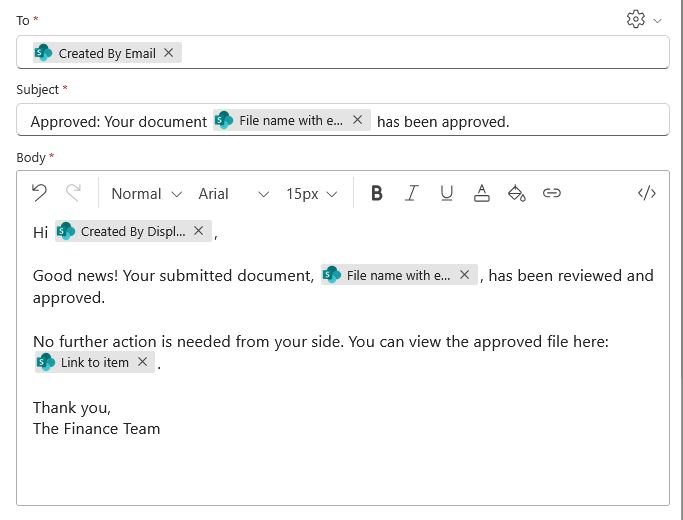
Replace the bracketed text like with the corresponding dynamic content from your Power Automate flow.
The “If No” Branch (Rejected)
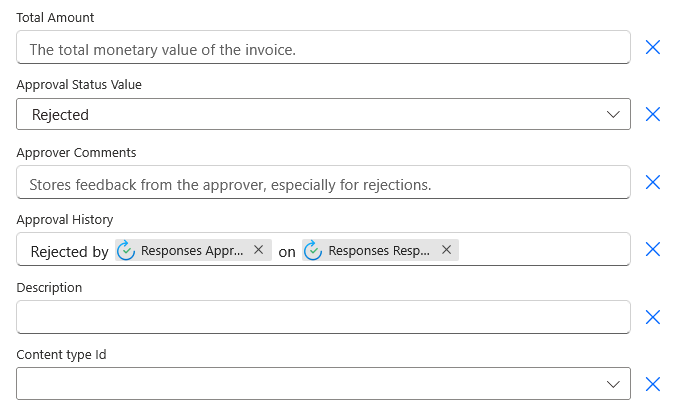
Similarly, use the Update file properties action to:
- Set the Approval Status to Rejected
- Update the Approval History with the rejection details
This notification is critically important.
Use the Send an email (V2) action to inform the creator of the rejection:
Subject: Action Required: Your document [File name with extension] was not approved.

Body:

Hi [Created By DisplayName],

Your submitted document, [File name with extension], has been reviewed but was not approved.

Reason for rejection: [Responses Comments]

Please review the comments above, make the necessary corrections, and resubmit the document for approval. You can access the file here: [Link to item].

Thank you, The Finance Team
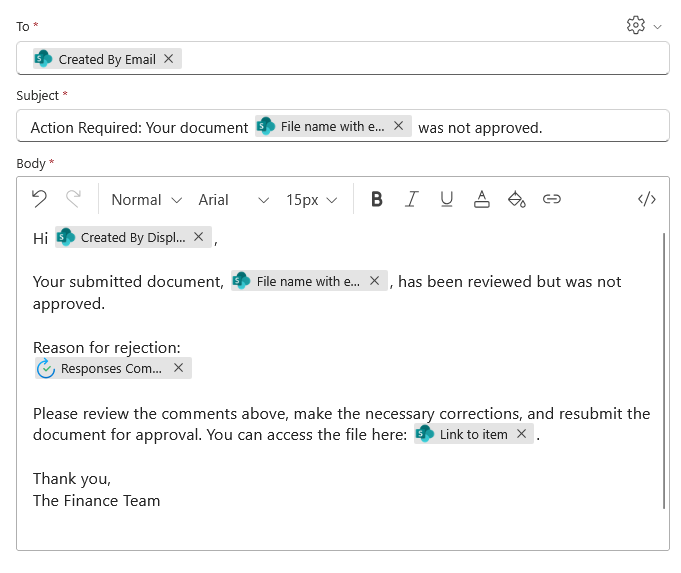
The email body must include the Responses Comments dynamic content.
It’s needed to provide the “why” behind the rejection, enabling the user to make corrections and resubmit.
Advanced Approval Patterns
While a single-approver workflow addresses many needs, real-world processes are often more complex.
Sequential (Multi-Level) Approvals
Sequential approvals are for processes that follow a chain of command.
This is where one level must approve before the request proceeds to the next:
- Use Case: An expense report that requires a manager’s approval before going to the finance department.
- Implementation: Chain Start and wait for an approval actions within the “If yes” branch of the previous approval.
Parallel Approvals
Parallel approvals are used when a document requires simultaneous sign-off from multiple people.
And one important detail: the order doesn’t matter.
- Use Case: A new marketing campaign that needs concurrent approval from Legal, Finance, and Brand Compliance.
- Implementation: Use the Add a parallel branch control to create multiple lanes, each with its own approval action.
For ultimate flexibility, this pattern decouples the approval logic from the flow itself.
This can be done by storing approver information in an external SharePoint list.
- Use Case: A global purchase order system where approvers change based on the PO’s department, country, and value.
- Implementation: Use a Get items action to query a SharePoint configuration list and an Apply to each loop to process the approvals dynamically.
Wrapping Up
Building a document approval automated cloud flow is a core competency in business process automation.
And starting with a properly structured SharePoint data source creates a reliable foundation.
Using Copilot can accelerate initial development, but expert refinement is essential to build a truly functional and scalable process.
Anyway, do you have any questions about which platform to use with your team? Let me know!
For any business-related queries or concerns, contact me through the contact form. I always reply. 🙂