
Table of Contents:
- How do Microsoft Lists, Planner, and To Do compare for projects?
- Picking the Right Template and Columns
- How do you create calendar and board views?
- What automations keep tasks moving?
- How do you integrate the list with Teams, Planner, and Copilot?
- How can you surface task data in Power BI dashboards?
- What permissions and lifecycle practices secure your list?
- Track Your Next Project in Lists
Last Updated on June 30, 2025
Not sure how Microsoft Lists can help with projects?
In this guide, let’s talk about how Lists can help you track project progress with far less confusion, and how it compares with others.
Let’s get started.
How do Microsoft Lists, Planner, and To Do compare for projects?
The short of it is that Microsoft Lists just makes project tracking easier because it keeps everything organized and always up to date.
It’s nice to use because:
- You can quickly build custom tables
- You can add columns for any project need
- You can instantly switch between different views, like a calendar, board, or timeline
- You don’t need extra tools or a complex setup
But technically, even if all three apps (Lists, Planner, and To Do) help manage tasks, they each serve a unique purpose:
| Tool | Best For | Limits |
| Microsoft Lists | Flexible task tables that need custom columns and multiple views | No native dependency tracking |
| Planner | Simple boards and charts for small teams | Limited custom fields |
| To Do | Personal task lists with reminders | Hard to share as a project board |
Because Lists lives on SharePoint, you get columns, views, and integrations that feel closer to a lightweight database.
Lists are best for teams who want to track specific details like status, owner, and deadlines, and slice them into views for each stakeholder.
Meanwhile, Planner shines for quick boards, and To Do handles personal action items with simple reminders.
Quick tip: You can connect Planner tasks to a list later, so you do not lose the visual board your team loves.
Sign up for exclusive updates, tips, and strategies
Picking the Right Template and Columns
Obviously, using the right template can help you save time and avoid missing key details.
There are 2 templates (built-in) that can help:
- The issue tracker template works great for bug tracking or IT requests
- The event itinerary template fits event planning or marketing campaigns.
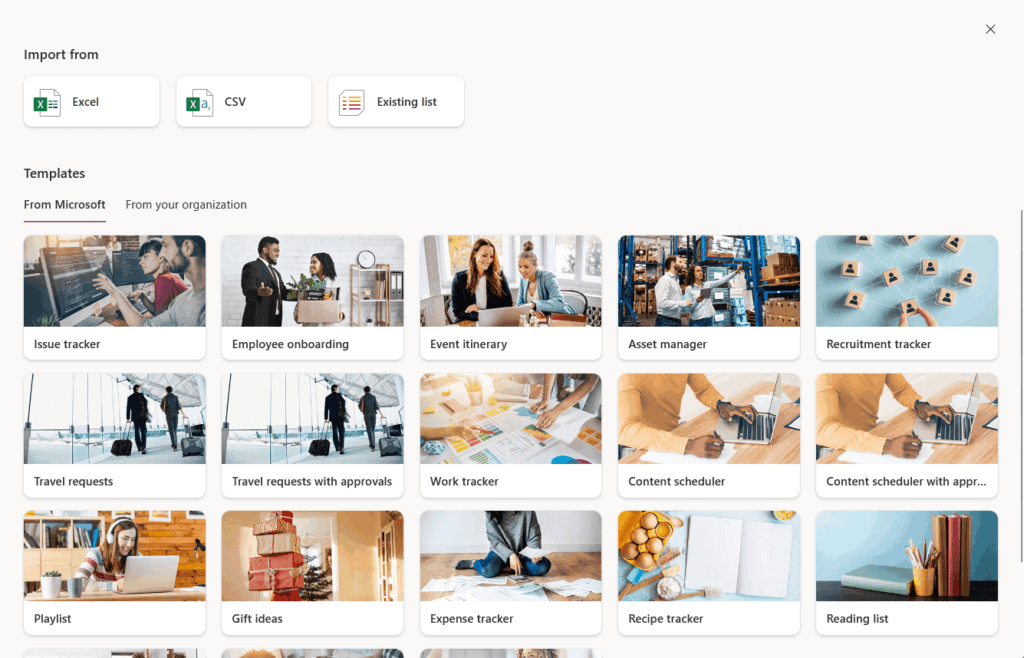
For something more custom, just start from scratch. 😊
After picking a template, add or rename columns so they speak your language:
- Task title: Keep names short and clear, making it easy to scan.
- Owner: Use the Person column type so the list shows profile photos and you can quickly see who is responsible.
- Priority: Switch the choice colors to match your team’s risk scale, such as High (red), Medium (orange), and Low (green).
- Status: Include Not started, In progress, Blocked, and Done so everyone knows the stage.
- Start date and Due date: Help Power Automate measure delays, and make calendar views possible.
- Effort (hours): Use a Number column for roll-up totals and effort estimation.
- % complete: Drives progress bars in timeline view and keeps everyone up to speed.
- Comments: Add a text column for quick notes or updates.
Because Lists supports version history, you can edit columns anytime without losing older entries.
This means you can refine your process over time and adjust columns as your team’s needs change.
If your team manages recurring projects, you can save your setup as a template for faster reuse.
How do you create calendar and board views?
Every team works differently, which is why Microsoft Lists offers more than just a table view.
Thankfully, you can easily switch between several display options depending on your needs.
Calendar View
The calendar view is one of the most valuable options in Microsoft Lists, as it displays all your tasks organized by date.
This makes it simple to track deadlines and spot what’s coming up (like overdue work 😅).
Here’s why it matters:
- Shows tasks by date
- Highlights what’s due soon
- Flags overdue items
- Keeps the whole team on schedule
- Makes planning simpler
To create a calendar view, click Add view → Calendar and map your Start date and Due date columns.
You can use color-coding to show status and make it easy to spot urgent or overdue tasks at a glance.

This puts every deadline on a single grid, so your team always knows what’s next and can react fast if dates change.
Board View
Board view lets you manage tasks in a Kanban-style layout, which is perfect for agile teams and visual thinkers.
Here’s why it works:
- Groups tasks by status or priority
- Lets you drag and drop to update instantly
- Makes daily standups simple
- Shows bottlenecks right away
To create a board view, click Add view → Board and choose which field to group tasks by (most teams use Status or Priority).
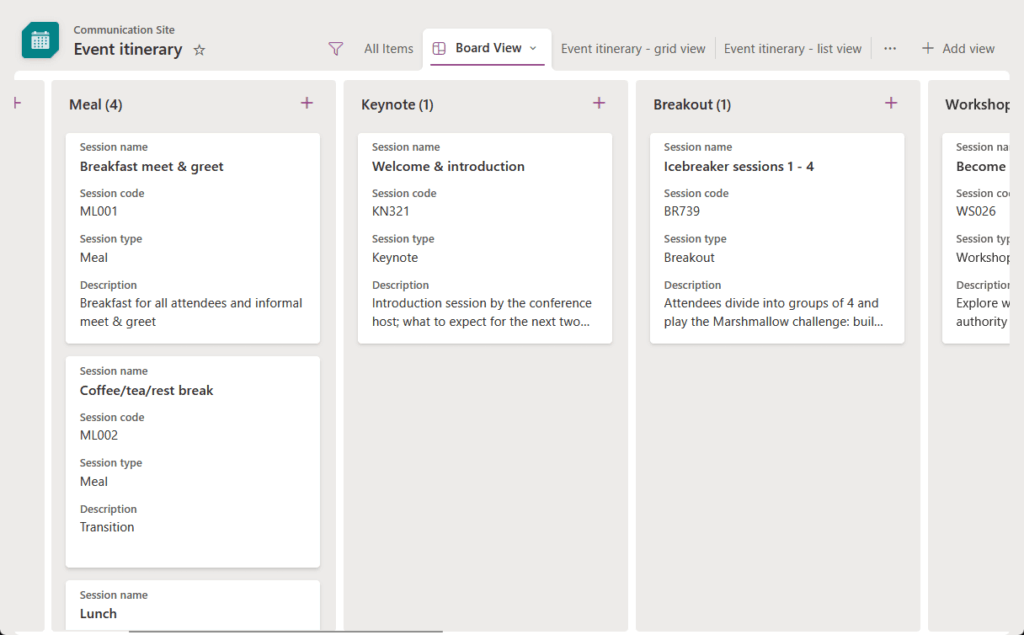
Each task will appear as a card, which you can drag between columns as progress changes.
How about the timeline view?
If you’re looking for a built-in timeline or Gantt view in Microsoft Lists, you might be surprised…there isn’t one (yet).
While Lists supports table, board, and calendar views, timeline-style visualizations aren’t available out of the box.
However, you have a few workarounds:
- JSON formatting
- Export to Power BI or Excel
If you want to keep it within SharePoint, you can use custom JSON formatting to style list items in a timeline format.
This takes a bit of setup, though (got a guide here):
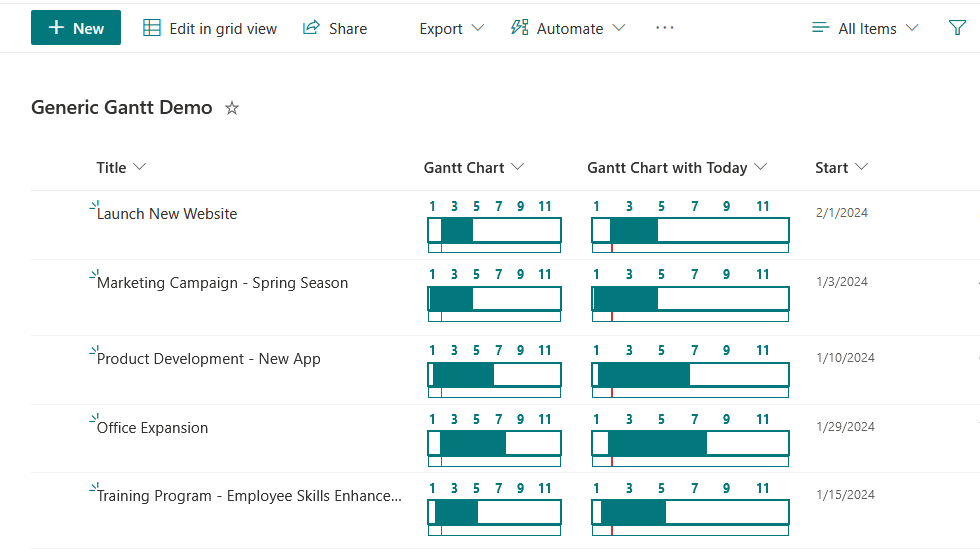
Many teams export Lists data to Power BI or Excel to build Gantt charts, then embed them in SharePoint or Teams.
If your project truly needs timeline management, consider connecting Microsoft Lists with Planner or Project.
These tools offer richer timeline and Gantt chart features, giving your team more ways to track progress visually.
What automations keep tasks moving?
Sometimes, projects stall because no one follows up, or deadlines slip by unnoticed.
That’s where automation steps in to keep everything moving without manual effort.
Rules you can set up in two minutes
Automations in Lists keep projects from stalling when everyone gets busy.
With a few clicks, you can set up rules like:
- Send an email when the status changes to Blocked
- Notify the owner one day before the due date
- Post in Teams when a new task is added
To set up a rule, just go to Automate → Rules and pick a template that fits your project.
Because these rules run right inside SharePoint, you don’t need Power Automate for basic needs.
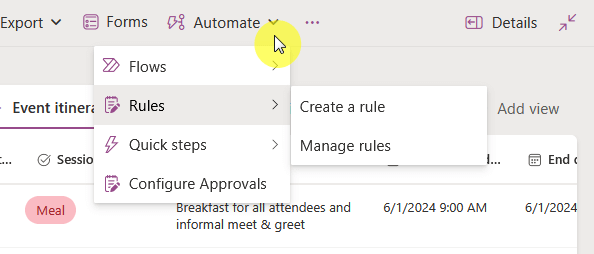
For example, you can send a reminder to the task owner before a deadline or alert your team if a task gets blocked.
These are ideal for small teams and simple scenarios, and you can build them in just a few clicks.
Power Automate Flows for Advanced Reminders
However, bigger projects often need richer workflows. You can:
- Escalate overdue tasks to a manager after three days
- Move completed items to an archive list every month
- Create Planner tasks when a list item reaches Ready for dev
Start by using the Microsoft Lists connector, then select the When an item is modified trigger and set up your conditions.
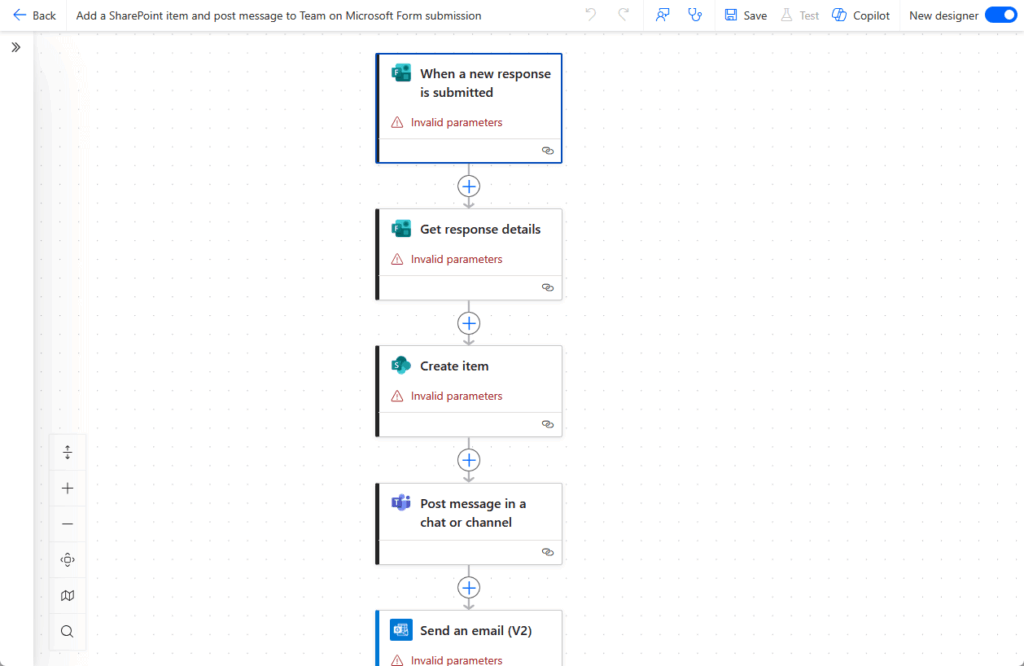
For example, a flow that notifies a manager when a high-priority task is overdue or automatically updates a tracker in Excel.
Be sure to log any failures so you can quickly troubleshoot issues as they happen.
How do you integrate the list with Teams, Planner, and Copilot?
Connecting Microsoft Lists with Teams, Planner, and Copilot makes collaboration smoother for your whole team.
Here is how you keep your Lists connected:
Add as a Teams tab
Adding your list as a tab in Teams makes it easy for everyone to access tasks right where the conversation happens.
Simply click the + button in any Teams channel, search for Lists, and select your project list.
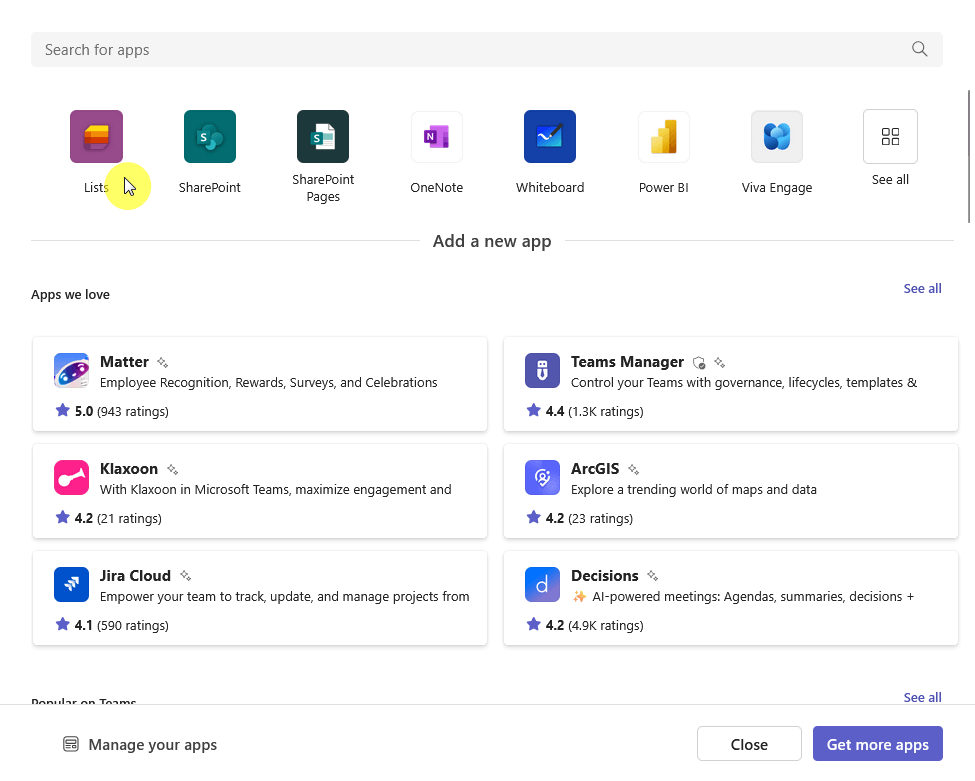
This way, your team can view and update tasks without switching between apps.
As a result, meetings and daily check-ins become more productive because everyone’s looking at the same data.
Sync with Planner
If your team uses Planner for sprint boards or visual task management, you can connect your list using Power Automate.
For example, set up a flow to push new or updated tasks from Lists into specific Planner buckets.
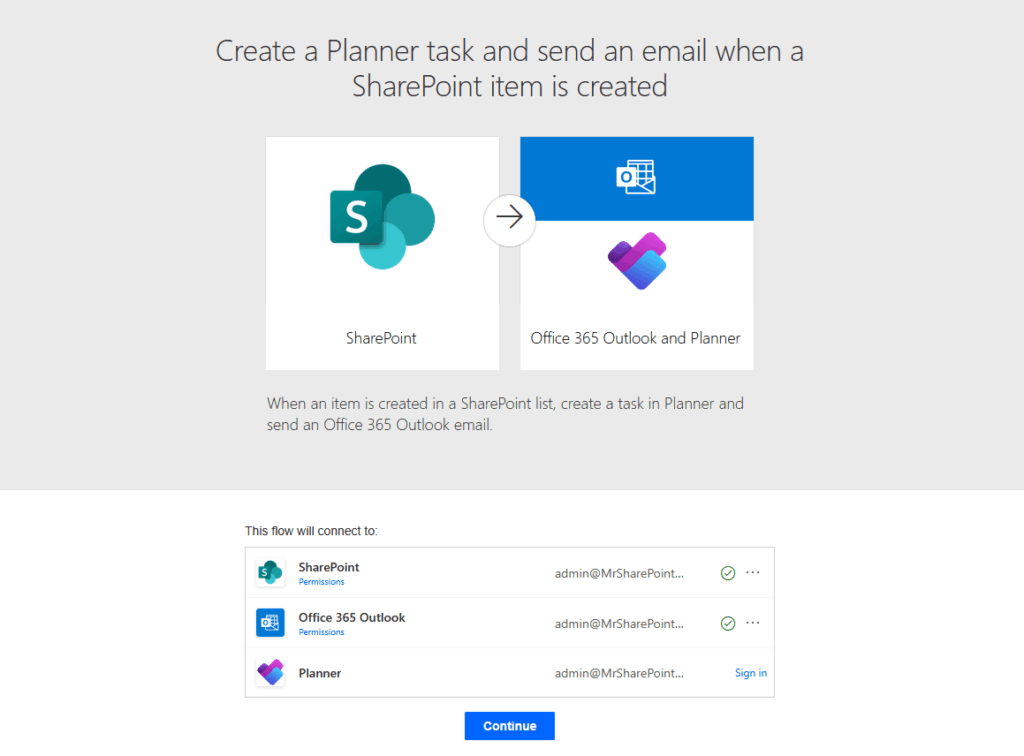
This way, you keep all your structured data in Lists while using Planner for visual boards and charts.
As a result, your team gets the best of both tools, and nothing falls through the cracks.
Copilot for Lists
Microsoft is testing Copilot-powered analysis in Business Central and Dynamics 365 lists.
But it’s still a preview feature and may not be available in all environments yet.
With this AI-powered “analysis assist,” you can type natural language prompts like:
- Show low-stock items by category
- Sort on quantity from smallest to largest
And then Copilot will generate suggested layouts, pivots, or summaries in a special analysis tab.
To try it, you need an admin to activate the Analyze list capability and grant permission for analysis mode.
Since it’s still in preview, features and language support may change, and accuracy may vary depending on your data and prompt style.
How can you surface task data in Power BI dashboards?
Stakeholders love charts. 💹
Fortunately, Lists stores data in SharePoint, which Power BI reads natively.
This means you can visualize your project’s health without copying and pasting.
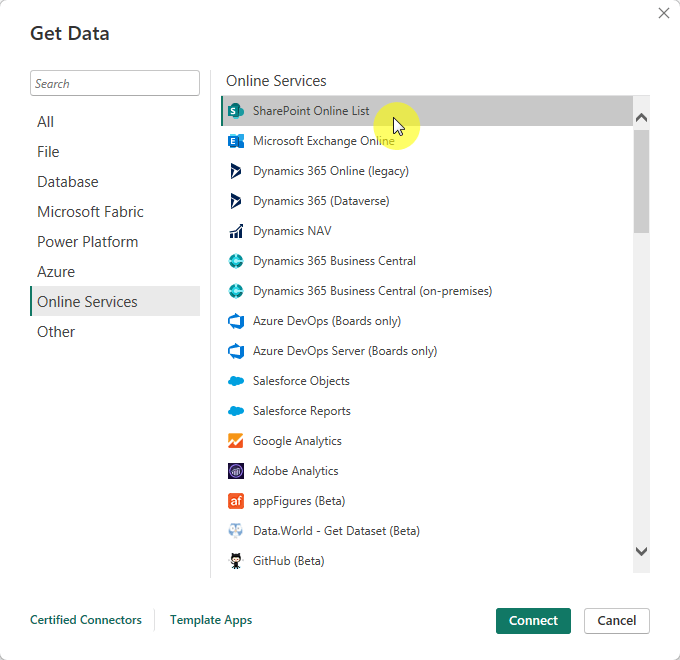
First, open Power BI Desktop and select Get Data → SharePoint Online list, then paste your SharePoint site URL.
Next, choose your project list and load it into Power BI.
Create visuals like:
- Total effort by the owner
- Tasks by status over time
- Burndown charts
Finally, publish your report and pin a live tile in Microsoft Teams so leadership can see real-time updates.
Because the connection stays live, updates appear without republishing (powerful for weekly check-ins or executive reviews).
You can also filter by status, owner, or custom tags to dig deeper.
What permissions and lifecycle practices secure your list?
As your project grows, managing permissions and data retention becomes essential.
Fortunately, Microsoft Lists gives you flexible options to keep your information safe at every stage.
Here’s what I recommend:
- Break inheritance only for sensitive items
- Use read-only access to prevent unwanted edits
- Turn on version history to track changes
- Archive closed projects to keep reports and data safe
Meanwhile, remember that SharePoint Alerts retire in 2026.
Switch sooner to built‑in rules or Power Automate for alerts and notifications.
You might also consider using Power Automate to generate PDFs of completed projects for easy sharing.
Pro tip: Schedule regular reviews of list permissions and cleanup of old data to keep things secure and tidy.
Track Your Next Project in Lists
Because Microsoft Lists brings together columns, views, and automation, you can stop juggling tools and focus on delivery.
Whether you are managing your first project or launching a new process, Lists can easily scale with your needs.
Try creating a timeline view today, set a simple rule, and watch how much smoother your project meetings become.
Let me know how it goes. Do you have any questions about tracking project tasks in Microsoft Lists?
For any business-related queries or concerns, contact me through the contact form. I always reply. 🙂