

Table of Contents:
Last Updated on October 24, 2025
Are you tired of tracking employee leave with messy spreadsheets?
In this guide, I’ll show you how to build an automated leave tracking system using SharePoint Lists and Power Automate.
Let’s get started.
SharePoint Lists turn leave tracking spreadsheets into dynamic systems. If your company uses Microsoft 365, there’s no extra cost.
Here’s what makes SharePoint Lists ideal for managing employee leave:
- No additional licensing costs for existing M365 subscribers
- No database administrator needed – site owners can create lists in minutes
- Automatic version history tracks every change with timestamps and user details
- Granular permission controls let you restrict access by employee, manager, or HR role
- Ready-to-use interface with customizable views including calendar visualization
- Built-in data validation maintains data quality and prevents errors
- Low-code approach empowers business users without heavy IT involvement
SharePoint Lists aren’t full databases, though. They lack true relational joins between lists, which means you sometimes need to include related data in a single list.
The most critical constraint is the list view threshold of 5,000 items.
When a view tries to display more than 5,000 items, SharePoint can throttle the request and your system slows down significantly.

But here’s the reality:
100 employees requesting 5 leaves each annually create 500 items a year. The 5,000-item limit would be reached in 10 years, but larger companies would hit it sooner.
This means you need to plan for scalability from day one.
The simple solution is annual archiving, which we’ll cover later in this guide. Without this plan, your efficient system will eventually become unusable.
Sign up for exclusive updates, tips, and strategies
A solid data structure is the foundation of your entire system. Get this right and everything else flows smoothly.
Creating the “Leave Requests” List
Start by navigating to your SharePoint site. Click + New in the top menu, then select List.
Choose Blank list from the options. Name it “Leave Requests” and add an optional description if you want. Click Create.
Now you need to add columns. Click + Add column and select the appropriate data type for each field.
Here’s the complete structure you need to build:
| Column Name | Data Type | Configuration | Purpose |
| Title | Single line of text | Default column | Brief description like “Family Vacation” |
| Requester | Person or Group | Required, People Only | Employee submitting the request |
| LeaveType | Choice | Options: Annual Leave, Sick Leave, Unpaid Leave, Other. Required | Categorizes leave for reporting |
| StartDate | Date and Time | Required, Date only format | First day of leave period |
| EndDate | Date and Time | Required, Date only format | Last day of leave period |
| TotalLeaveDays | Number | 1 decimal place, not required on form | Stores calculated business days |
| Comments | Multiple lines of text | Optional, Plain text | Additional context from employee |
| LeaveStatus | Choice | Options: Pending, Approved, Rejected. Default: Pending. Required | Tracks approval state |
| Manager | Person or Group | Optional, People Only | Identifies the approver |
| ApprovalHistory | Multiple lines of text | Optional, enable “Append Changes to Existing Text” | Logs approval comments and timestamps |
It should look something like this:

The TotalLeaveDays field will be populated automatically by Power Automate. Don’t make employees fill it in manually.
For the ApprovalHistory column, enabling “Append Changes to Existing Text” creates an audit trail. New comments are timestamped and appended, not replaced.
Creating the “Company Holidays” List
Accurate business day calculations require knowing which days are public holidays. A separate list keeps this data clean and easy to update.
Create another blank list on the same SharePoint site. Name this one “Company Holidays”.
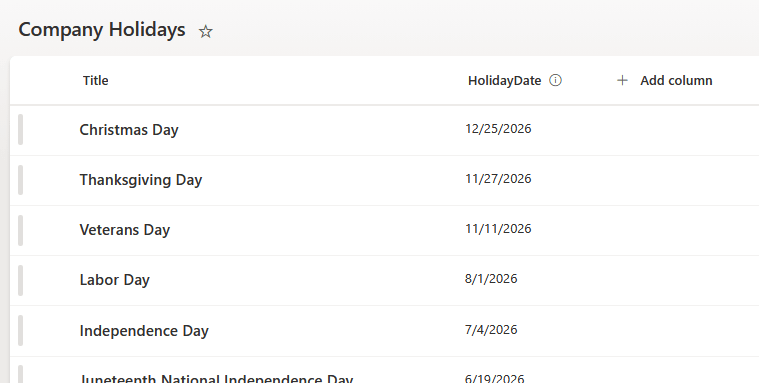
The default Title column works perfectly for holiday names. Just add one new column: HolidayDate (Date and Time type, Date only format, required field).
Populate this list with all official company holidays for the current year and next year. Update it annually to keep calculations accurate.
Adding a Calendar View
A calendar view turns your data into something managers can actually use for planning. It shows who’s out at a glance.
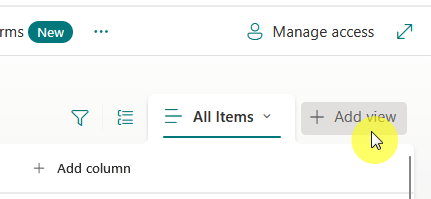
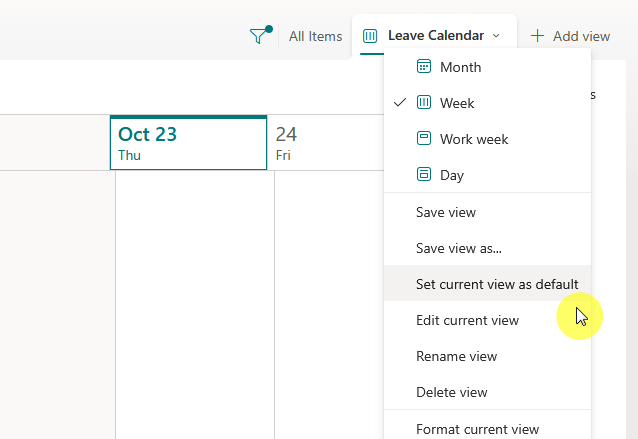
Navigate to your “Leave Requests” list. Click the “+Add view” button in the top-right corner:
Then do the following:
- Enter “Leave Calendar” as the view name.
- Under Show as, select Calendar.
- For Start date on calendar, choose your StartDate column.
- For End date on calendar, choose your EndDate column.
calendar view for leave request list
This displays leave periods as spans across the calendar instead of single-day events.
To make this the default view, select it from the view switcher, then click the switcher again and choose Set current view as default.
Building the Automated Approval Workflow
Now comes the automation that eliminates manual work. This workflow handles everything from submission to final notification.
Quick Start with Copilot (Recommended for Beginners)
Power Automate now includes Copilot, an AI assistant that can build flows from simple prompts. This makes automation accessible even if you’re new to it.
Go to make.powerautomate.com and click Create > Describe it to design it. Use a prompt like this:
"When a new item is created in the Leave Requests SharePoint list, get the requester's manager from Microsoft Entra ID, send an approval request to the manager via email and Teams, then update the SharePoint item with the approval status and send a notification email to the requester."
Copilot will generate the flow structure automatically.
You’ll still need to configure specific details like your SharePoint site URL and list name, but the basic framework is already built.
Here’s the result:
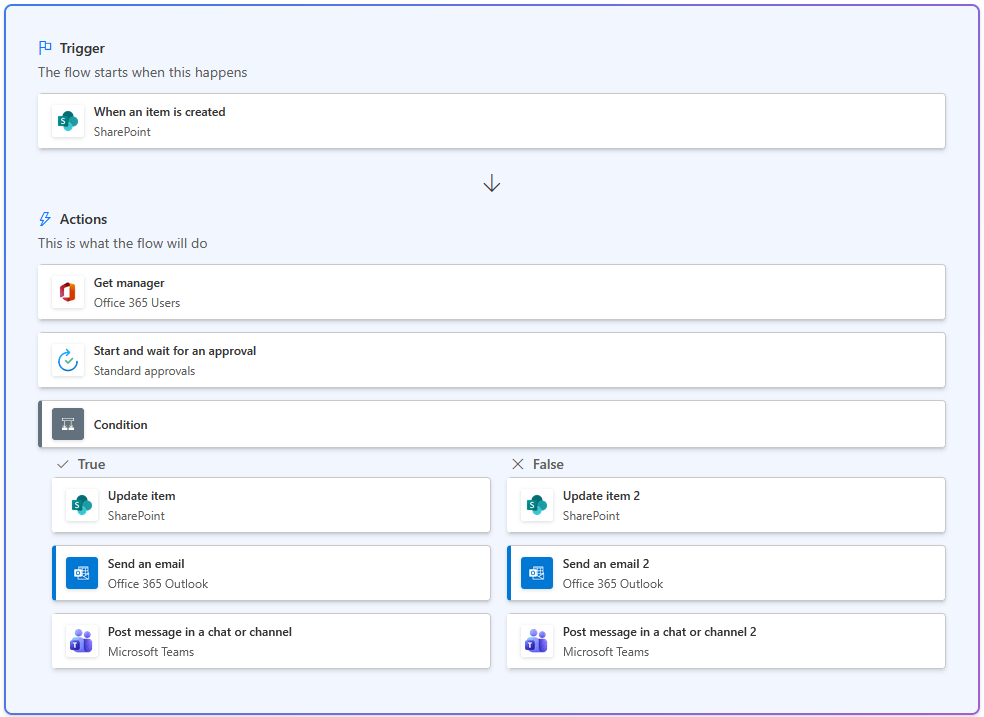
Important note:
Copilot performs best with prompts referencing Microsoft products (SharePoint, Outlook, Teams, Entra ID). Be specific about the Microsoft tools for better results.
After Copilot generates your flow, you can customize it following the detailed steps below.
The manual instructions help you understand what each action does and how to add advanced features like business day calculations.
Step 1: Set Up the Trigger
Note: If you used Copilot to generate your flow, this trigger is already configured. Just verify the SharePoint site and list name are correct, then skip to Step 2.
Open your browser and go to make.powerautomate.com. Sign in with your Microsoft 365 account.
Click Create in the left navigation pane. Select Automated cloud flow. Name your flow something descriptive like “Leave Request Approval Workflow”.
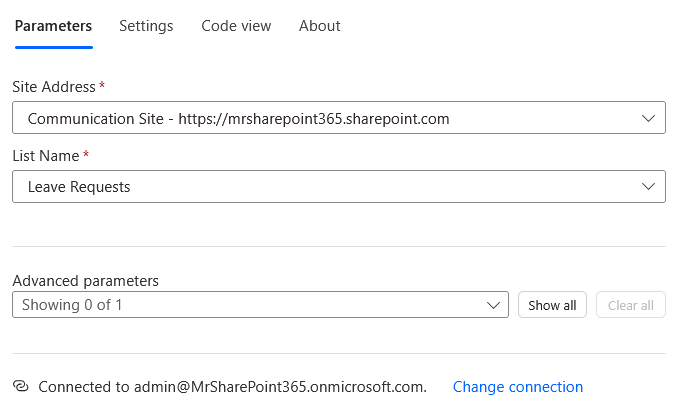
In the search box, type “SharePoint” and select the When an item is created trigger. Click Create.
Configure the trigger by selecting your SharePoint site address from the dropdown. Then select “Leave Requests” as the list name.
This flow will now start automatically every time someone submits a new leave request. No manual intervention required.
Step 2: Calculate Business Days Excluding Weekends and Holidays
Calculating working days accurately is important for leave balance tracking. You need to exclude weekends and company holidays from the count.
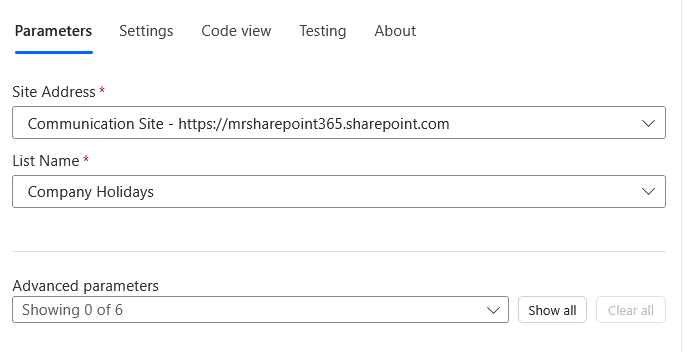
Add a new step and search for “SharePoint”. Select the Get items action. Configure it to retrieve items from your “Company Holidays” list.
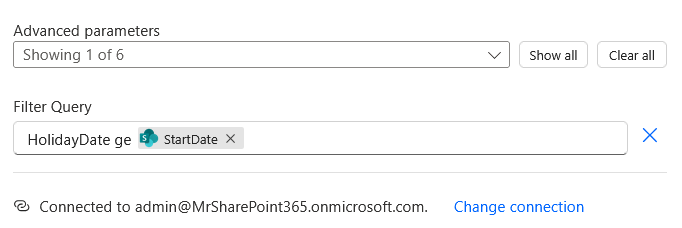
For better performance, add a Filter Query.
In the Filter Query field, type HolidayDate ge (note the space after “ge”), then click in the field and insert the StartDate dynamic content from the trigger.
Power Automate will format it automatically. This only fetches holidays that occur during or after the requested leave period.
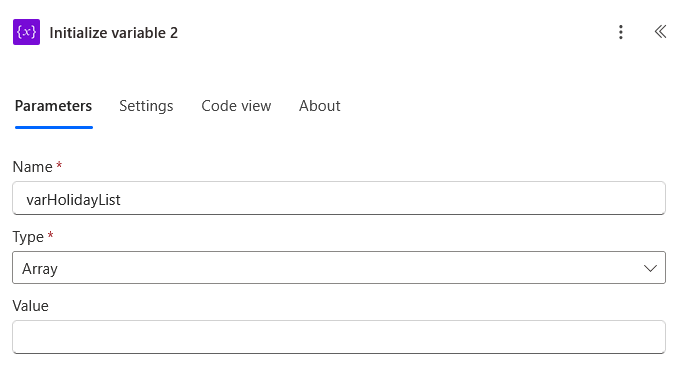
Now initialize three variables. Click New step, search for “Initialize variable”, and add it three times:
- Variable 1: Name = varTotalLeaveDays, Type = Integer, Value = 0
- Variable 2: Name = varCurrentDate, Type = String, Value = (select StartDate from the trigger dynamic content)
- Variable 3: Name = varHolidayList, Type = Array, Value = (leave empty)
Add an Apply to each control. For the output, select value from the “Get items” step. Inside this loop, add Append to array variable.
Select varHolidayList as the variable. For the value, use this expression: formatDateTime(items(‘Apply_to_each’)?[‘HolidayDate’], ‘yyyy-MM-dd’).
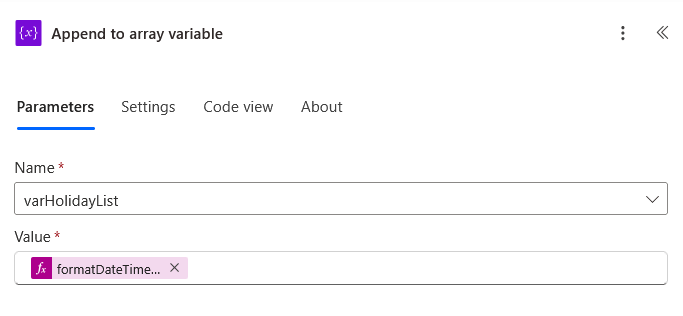
This creates a simple list of holiday dates for quick lookup. Now you need to loop through each day of the requested leave period.
Outside the “Apply to each” loop, add a Do until control. You need to configure when this loop should stop. In the “Do until” settings:
- First field: Select varCurrentDate from the variables list
- Operator: Select is greater than
- Second field: Select EndDate from the trigger’s dynamic content
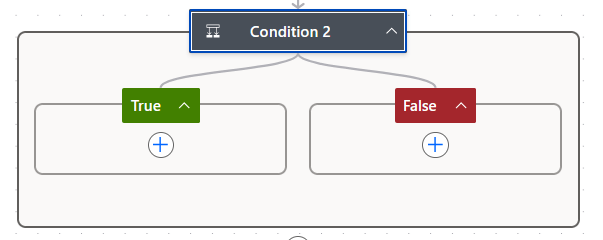
Inside the loop, add a Condition control.
The condition checks if the current day is a weekend. Click in the first Choose a value field. In the dynamic content panel that appears, switch to the Expression tab. Paste this expression:
or(equals(dayOfWeek(variables('varCurrentDate')), 0), equals(dayOfWeek(variables('varCurrentDate')), 6))
Click OK to add it. Set the operator to is equal to. In the second Choose a value field, type `true`.
This checks if the day is Sunday (0) or Saturday (6).
condition or(equals(dayOfWeek(variables(‘varCurrentDate’))
In the If no (False) branch (meaning it’s a weekday), add another Condition control.
Click in the first Choose a value field on the left. In the panel that opens, switch to the Expression tab and paste:
contains(variables(‘varHolidayList’), formatDateTime(variables(‘varCurrentDate’), ‘yyyy-MM-dd’))
Click OK.
- Set the middle operator to is equal to.
- In the third field (right side), type true.
This checks if the current date exists in your holiday list.
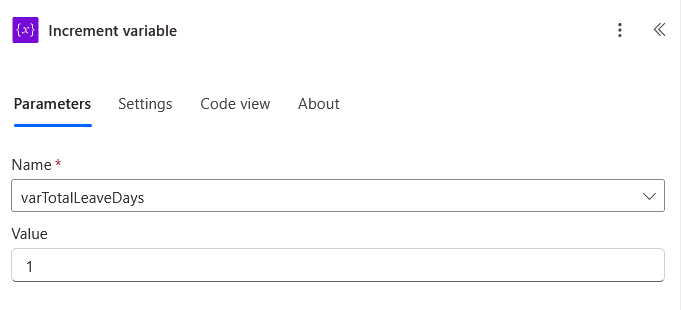
In the If no branch of this second condition, add Increment variable. Increment varTotalLeaveDays by 1. This counts only working days.
At the very end of the Do until loop (outside both condition branches but still inside the loop), add Set variable to increment varCurrentDate by one day. Use this expression:
addDays(variables('varCurrentDate'), 1)
This ensures your leave calculations are accurate and fair.
Step 3: Send Approval Request to Manager
After calculating the leave duration, you need to route the request to the right approver. Add a new step and search for “Office 365 Users”. Select Get manager (V2).
In the User (UPN) field, look in the dynamic content panel. You should see multiple options for the Requester field:
- Requester Email
- Requester DisplayName
- Requester (this is the full object)
Select Requester Email. This pulls the manager’s information from Microsoft Entra ID.
Note: If you only see “Requester” without the Email option, it might be due to experimental features. You can either:
- Turn off experimental features in Power Automate settings (gear icon > View all Power Automate settings > turn off Experimental features)
- Or just select “Requester” – it should still work as Power Automate will automatically use the email property
Now add the Start and wait for an approval action. Configure this action carefully to route approvals correctly.
Power Automate offers several approval types for different scenarios:
| Approval Type | Behavior | Common Use Case |
| Approve/Reject – First to respond | Completes as soon as the first approver responds | Request sent to a group where anyone can approve |
| Approve/Reject – Everyone must approve | Waits for all approvers. One rejection = overall rejection | High-stakes decisions requiring unanimous consent |
| Custom Responses – Wait for one response | Similar to “First to respond” but with custom options beyond Approve/Reject | Gathering feedback where one response is sufficient |
| Custom Responses – Wait for all responses | Waits for all approvers with custom response options | Committee vote where every member’s choice matters |
For most leave requests, select Approve/Reject – First to respond. Create a clear title using dynamic content: “Leave Request: [Requester DisplayName] – [LeaveType]”.
In the Assigned to field, look for the manager’s email from the “Get manager (V2)” step. You should see options like:
- Mail (this is what you want)
- Display Name
- User Principal Name
Select Mail.
Format the Details section with all the information the manager needs to decide. Use this structure:
concat('Requester: ', triggerBody()?['Requester'], '\nLeave Type: ', string(triggerBody()?['LeaveType']), '\nStart Date: ', formatDateTime(triggerBody()?['StartDate'], 'MM/dd/yyyy'), '\nEnd Date: ', formatDateTime(triggerBody()?['EndDate'], 'MM/dd/yyyy'), '\nTotal Business Days: ', string(variables('varTotalLeaveDays')), '\nComments: ', triggerBody()?['Comments'])
The manager receives this as an actionable card in their email and Teams. They can approve or reject with one click.
Step 4: Handle Approval Response
Add a Condition control after the approval step. In the first field, select Outcome from the approval action’s dynamic content.
Set the operator to is equal to. In the second field, type “Approve”.
This creates two branches. The If yes branch runs when the manager approves. The If no branch runs when they reject.
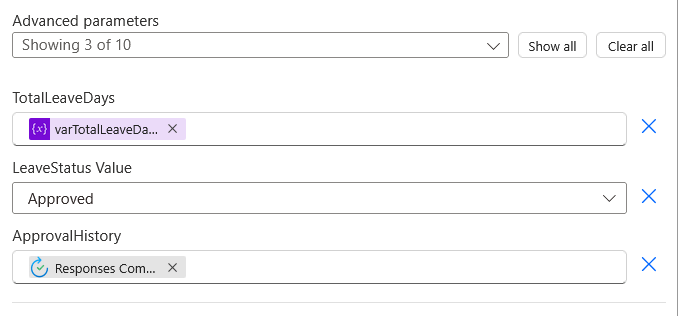
In the If yes branch, add a SharePoint Update item action.
Select your site address and the “Leave Requests” list. For the Id field, select ID from the trigger to update the correct item.
- Set LeaveStatus to “Approved”.
- Set TotalLeaveDays to your varTotalLeaveDays variable.
- n ApprovalHistory, select Comments from the approval action to log the manager’s feedback.
In the If no branch, add another Update item action with the same configuration. This time, set LeaveStatus to “Rejected”.
Both branches update the original SharePoint item with the approval decision. This keeps your data synchronized and creates a permanent record.
Step 5: Notify the Employee
Employees shouldn’t have to check SharePoint constantly to see if their request was approved. Automatic notifications close the loop.
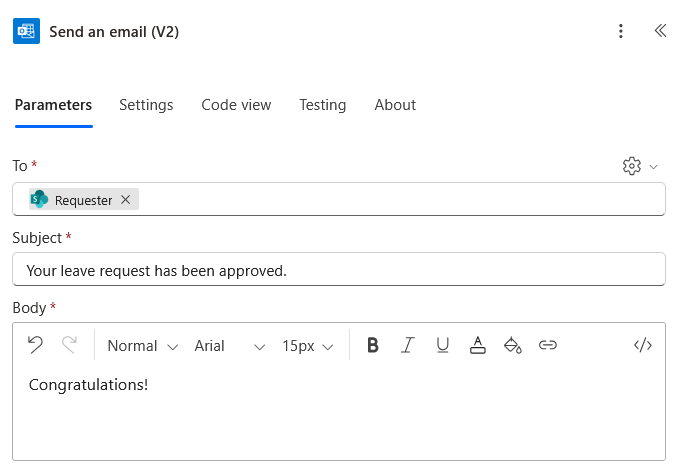
In the If yes branch (after the Update item action), add Send an email (V2) from Outlook. Set To to Requester Email from the trigger.
Write a subject line like “Your leave request has been approved”. In the body, confirm the approval and include the manager’s comments if they added any.
In the If no branch, add another Send an email action. Set To to Requester Email again.
Use a subject like “Update on your leave request”. In the body, inform them the request was rejected and include the manager’s comments so they understand why.
You know, clear communication prevents confusion and follow-up questions. Everyone knows the status immediately.
Enhancing Your Leave Tracking System
The core workflow is complete and functional. These optional enhancements take it from good to great.
Sync Approved Leave to Outlook Calendar
Team calendars give everyone visibility into upcoming absences. This helps with project planning and meeting scheduling.
In the If yes branch of your approval condition, after the Update item action, add the Outlook action Create event (V4).
Select your shared calendar from the Calendar id dropdown. This could be an “HR – Team Leave” calendar or a department-specific one.
Create a descriptive subject like “[Requester DisplayName] – [LeaveType]”. For Start time and End time, select StartDate and EndDate from the trigger’s dynamic content.

Select your business time zone from the dropdown. Power Automate handles all the necessary conversions automatically.
Here’s a pro tip for advanced users:
Add a new column to your “Leave Requests” list called OutlookEventID (Single line of text).
After the Create event action, add another Update item action. Save the Event Id from the Create event output into this new column.
This links your SharePoint item to the calendar event. You can then build a separate flow to update or delete the event if leave is canceled or modified.
Customize the Form with Power Apps
The default SharePoint form is functional but basic. Power Apps gives you a custom interface without extensive coding.
Navigate to your “Leave Requests” list in SharePoint. From the command bar, select Integrate > Power Apps > Customize forms.
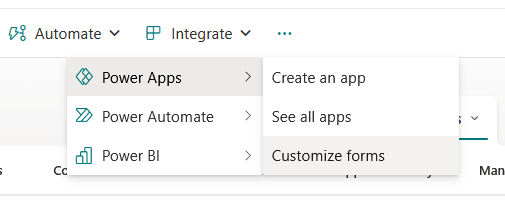
This opens Power Apps Studio with a form already generated from your list columns. You can now drag, drop, and configure elements visually.
Try these improvements:
- Change the form layout to two columns so all fields display without scrolling
- Add validation to prevent EndDate from being earlier than StartDate
- Make the Comments field only appear when someone selects “Other” as the leave type
- Add a custom save button with friendlier text than “Submit”
After customizing, click Publish to SharePoint from within Power Apps. Your new form replaces the default one instantly.
Alternative: Microsoft Forms for Submission
Some employees find SharePoint lists intimidating. Microsoft Forms offers a simpler, friendlier front-end.
Create a new form at forms.office.com with questions matching your SharePoint columns. Add questions for Leave Type, Start Date, End Date, and Comments.
Create a separate automated flow in Power Automate. Use the Microsoft Forms trigger When a new response is submitted and point it to your leave request form.
Add the Get response details action. Then add a SharePoint Create item action that maps the form answers to your “Leave Requests” list columns.
When someone submits the form, this flow creates the SharePoint item. That triggers your main approval workflow automatically. The two flows work together seamlessly.
Governance and Best Practices for Long-Term Success
Building the system is just the beginning. These practices keep it running smoothly for years.
Common Troubleshooting Issues
Even with good error handling, you’ll encounter problems. Here are some examples of error message and their solutions:
| Error Message | Common Cause | Solution |
| Unauthorized / 401 or 403 | Expired credentials or missing permissions | Re-authenticate connections in Data > Connections. Verify account permissions on SharePoint and Outlook |
| Flow Run Timed Out | Action exceeded time limit | Adjust Timeout duration in action settings. For approvals, add escalation logic |
| Infinite Loop | Update item re-triggering the flow | Add trigger conditions to prevent running under certain conditions |
| Bad request / 400 | Data type mismatch or invalid expression | Review data types in Update/Create actions. Validate expressions and OData syntax |
| Required field ‘assignedTo’ is missing | User has no manager in Entra ID | Add condition after Get manager to check if Mail is empty. Route to HR if needed |
The 28-day run history in Power Automate is your best debugging tool. It shows inputs and outputs for every action in every run.
Plan for Scalability: Annual Archiving
The 5,000-item list view threshold is your biggest long-term challenge. Annual archiving is the simple solution that works forever.
At the end of each year, go to your “Leave Requests” list settings. Change the name to “Leave Requests 2024” (or whatever year).
This archives the data while keeping it accessible.
Create a new list using the “From an existing list” template. Select the archived list as the source.
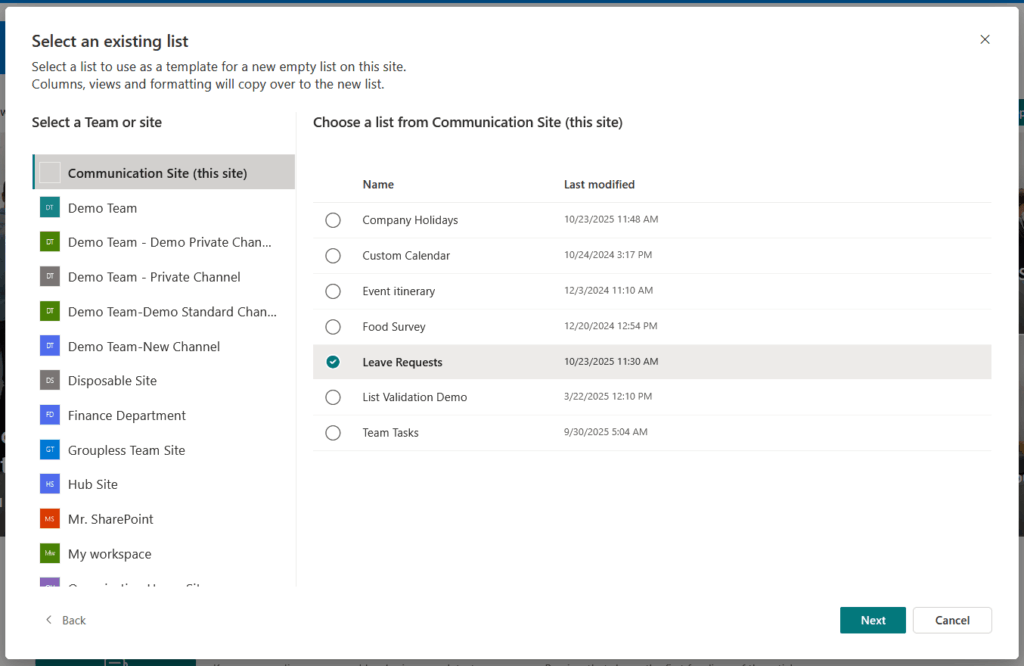
This perfectly duplicates all columns, views, and formatting. Name it “Leave Requests”.
Open your Power Automate flow. Update the trigger and all SharePoint actions to point to the new list. Test with a sample request to confirm everything works.
This process takes under an hour annually. But it ensures your active list never grows large enough to hit the performance threshold.
Making This Work for Your Team
The key to success is building with scalability in mind from day one:
Annual archiving prevents the 5,000-item threshold from becoming a problem, while proper error handling keeps your workflow running smoothly.
Test thoroughly with a small group before rolling it out company-wide, and you’ll have a system that serves your organization for years.
Do you have questions about how to track employee leave using Power Automate and Lists? Let me know.
For any business-related queries or concerns, contact me through the contact form. I always reply. 🙂


