

What happens to all those SharePoint alerts your organization has been running for years?
Here’s the answer: By July 2026, they’ll stop working completely.
In this article, we’ll walk through the retirement timeline, replacement tools, and how to rebuild your alerts before the deadline.
Let’s get started.
Table of Contents:
- Why SharePoint Alerts Are Going Away
- The Official Retirement Timeline (2025–2026)
- Replacement Options: SharePoint Rules vs. Power Automate
- Step-by-Step Action Plan for Administrators
- How-To: Rebuilding Common Alert Scenarios in Power Automate
- What You Need to Know (Licensing and Governance)
- What to Do Now
Microsoft is shutting down classic SharePoint Alerts by July 2026. This goes beyond a simple update. It’s a complete redesign of how notifications work in Microsoft 365.
The old alert system has real problems, like:
- Being rigid and tied to outdated technology
- Lacking visibility across the tenant for administrators
- Preventing users from customizing email content or setting conditions
- Offering no audit trail or security for these background processes
This retirement is actually good news in disguise. Microsoft is moving the entire automation platform to Power Automate, a tool that’s infinitely more flexible and powerful.
But here’s the catch: there’s no automatic migration. Every alert your organization uses must be manually rebuilt before July 2026.
This is a “rebuild” project, not a “migrate” project. You’ll need to audit your tenant, prioritize your most critical alerts, and systematically recreate them.
Honestly, the timeline is tight, but it’s manageable if you start now.
Sign up for exclusive updates, tips, and strategies
The Official Retirement Timeline (2025–2026)
Microsoft has mapped out a phased shutdown. It’s not a surprise flip of a switch but a series of deliberate milestones designed to push organizations toward action.
Key Dates and What They Mean
July 2025: New tenants can no longer create new SharePoint Alerts. This quarantines the problem and stops additional technical debt from piling up.
October 2025: The expiration feature applies to all tenants. Alerts expire 30 days after their last run, and users must manually renew critical alerts to extend them for another 30 days.
January 2026: This is the hard stop. No organization can create new alerts, no matter what. All new notifications must use SharePoint Rules or Power Automate.
July 2026: Complete retirement. All classic alerts stop working permanently. Existing alerts cannot be extended.
The October 2025 Expiration Feature (Hidden Benefit)
That 30-day expiration rule might sound annoying. It’s actually strategic.
It forces users to identify and re-validate only the alerts they truly care about. Abandoned or forgotten alerts will quietly expire.
For administrators, this is a gift. The alerts users complain about losing are, by definition, business-critical. You’ll know exactly which ones matter.
Here’s the timeline and what to do:
| Date | What Happens | Your Action |
| July 2025 | New tenants blocked from creating alerts | Audit your existing alerts now |
| October 2025 | Alerts expire 30 days after last run | Users manually extend critical ones |
| January 2026 | Hard stop on all new alerts | All new needs go to Rules or Power Automate |
| July 2026 | Full retirement | All migration work must be complete |
Microsoft is offering two paths forward, each designed for different needs. Think of it as “simple” or “powerful.”
Here’s how the three systems stack up:
| Feature | Classic Alerts | SharePoint Rules | Power Automate |
| Ease of Use | Simple (user-level) | Very simple (user-level) | Moderate (power-user level) |
| Triggers | Item added, modified, deleted | Item added, modified, deleted | Hundreds of options including field changes, schedules, external events |
| Customization | Low (pre-canned email only) | Low (email recipient only) | High (full control over content, logic, recipients) |
| “Any Change” Alert | One-click option | Requires 3 separate rules | Single trigger option |
| Max Rules/Flows | Unlimited (but messy) | 15 per list | Unlimited |
| Admin Governance | None | None | Full governance, monitoring, control |
| Cost | Included | Included | Included (for basic M365 connectors) |
SharePoint Rules are the lightweight option. Microsoft calls them “the new, easier way” to get notified.
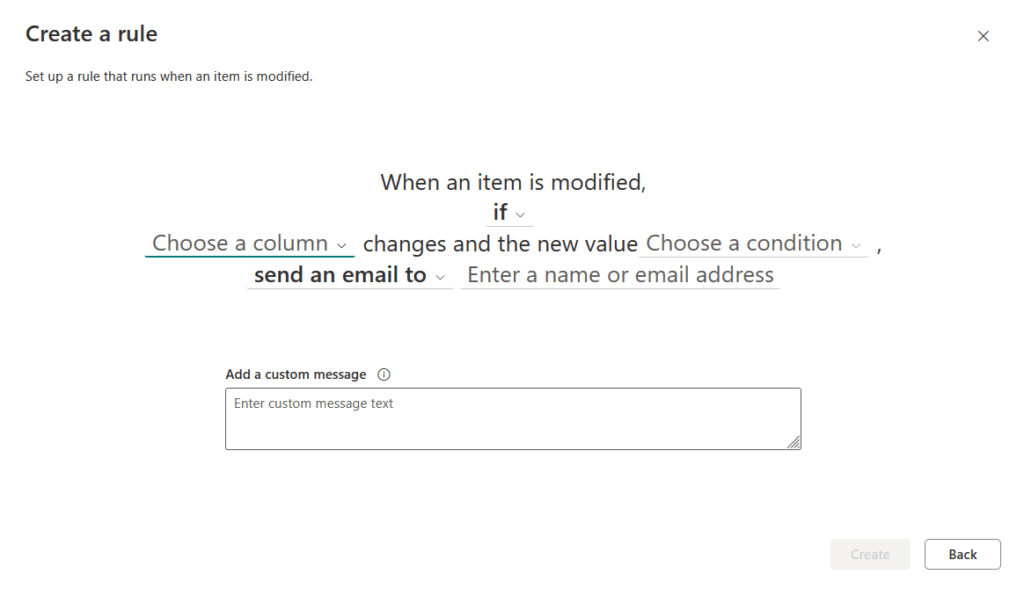
Here’s what this feature can do:
- Trigger on item added, modified, or deleted
- Customize who receives the email
- Require no technical skills to set up
- Work great for basic, personal notifications
Rules are user-friendly and perfect for simple, immediate alerts. But they have serious limitations that make them unsuitable for most organizations.
The biggest problem is the “three-for-one” gotcha. To replicate the classic “alert me on any change” option, you need to create three separate rules:
- One for item added
- One for item modified
- Another for an item deleted
There’s also a hard cap of 15 rules per list or library. For teams that used alerts heavily, this limit becomes a dealbreaker fast.
Rules are consumer-grade features. They work for personal productivity, not enterprise-scale processes or anything that might grow in the future.
Power Automate: The Enterprise Solution
Power Automate is the real replacement and where Microsoft is investing all its automation energy. It’s built to handle complex, multi-step business processes that rules simply can’t touch.
Here’s what makes Power Automate different:
- Hundreds of trigger options, not just three
- Multi-step workflows that can route documents, post to Teams, write to external systems, and send emails (all in one flow)
- Conditional logic so workflows only run when specific fields meet specific conditions
- Full admin governance, visibility, and security controls
- Scheduled digests and advanced email formatting
With Power Automate, you can do things classic alerts never could. Route a document for approval, post a Teams message, create a task, and send a customized email (all automatically).
If your organization has more than a handful of alerts, Power Automate is where you’ll end up. It’s scalable, manageable, and powerful enough to grow your business.
Step-by-Step Action Plan for Administrators
This is where the work happens. A structured plan turns chaos into manageable chunks.
Phase 1: Audit Your Tenant (Now)
Before you can plan, you must understand the scope.
Run the Microsoft 365 Assessment tool. It generates a Power BI Alerts Report that shows every active alert in your tenant, filtered by site collection and list.
This report is your foundation. It transforms an unknown sprawl into a concrete inventory.
Action items:
- Run the assessment tool immediately
- Generate and review the Power BI report
- Identify high-usage sites and lists
- Count total alerts (this helps estimate rebuild effort)
Phase 2: Prioritize Business-Critical Alerts (Q4 2024–Q1 2025)
With your report in hand, contact site owners in high-usage areas. Ask which alerts are truly business-critical and which are nice-to-have or abandoned.
The October 2025 expiration wave will naturally separate signal from noise. Users will re-enable their critical alerts. The forgotten ones will expire silently. Use this data to refine your priorities.
Strategy:
- Identify quick wins (simple, high-impact alerts)
- Flag complex workflows for detailed planning
- Plan rebuild sequence (easy first, complex last)
- Estimate staff time and resources
Phase 3: Rebuild Workflows (Q1–Q2 2026)
This is the heavy lifting. Start with simple scenarios and use Power Automate templates as starting points. Test thoroughly. The January 2026 hard stop is non-negotiable.
For truly simple needs, SharePoint Rules might work. But if there’s any chance of future expansion, Power Automate is safer long-term.
Critical milestones:
- January 2026: No new classic alerts allowed (hard deadline)
- May 2026: All critical workflows should be tested and running
- July 2026: Complete retirement (all work must be done)
Phase 4: User Communication & Training (Ongoing)
Users need to understand what’s changing and why. Don’t wait until October to tell them.
Start with documentation.
Create “how-to” guides. Brief your helpdesk on common questions. Run training sessions for power users. Frame this as an upgrade because it genuinely is one.
Communication checklist:
- Internal announcement of the timeline and impact
- “How-to” guides for common scenarios
- Helpdesk training and FAQ document
- Hands-on training sessions for site owners
How-To: Rebuilding Common Alert Scenarios in Power Automate
Power Automate looks intimidating at first. But the core concept is simple: a trigger starts the flow, and actions do the work.
Here are the most common scenarios you’ll rebuild.
Building Flows with Copilot (The Faster Way)
Don’t want to build flows step-by-step manually? Copilot in Power Automate can create flows from natural language descriptions.
Instead of clicking through the designer, describe what you want in the “Create your automation with Copilot” field.
The best prompts follow a “When X happens, do Y” format and include specific details about your SharePoint site, list, and desired actions.
Each scenario includes a ready-to-use Copilot prompt. Replace the bracketed placeholders with your site name, list name, or email address, then select Generate.
Scenario 1: Alert When a New Item Is Created
This is the most basic replacement. Someone adds an item to a list, and you get notified by email.
Option 1: Use Copilot (Fastest)
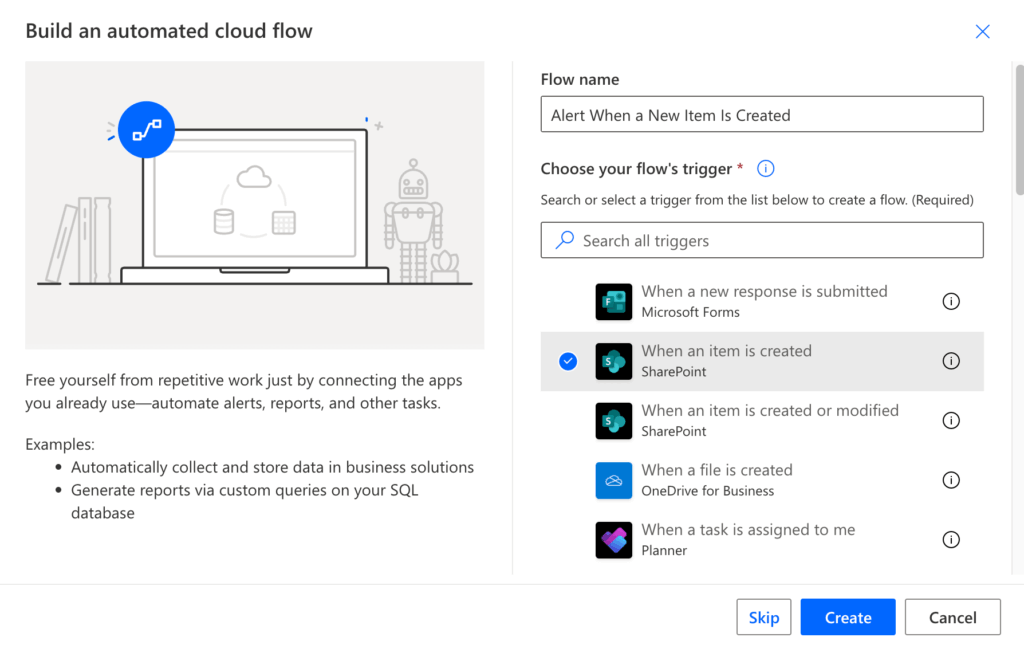
Go to Power Automate and select Create > Automated cloud flow. In the “Create your automation with Copilot” field, paste this prompt:
When a new item is created in the [List Name] list on the [Site Name] SharePoint site, send me an email at [] with the subject "New Item: [item title]" and include who created it.
Select Generate and Copilot builds the flow for you.
Option 2: Build Manually (Traditional)
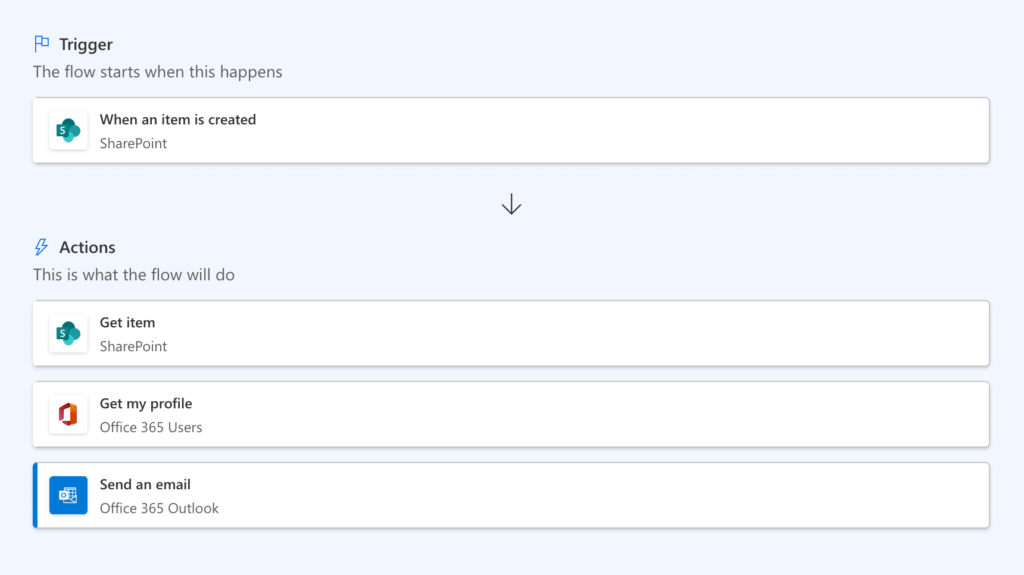
Go to Power Automate and select Create > Automated cloud flow.
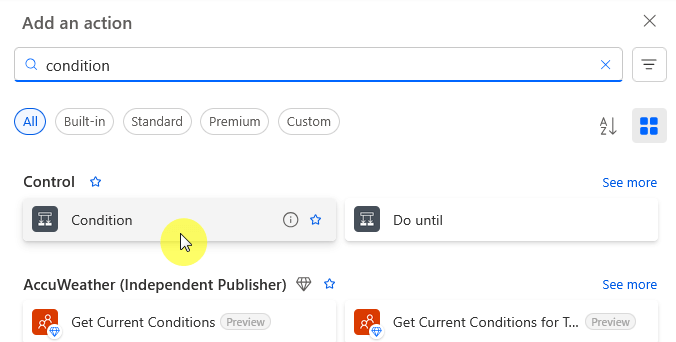
For the trigger, search and select “When an item is created” (SharePoint).
Configure the trigger by selecting your Site Address and List Name in the parameters of the trigger.
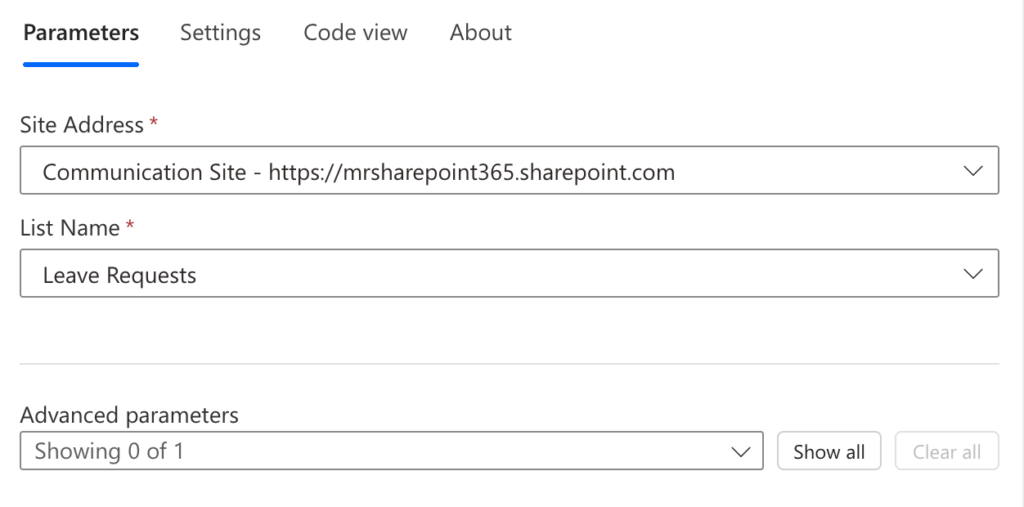
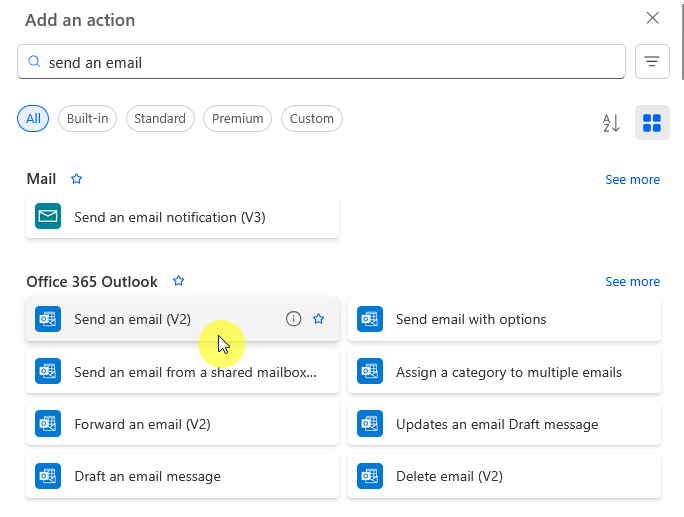
Then select New Step and add the “Send an email (V2)” action (Outlook).
Fill in the email details:
To:
Subject: New Item: [Use dynamic content to insert item title]
Body: A new item was created by [dynamic content for creator name]
Select Save.
Scenario 2: Alert When an Item Is Modified (Posted to Teams)
Here’s a modern upgrade. Instead of just sending an email, post a notification in your team’s Microsoft Teams channel.
Option 1: Use Copilot (Fastest)
In the Copilot prompt field, paste this:
When an item or file is modified in the [Library Name] library on the [Site Name] SharePoint site, post a message to the [Channel Name] channel in the [Team Name] Teams team saying: "File '[item name]' was just modified by '[modifier name]'". Include a link to the file.
Select Generate and let Copilot build it.
Option 2: Build Manually (Traditional)
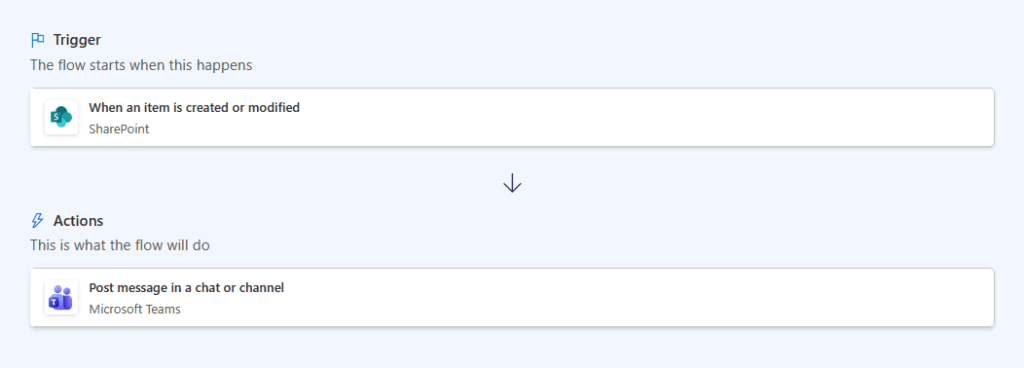
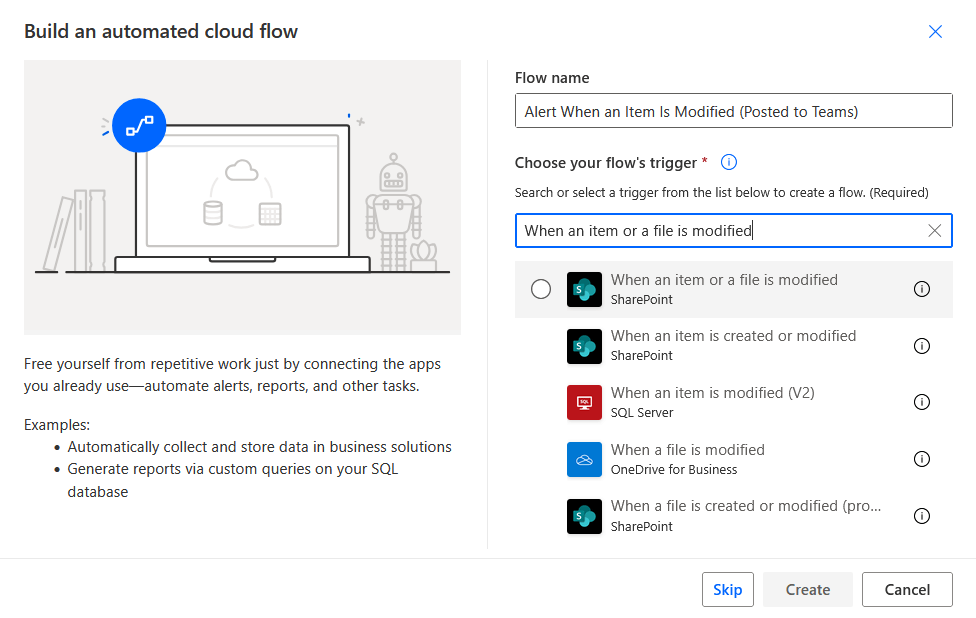
Create a new automated cloud flow and select “When an item or a file is modified” (SharePoint).
Configure with your Site Address and Library Name same as earlier.
Add a new step: “Post a message in a chat or channel” (Microsoft Teams).

Configure the Teams action:
- Post as: Flow bot
- Post in: Channel
- Team: [Select your team]
- Channel: [Select your channel]
- Message: File ‘[item name]’ was just modified by ‘[modifier name]’. Link: [dynamic content for item link]
Save and test. Your Teams channel now gets instant notifications when files change.
Scenario 3: Conditional Alert (Advanced)
This is where you start reducing notification noise.
Instead of alerting on every change, only trigger when a specific field equals a specific value. For example, alert only when a “Status” column changes to “Approved.”
Option 1: Use Copilot (Fastest)
Paste this prompt:
When an item is created or modified in the [List Name] list on the [Site Name] SharePoint site, check if the Status field is "Approved". If it is, send me an email at [] notifying me that an item with status Approved was created or modified.
Select Generate.

Option 2: Build Manually (Traditional)
Create a flow with “When an item is created or modified” like the one above and then add a new step: Condition (Control action).
In the condition, set up your logic:
- First box: Select Status (or its equivalent) from dynamic content
- Operator: is equal to
- Last box: Type Approved
In the “If yes” branch, add your Send an email or Post to Teams action and leave the “If no” branch empty.
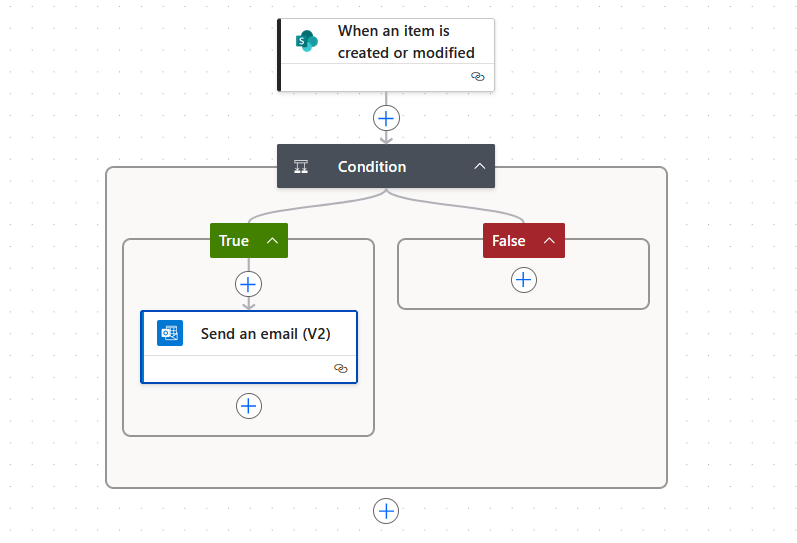
Then save. Now the flow only runs when the status actually changes to “Approved”. You’ve eliminated the spam.
Scenario 4: Daily or Weekly Digest Email
Replace those daily or weekly summary emails with a formatted digest. This is more complex but also more powerful.
Option 1: Use Copilot (Fastest)
Paste this prompt:
Create a flow that runs once per day. Get all items created in the [List Name] list on the [Site Name] SharePoint site in the last 7 days. Create an HTML table showing the items with columns for Title, Created by, and Created date. Send me an email at [] with the subject "Daily Digest: New Items" and include the table in the email body.
Select Generate and Copilot builds the complete digest flow.

Option 2: Build Manually (Traditional)
Create a new automated flow (skip the naming and trigger selection part.
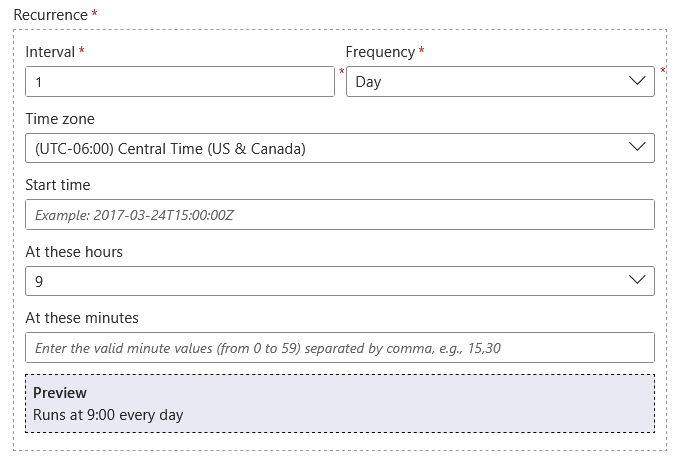
Inside the canvas, select Recurrence (Schedule) as the trigger and set it to run once per day or once per week.
Add a new step: “Get items” (SharePoint)and select your Site Address and List Name.
In Advanced options, add a Filter Query to get only recent items.

Put Created gt 'formatDateTime(addDays(utcNow(),-7),'yyyy-MM-ddTHH:mm:ssZ')' inside the filter query field to get items from the last 7 days.
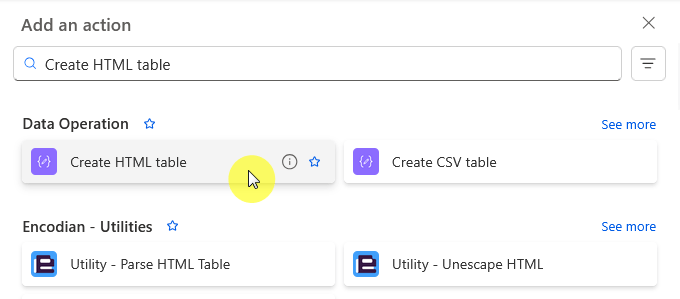
Then add a new step: “Create HTML table” (Data Operation).
In the From field, pass the items from Step 4.
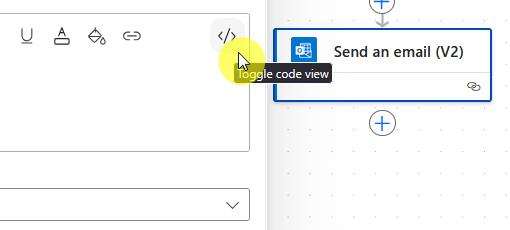
Add a final step: “Send an email (V2)” and in the email body, switch to HTML mode (click \</\>) and insert the table output.
Save. Every day or week, users get a clean, formatted table of recent items.
Quick Reference: Using Built-In Templates
Power Automate has pre-built templates for common scenarios. Use them as they can save time.

One example: date-based reminders have a ready-made template.
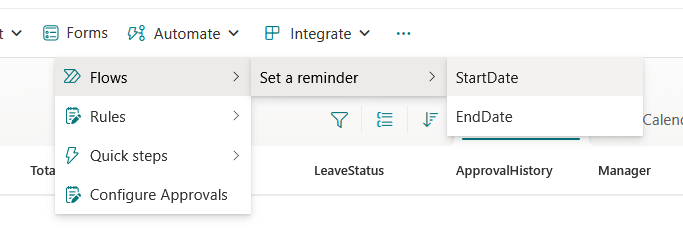
If you want to remind someone five days before a due date, just go to your SharePoint list, select Automate > Flows > Set a reminder.
Pick a date column for the reminder and Power Automate does the rest.
Microsoft also publishes a direct mapping of classic alert scenarios to specific templates.
Check the template gallery for “Send an email when a SharePoint list item is created” or “Send an email when an item is modified.”
Start with a template and customize from there.
What You Need to Know (Licensing and Governance)
Good news: replacing classic alerts with basic Power Automate flows is free. The Power Automate for Microsoft 365 license comes with most Microsoft 365 plans.
These scenarios utilize standard, included connectors (SharePoint, Outlook, Teams), meaning no extra licensing costs for basic migration.
However, free doesn’t mean unlimited. Here are the things you need to plan for:
- API usage limits are strictly enforced by Microsoft
- High-volume triggers (like “when modified” on busy lists) can quickly hit quotas and get throttled
- Premium licenses are required for connections outside Microsoft 365 (Salesforce, SQL, custom APIs)
- Governance is now mandatory, not optional
Microsoft now actively tracks API consumption and enforces limits across all tenants.
A flow that triggers thousands of times per day on a high-volume list can burn through your quota fast and cause critical automations to fail.
Start monitoring your flow usage immediately. Consider setting up a Power Platform Center of Excellence (CoE) to track consumption and prevent throttling of business-critical workflows.
If you need advanced integrations beyond Microsoft 365, budget for premium licensing. The seeded license covers only M365 connectors, so plan accordingly.
What to Do Now
The July 2026 deadline is hard. You’re looking at a manual rebuild project because there’s no automated migration tool. But you have time if you act now.
Start immediately: Run the Microsoft 365 Assessment tool today and generate that Power BI report. Understand your organization’s dependency on classic alerts.
Prioritize ruthlessly: The October 2025 expiration phase will show you which alerts users actually need. Build those first.
Use Power Automate: Not a replacement. Use it to improve processes with conditions, scheduled digests, and smarter automation. Go beyond simple notifications.
Establish governance: Set up monitoring and a Power Platform Center of Excellence (CoE) to track API usage. Governance prevents critical workflows from failing.
This transition is mandatory, but it’s also an upgrade. So make sure that you start planning your rebuild today while you still have ample time.
Do you have questions about SharePoint alerts retirement or Power Automate migration? Let me know.
For any business-related queries or concerns, contact me through the contact form. I always reply. 🙂
This article is a good example of how complicated Power Automate is versus the Alert system in SharePoint which is being retired. Be prepared to spend several hours and/or days working through the bugs in your flow as Power Automate has also been updated to look more like a programming tool versus a user friendly interface. They have also invalidated older automations with their last update causing teams to have to re-engineer the flows in with the newer tools in order to get them back up and running again. This is similar to what Microsoft is doing with MS Outlook’s… Read more »