

Table of Contents:
- Choose the Right Architecture Before You Build Anything
- Build the Onboarding Checklist in Microsoft Lists
- Lock Down Permissions and Governance Early
- Automate the Repeatable Parts with Power Automate
- Roll It Out Without Losing Momentum
- Common Pitfalls and Quick Answers
Last Updated on February 13, 2026
Most organizations know onboarding matters. Few have a system that actually works.
Here’s what I typically see:
- HR sends a welcome email with a few attachments.
- The manager forwards a checklist they built in Word last year.
- IT gets a ticket two days after the new hire starts.
Nobody knows which version of the employee handbook is current. And there’s no record of what the new hire has actually completed.
SharePoint Online, combined with Microsoft Lists and Power Automate, fixes this.
Together, they give you a governed, repeatable onboarding system that scales across departments, locations, and business units.
Choose the Right Architecture Before You Build Anything
Before you create a single list or upload a document, decide how your onboarding sites will be organized. Getting this wrong early means rebuilding later.
The Hub-and-Spoke Model
The approach I recommend is a hub-and-spoke topology. You create a single SharePoint Hub Site, often called the “Employee Lifecycle Hub,” and associate your onboarding sites to it.
This hub connects three types of sites:
| Site Type | Purpose | Primary Audience |
| Pre-boarding Site | Cultural introduction, hardware selection, and identity verification before day one. | Candidates and new hires (external access may be required). |
| Corporate Onboarding Site | Global compliance, benefits enrollment, and organizational policies. | All new hires across the organization. |
| Departmental / Team Sites | Role-specific training, mentor assignments, and shadowing checklists. | Hires within a specific team or function. |
The hub provides unified navigation, consistent branding, and a shared search experience. This flat architecture also performs better with Microsoft 365 Copilot and search than deep folder hierarchies.
Each tool in the Microsoft 365 stack has a specific job in the onboarding process. Using the right tool for the right purpose avoids duplication and confusion.
- SharePoint Online is the system of record. It hosts long-form content like employee handbooks, training videos, and policy documents.
- Microsoft Lists is the execution engine. This is where the actual onboarding checklist lives, with task tracking, assignments, and automation.
- Microsoft Teams is the engagement layer. Pin your onboarding list and SharePoint site as tabs in a “New Hire Welcome” channel.
- Microsoft Planner handles lightweight, informal tasks. It works well for social onboarding like scheduling team lunches or meet-and-greets.
The guideline I give clients is straightforward:
If governance and auditability matter, Lists on SharePoint is the backbone. Planner is a useful complement for soft tasks, not a replacement.
Sign up for exclusive updates, tips, and strategies
Build the Onboarding Checklist in Microsoft Lists
With your architecture in place, the next step is building the checklist itself. Microsoft Lists gives you the structure, views, and conditional logic to make onboarding work at scale.
Recommended Column Schema
A well-designed column schema makes filtering, automation, and reporting possible. Here’s the starting point I recommend:
| Column Name | Type | Purpose | Example Values |
| Task Title | Single Line Text | The specific onboarding action. | “Set up multi-factor authentication” |
| Category | Choice | High-level grouping for filtering. | HR, IT, Security, Finance, Culture |
| Assigned To | Person | The individual completing the task. | [New Hire Email] |
| Owner / Mentor | Person | The person overseeing the task. | [Manager or Buddy Email] |
| Due Date | Date and Time | Deadline relative to start date. | Start Date + 2 Days |
| Status | Choice | Tracks task progress. | Not Started, In Progress, Completed, Blocked |
| Priority | Choice | Indicates urgency. | High, Normal, Low |
| Proof of Completion | Attachment | Stores certificates or signed forms. | PDF, image, or document |
| Role / Department | Managed Metadata | Filters tasks by job function or region. | Engineering, Sales, EMEA |
It looks like this:
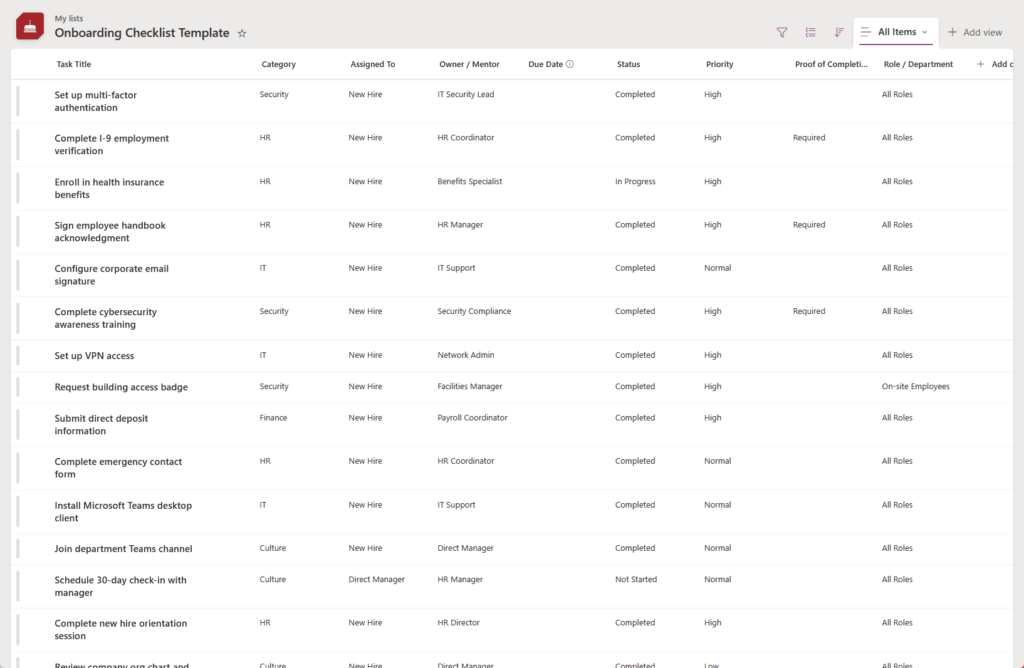
One important detail here: use Managed Metadata for Role and Department instead of plain Choice columns.
Managed Metadata is centrally managed and consistent across lists and sites, which matters when you’re filtering across departments or regions, see metadata examples.
Set Up Views That Actually Help People
Views replace folders. Instead of burying tasks inside nested directories, you create filtered views that show each person exactly what they need.
I recommend building these three views as a starting point:
- “My Onboarding” filtered by Assigned To equals [Me]. Each new hire sees only their own tasks. This is the default view.
- “Overdue Tasks” filtered by Due Date before today and Status not equal to Completed. Managers and HR use this to catch items falling behind.
- “By Category” grouped by Category, then sorted by Due Date. This gives HR and compliance teams a clear picture of completion rates.
The [Me] filter is especially important. It ensures that New Hire A can’t see the progress or attachments of New Hire B, which protects privacy without item-level permissions.
How to Create a Custom View
Here’s the step-by-step process to create these views in your onboarding list:
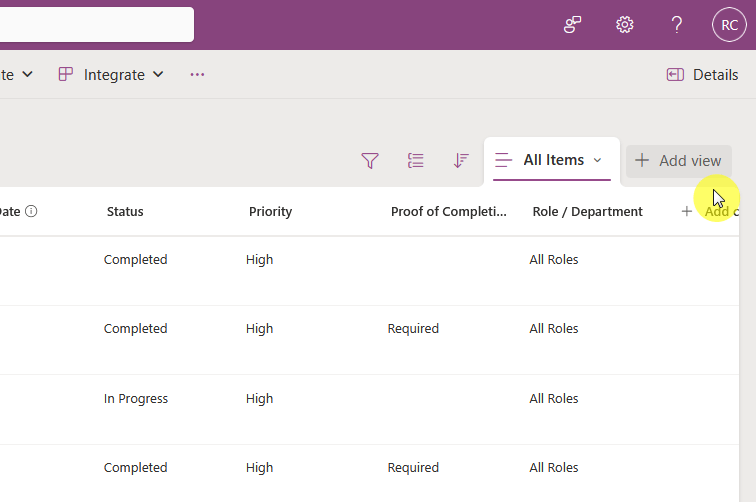
Step 1: Access the View Menu
Open your Microsoft List and click the All Items button in the top right corner of the list. The “Create view” dialog pops up immediately.
Step 2: Name and Format Your View
In the dialog, enter your view name in the “View name” field (like “My Onboarding” or “Overdue Tasks”).
Under “Show as,” choose your format:
- List for standard rows
- Calendar for date-based views
- Gallery for card layouts
- Board for kanban-style columns
Leave “Make this a public view” checked if you want all users to see this view, or uncheck it for a personal view. Click Create.

Step 3: Configure View Settings
After creating the view, click the view name dropdown and select Edit current view.
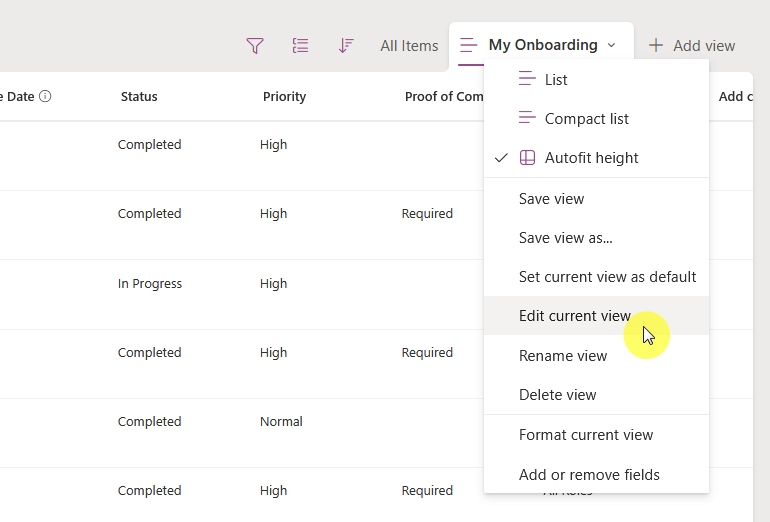
This opens the full settings page where you can configure:
- Columns: Check which columns appear in the view. Uncheck columns you want to hide.
- Sort: Set primary and secondary sorting (like Due Date ascending, then Priority descending).
- Filter: Click Show items only when the following is true. Add your filter conditions here.
- Group By: Select a column to group items (like Category). You can group by up to two levels.
Grouping creates collapsible sections that organize your list visually. This works especially well for the “By Category” view where HR, IT, and Security tasks appear in separate sections.
You can expand or collapse each group to focus on specific task categories.
Step 4: Apply Dynamic Filters
For the “My Onboarding” view, set the filter to: Status is equal to In Progress. This shows all active tasks that need attention.
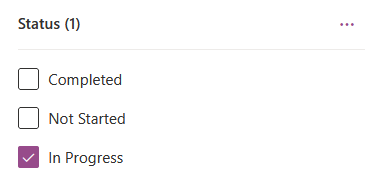
For the “Overdue Tasks” view, create two filter conditions: Due Date is less than [Today] AND Status is not equal to Completed. The [Today] token dynamically represents the current date.
Step 5: Save and Test
Scroll to the bottom and click OK to save your view.
Switch between views using the dropdown menu to confirm they’re working correctly. Test the [Me] filter by having different users log in and verify they only see their assigned tasks.
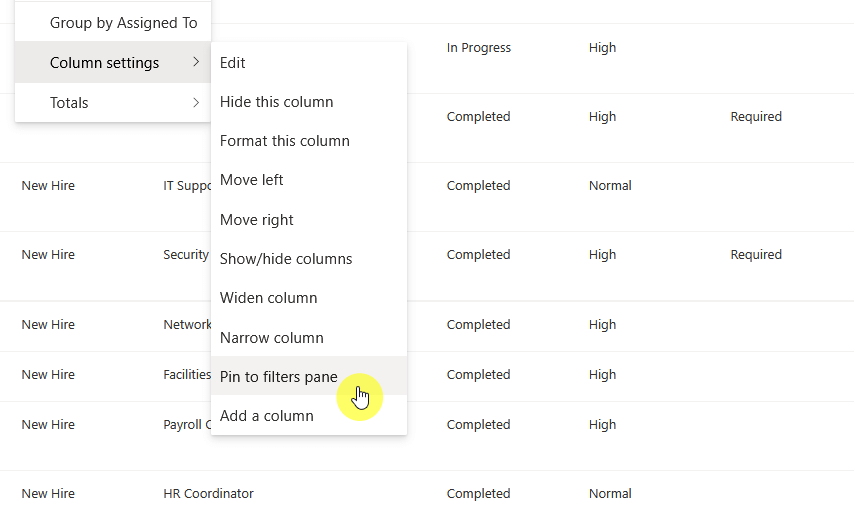
You can pin commonly used columns to the Filters Pane for quick refinement.
Click any column header, select Column settings, then Pin to filters pane. This gives users additional filtering options without cluttering the view.
Use Conditional Branching to Reduce Form Fatigue
Microsoft Lists now supports enhanced forms with conditional branching. You can configure a form to show or hide fields based on user input.
For example, if a new hire selects “Manufacturing” as their department, the form displays a “Safety Equipment Request” section. If they select “Marketing,” those fields stay hidden.
This keeps forms short and relevant. New hires only see the tasks that apply to them, which reduces errors and improves completion rates.
How to Set Up Conditional Branching
Microsoft Lists now supports Enhanced Forms with conditional branching. This feature rolled out to all Microsoft 365 tenants throughout 2025.
Here’s how to configure it:
Step 1: Open the Form Editor
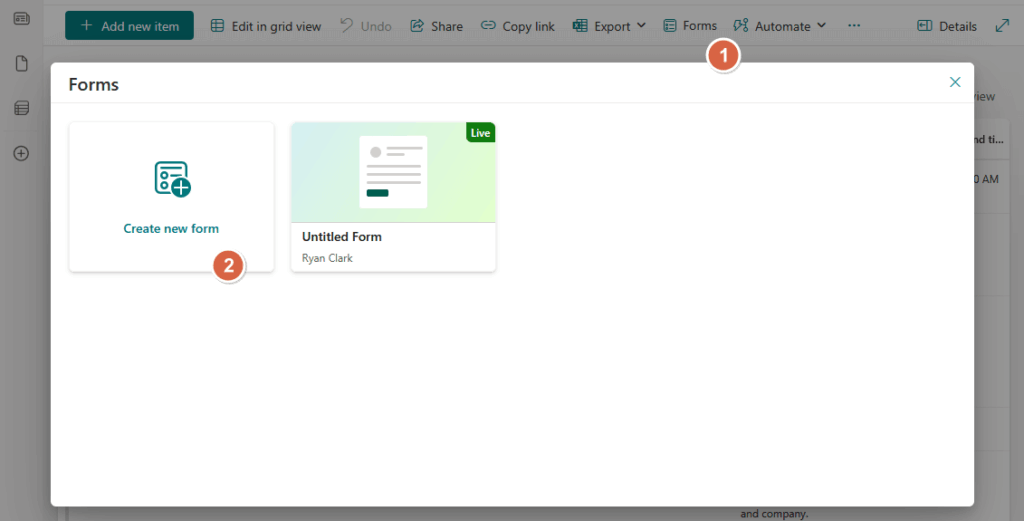
Navigate to your onboarding list and click the Forms button in the toolbar. This opens the Forms window. Click Create new form to start building your conditional form.
Step 2: Access Branching Settings
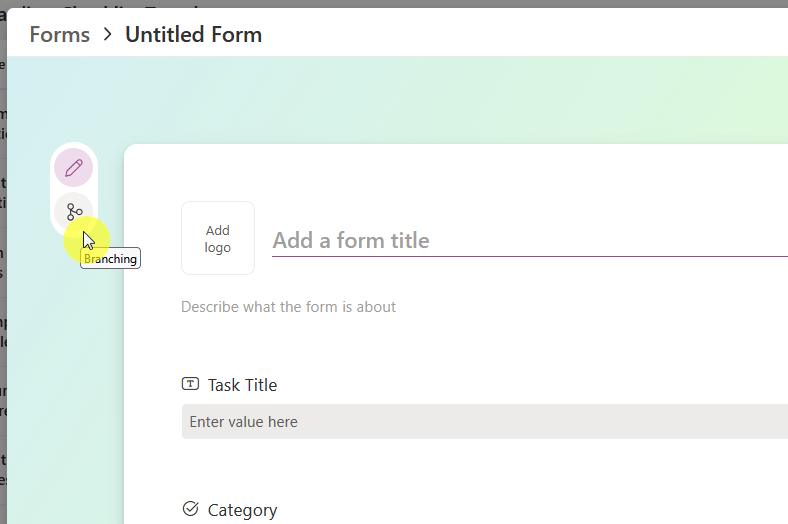
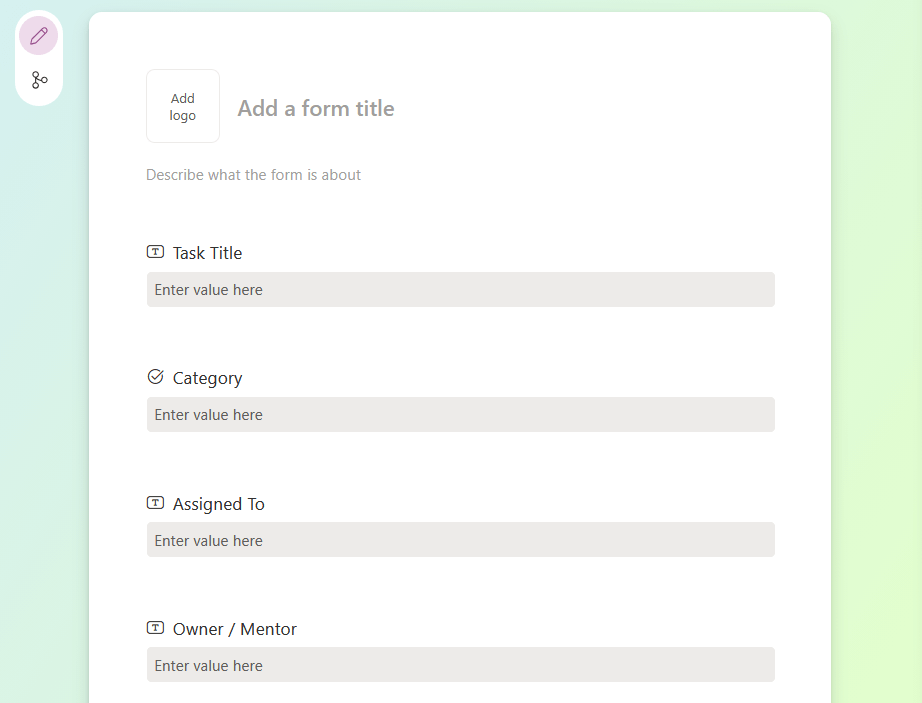
You’ll see a list of all columns in your form. Look for the Branching or Show/hide based on option next to each field (this may appear as a small branch icon or in the field settings menu).
Step 3: Define Your Branching Rules
Click on the field you want to conditionally display. Set up the rule using this pattern:
- If [Department] equals “Manufacturing”
- Then show [Safety Equipment Request]
You can also chain multiple conditions together. For example:
- If [Employee Type] equals “Contractor”
- Then skip to [Work Location] (bypassing Department selection)
Step 4: Set Up Choice-Based Branching
Choice columns work best for branching logic.
When a user selects a specific choice (like “IT” from the Department column), you can reveal follow-up fields like “Admin Access Required” or “Hardware Specifications.”
The branching interface lets you:
- Show or hide fields based on previous answers
- Skip directly to a specific field (bypassing irrelevant questions)
- Branch to different paths based on multiple conditions
Step 5: Test Your Form Logic
Before deploying the form, click Preview to test it. Walk through different scenarios:
- Select “Manufacturing” and verify the safety fields appear
- Select “Marketing” and confirm those fields stay hidden
- Test all branching paths to ensure logic flows correctly
Once you’ve confirmed the branching works, save the form and share it. Users filling out the form only see fields relevant to their selections, making the experience cleaner and faster.
Lock Down Permissions and Governance Early
Permissions and governance are where onboarding systems break down over time. I always tell clients to set the rules before launch, not after problems appear.
Use M365 Groups, Not Individual Permissions
The standard practice is to manage access through Microsoft 365 Groups. Create groups for HR, Managers, and each department, then assign permissions at the group level.
This approach scales well.
When a new manager joins, you add them to the Manager group once and they automatically get the correct access to SharePoint, Teams, and Planner.
Individual user permissions become unmanageable within months.
Common Governance Mistakes to Avoid
I see the same mistakes in almost every environment I assess. Here are the patterns that cause the most damage over time:
| Mistake | Why It Hurts | What to Do Instead |
| Breaking permission inheritance at the item level. | Creates administrative overhead and can break search indexing. | Use the [Me] filter view to control visibility. |
| Granting “Everyone except external users” access. | Exposes sensitive HR documents to Copilot queries and unauthorized staff. | Scope access to specific M365 Groups only. |
| Letting anyone create SharePoint sites. | Leads to duplicate sites, abandoned content, and search pollution. | Restrict creation to admins or use a provisioning form with naming conventions. |
| Ignoring inactive onboarding sites. | Abandoned sites clutter search results and degrade AI accuracy. | Use Site Lifecycle Management to archive sites after 90–120 days. |
Two additional practices worth establishing from the start:
- Apply sensitivity labels (e.g., “Confidential, HR”) to onboarding document libraries. Labels automatically enforce encryption, restrict external sharing, and prevent downloads to unmanaged devices.
- Schedule quarterly access reviews to confirm that only active employees and current managers have access to sensitive onboarding data.
Automate the Repeatable Parts with Power Automate
Automation keeps onboarding moving without manual follow-up. Power Automate connects SharePoint, Lists, and Teams so that tasks trigger the right actions at the right time.
Four Flows Every Onboarding System Needs
These four flows cover the full onboarding lifecycle. I’ve built variations of each for multiple clients:
- New Hire Creation Flow fires when a new entry appears in the Master Hire List (often synced from an HRIS). It provisions the Microsoft 365 account, assigns the correct license, and populates the checklist.
- Pre-boarding Welcome Flow triggers seven days before the start date. It sends a welcome email with a link to the pre-boarding site and hardware selection forms.
- Overdue Task Reminder Flow runs on a daily schedule. It checks the onboarding list for overdue items and sends a Teams adaptive card to both the new hire and their manager.
- Role-Based Group Enrollment Flow reads the Department metadata and automatically adds the new hire to the correct Teams channels, SharePoint sites, and Viva Engage communities.
Each flow is straightforward to build using standard connectors. No custom code is required for any of these patterns.
When to Consider Copilot Agents and Agent Flows
For organizations with a mature onboarding environment, Microsoft 365 Copilot adds another layer. You can build a declarative agent in Copilot Studio, scoped to your onboarding libraries, that acts as a virtual buddy.
A new hire can ask the agent questions like “Where is the benefits enrollment form?” The agent retrieves the answer from SharePoint or triggers an Agent Flow in Power Automate to handle the request.
I recommend this as a next step for organizations that already have their checklist, governance, and automation in place. It’s not a day-one requirement.
Roll It Out Without Losing Momentum
A well-built system still fails if nobody uses it. Rollout planning matters as much as the technical build.
The 30/60/90-Day Staged Content Model
The most common mistake I see is dumping 100 tasks on a new hire in week one. Use a staged approach that reveals information over 90 days instead.
- Day 1 Essentials include account setup, security training, and workspace orientation.
- Month 1 Foundations cover benefits enrollment, compliance training, and team introductions.
- Month 2 Ownership introduces project assignments, certifications, and performance goal-setting.
Use due dates and list views to control when tasks appear. The new hire’s “My Onboarding” view should feel manageable at every stage.
Train Managers, Not Just New Hires
Research consistently shows that new hires are more engaged when their manager actively participates in onboarding. The system should support this.
Create a simple manager playbook that includes:
- Weekly check-in templates
- Goal-setting guides
- Automated reminders to acknowledge early wins
Power Automate can send these reminders directly to the manager’s Teams feed on a set schedule.
Surface a Power BI dashboard in SharePoint that tracks completion rates, overdue tasks, and 30/60/90-day retention. This gives leadership visibility into what’s working and where the process needs attention.
Common Pitfalls and Quick Answers
Should I use SharePoint Lists or Planner for the checklist?
Use Lists when you need audit trails, compliance tracking, and automation. Use Planner for informal social tasks like scheduling team lunches. They complement each other well.
Can I use item-level permissions to hide tasks between new hires?
Don’t do this. Item-level permissions are an administrative burden and can break search. Use the [Me] filter view instead. It gives each person a private view of their own tasks.
What about SharePoint Premium Autofill Columns?
Autofill columns are useful for extracting data from uploaded resumes, IDs, and certificates. However, this is a paid add-on with pay-as-you-go billing. Evaluate the ROI based on your hiring volume before enabling it.
How do I prevent site sprawl?
Restrict site creation to a small group of admins. Enforce a naming convention like ONB-Department-YYYY. Then use Site Lifecycle Management policies to archive onboarding sites after 90 days of inactivity.
What’s the biggest onboarding challenge you’re facing right now? Drop a comment below.
Need help building a SharePoint onboarding system that actually works? I work with M365 teams on this every week. Reach out and let’s talk through your setup.