

Last Updated on September 19, 2025
Struggling to manage complex decisions in your automated workflows?
In this guide, you will learn six essential methods for managing multiple conditions in Power Automate.
Let’s get started.
How to Manage Power Automate Multiple Conditions
To build these intelligent workflows, Power Automate provides a suite of tools and techniques for handling multiple conditions.
Here are the six essential methods you need to know:
Method 1: Use Trigger Conditions to Filter Runs
The most efficient way to apply logic is to use a trigger condition.
This acts as a gatekeeper that checks your criteria before a flow even starts.
Instead of running for every single event and then stopping, the flow only runs when it matters.
![A screenshot showing a Trigger conditions section with an option to add a condition and an existing condition using the expression: @equals(triggerOutputs()?[body/{IsFolder}],false).](https://www.mrsharepoint.com/wp-content/uploads/2025/07/trigger-conditions-prevent-flow-to-folders.png)
Here are its key benefits:
- Reduces unnecessary runs: Stops the flow from executing unless specific conditions are met
- Saves costs: Fewer runs mean fewer API calls against your license limits
- Improves performance: A cleaner run history makes troubleshooting much easier
For example, a SharePoint flow can be triggered when a document’s status is “Approved.”
Method 2: Group Conditions in the UI (And/Or Logic)
For beginners, the standard condition control is the most intuitive way to handle multiple conditions.
The user interface allows you to add several rows of logic without writing any code.
Initially, the conditions are joined by an AND operator, which means all of them must be true.

You can easily change this to OR, which only requires one of the conditions to be true.
For more complex logic, such as (Condition A AND Condition B) OR Condition C, you can select multiple rows and group them.
This creates a logical container, like adding parentheses to a math problem.
Unfortunately, it’s good for simple logic, but limited to 10 rows per group (restrictive for complex scenarios).
Method 3: Layer Logic With Nested Conditions
When one decision depends on the outcome of another, you can nest conditions.
This means placing one condition control inside the “If yes” or “If no” branch of a parent condition.
The end product is a clear, hierarchical structure that mirrors a traditional if statement in programming.

It’s best for scenarios where a second check is only needed if the first one passes.
For instance, first check if an employee’s department is “HR,” and if yes, then use a nested condition to check their years of experience.
While intuitive, this method scales poorly.
Power Automate has a hard limit of 8 nested levels, and the flow canvas can quickly become wide and difficult to read.
Method 4: Use the Switch Control for Specific Values
For flows with a single variable having multiple values, the switch control is cleaner than nested conditions.
It evaluates one input and directs the flow down one of many possible branches, or “cases.”
For example, you could use a switch control to route a support ticket based on its priority:
- Low
- Medium
- High
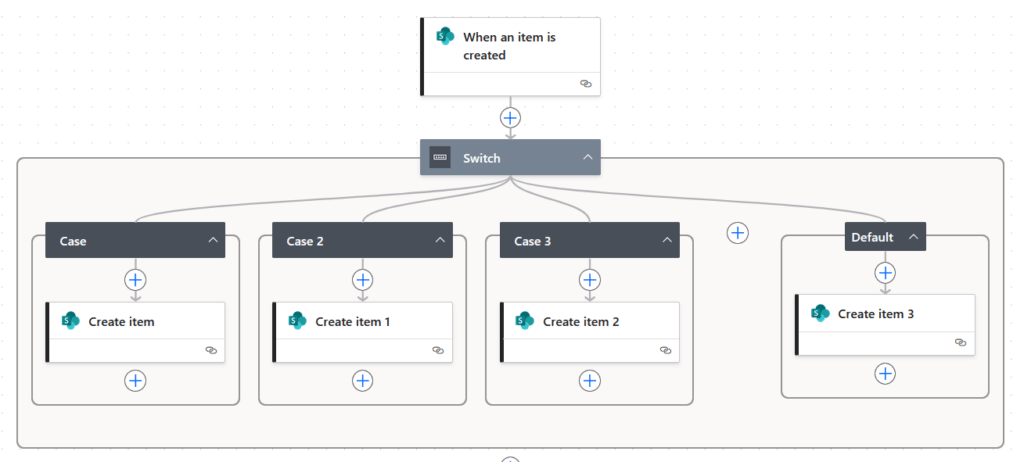
A key feature is the “Default” case, which runs if none of the other cases match the input value.
This helps handle unexpected data without causing the flow to fail.
One important limitation to remember is that the switch control only performs an “is equal to” comparison.
It cannot handle more complex operators like “contains” or “greater than.”
Method 5: Write Complex Logic With Advanced Expressions
To handle truly complex logic, you can move beyond the UI and write your own logical expressions.
Clicking “Insert expression” on a condition control allows you to enter a single statement that combines multiple checks using built-in functions.

Common functions include:
- and(expression1, expression2)
- or(expression1, expression2)
- equals(value1, value2)
- greater(value1, value2)
- contains(collection, value)
For example, you could write a single expression to check if an invoice amount is greater than $10,000 AND the vendor is not on a pre-approved list.
This gives you maximum power and flexibility to define precise conditions for your flow.
Method 6: Use the Filter Array Action for Data
A common task is to get a list of items from a source like SharePoint and then process only the ones that meet certain criteria.
Looping through each item with a condition action is inefficient, slow, and API-intensive, especially for large datasets.
The better solution is the filter array data operation action.

This action takes an array of items, then outputs a new array with only the items that match your conditions.
For example, you can use the filter array action to instantly find all support requests from a list that are marked “Urgent” but have no one assigned.
Sign up for exclusive updates, tips, and strategies
How to Choose the Right Conditional Method
With several options available, selecting the right one is key to building an efficient and readable flow.
Use this table as a quick reference to make decisions based on your needs:
| If you need to… | The Best Method Is… | Why? |
| Stop a flow from running in the first place. | Trigger Condition | It’s the most efficient, as it filters before the flow even starts. |
| Evaluate a single variable against many exact values. | Switch Control | It’s cleaner and more readable than many nested if statement blocks. |
| Check a simple true/false or a range (e.g., > 1000). | Condition Control | It’s the standard, UI-friendly tool for binary decisions. |
| Combine multiple, unrelated criteria with AND/OR logic. | Advanced Expression | It offers the most power and flexibility for complex logical statements. |
| Find a subset of items within a large list of data. | Filter Array Action | It’s much faster and more efficient than looping through every item. |
Next Steps
Mastering how to handle multiple conditions is the most important step in moving from simple task automation to building powerful solutions.
Understanding what each control does and when to use it is key, as the right tool ensures efficient, scalable, and maintainable flows.
Do you have any questions about how Power Automate multiple conditions work? Let me know below.
For any business-related queries or concerns, contact me through the contact form. I always reply. 🙂


