
Last Updated on September 14, 2025
Want to improve your SharePoint site’s usability?
In this guide, you will learn how to manage navigation on individual sites, across a group of sites using hubs, and more.
Let’s get started.
Before you start making changes, it’s helpful to understand the basic ideas behind SharePoint’s navigation system.
SharePoint navigation refers to the menus and links that help users find their way around.
A well-planned navigation system makes content easy to find, which helps with collaboration and makes the user experience better.
Think of it as the main map to your company’s information (if this map is confusing or cluttered, users get frustrated).
Difficult navigation deters users (even with excellent content) as normally, when people can’t find what they need, they stop using the tool.
On the other hand, simple and clear navigation helps users feel confident and in control, saving time and boosting productivity.
Modern SharePoint employs a three-level navigation system for a consistent experience:
- Global navigation: Provides tenant-wide links to universal resources, appearing in the SharePoint app bar on every site
- Hub navigation: Connects a family of related sites with a shared, consistent menu
- Local navigation: Contains links to content within a single site, like its document libraries and pages
Global navigation acts as the main highway for the entire organization, always accessible.
Hub navigation provides the connecting roads for a specific department or topic, while local navigation maps single sites.
Together, they build a logical and scalable information architecture.
SharePoint has changed how it structures sites.
The old classic model used a strict hierarchy of sites and subsites.
Navigation was often inherited from the parent site, which could be inflexible and slow down page loads.
The modern SharePoint approach avoids subsites and instead uses a “flat” structure where every new site is independent.
These sites are then flexibly connected using hub sites.
This change means navigation is no longer automatic and must be planned out using tools like hub associations.
This gives you more power to design a user-friendly structure that matches how your organization works.
Here’s a quick comparison of the two approaches:
| Feature | Classic SharePoint | Modern SharePoint |
| Architecture | Hierarchical (sites and subsites) | Flat (independent sites) |
| Connections | Rigid, inherited structure | Flexible, connected via Hubs |
| Navigation | Often automatic, based on hierarchy | Deliberately planned and managed |
| Performance | Can be slow with complex structures | Optimized for better performance |
Sign up for exclusive updates, tips, and strategies
The most common changes happen at the local site level as site owners can directly manage the menu to organize their content.
Top Link Bar vs. Quick Launch
The appearance of your local navigation is determined by the site template you choose, as each is designed for a specific purpose.
Here are the two default options:
- Top link bar: A horizontal menu for communication sites, ideal for broadcasting information.
- Quick launch: A vertical menu for team sites, providing quick access to collaborative tools.
This design choice helps align the site’s layout with its intended use from the start.
Team site owners who prefer a different layout can switch from the vertical quick launch to a horizontal top link bar.
You can find the settings under Settings > Change the look > Navigation:

How to Add, Edit, and Remove Links
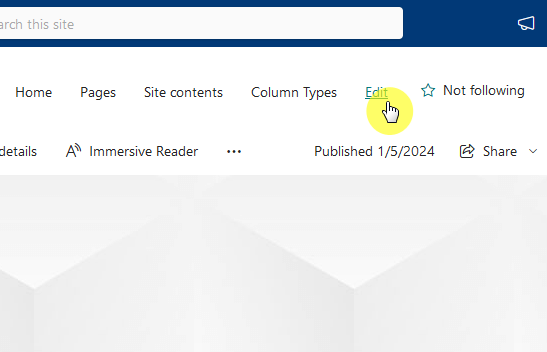
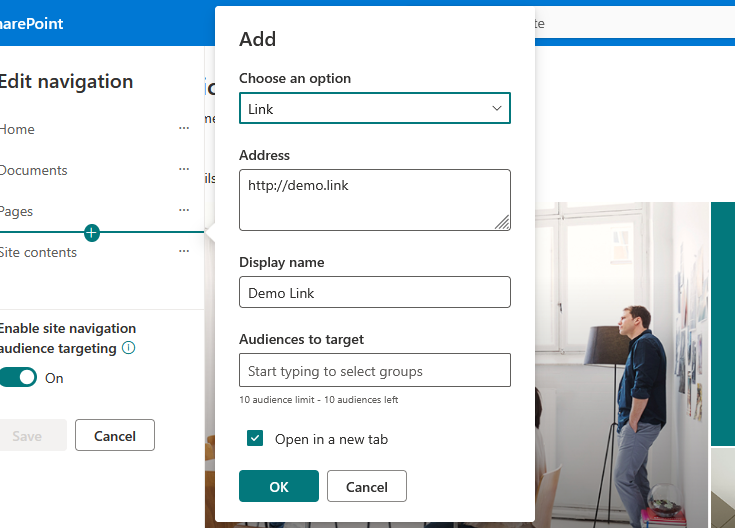
You can easily change your site’s menu by entering edit mode.
Click the edit link next to your navigation menu (on a vertical menu, it’s at the bottom).
Hover where you want to add an item and click the + icon.
You can add a standard link to any URL or a non-clickable label to group other links.
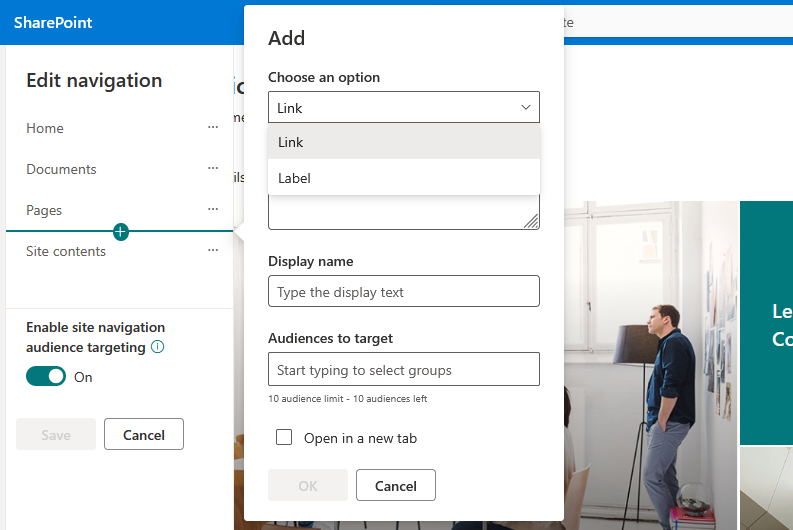
Give your link a display name.
It’s a good idea to check the open in a new tab box for links that go to external websites.
Click OK.
If you want to reorder the links, click the ellipsis (…) next to any link to edit, move up, or move down, and even remove it.
Click Save to publish your changes.
Creating Drop-Down Menus with Sublinks
To keep your menu tidy, you can group links into drop-down menus.
This creates a cleaner look and helps users find things without seeing a long, overwhelming list.
In edit mode, add the item that will be the top level of your drop-down (it’s best to use a non-clickable label for this).
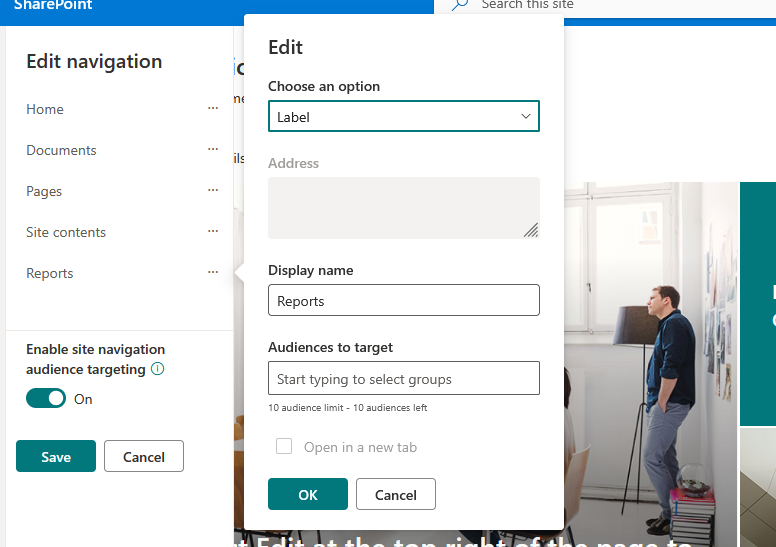
Add the links you want to appear in the drop-down directly below the parent item.
For each child item, click the ellipsis (…) next to it and select make sub link, and this will indent the item under the parent.
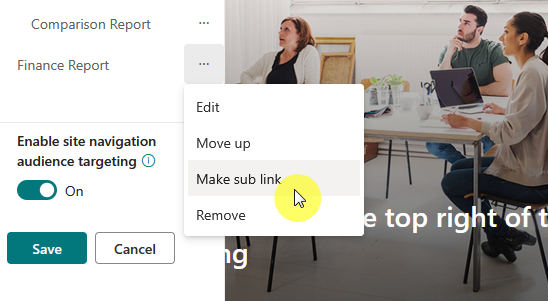
Make sure to save your progress, and your parent item will show an arrow, indicating it has a drop-down menu.
You can create up to two levels of sublinks, for a total of three levels in your menu (top level > second level > third level).
Cascading vs. Mega Menus
On communication sites and hub sites, you can pick between two menu styles.
Here’s how they compare:
| Style | Description | Best For |
| Cascading | A traditional, single-column drop-down list | Simpler sites with a straightforward, two-level menu structure |
| Mega Menu | A large, multi-column panel that shows many links at once | Complex sites like an intranet portal with three levels of menu hierarchy |
A well-organized mega menu can make content much easier to find and reduce clicks while a bad one overwhelms.
Personally, I find the cascading style simpler but can hide content in deeper menus.
Hub sites are the glue that connects individual SharePoint sites into a single, easy-to-navigate intranet.
I’ll explain here how to set up and manage hub navigation to create a unified user experience.
What is a Hub Site?
A SharePoint Hub Site is a site that you register to act as a central point for other sites.
Hubs are used to group sites by department, region, or project.
When you associate a site with a hub, it gets three main benefits:
- Shared navigation: Get a consistent menu and theme across all connected sites
- Content roll-up: Display news and content from associated sites in one place
- Scoped search: Search for content across all sites within the hub at once
This model allows organizations to group sites logically without forcing them into a rigid structure.
The unified experience for a specific department or project makes it easier for users to discover related content and stay informed.
When a site becomes a hub, a new hub navigation bar appears at the top.
This menu is the same on all sites connected to the hub.

The hub owner is the only one who can edit this navigation bar, and they do it directly on the hub site.
The editing process is the same as for local navigation where the owner clicks edit and can then add links, labels, and sublinks.
Hub navigation supports the mega menu style, which is often the best choice for organizing links to many different sites.
When you connect a site to a hub, it automatically gets the hub’s navigation bar and theme.
It’s important to know that this hub menu appears in addition to the site’s own local navigation (as you can see earlier).
This creates a two-menu system on associated sites:
- Hub navigation bar – at the very top (shared and centrally managed)
- Local navigation menu – just below it (unique to the site and locally managed)
This setup separates shared, hub-level links from site-specific content (but can be confusing if not planned well).
To avoid this, it’s a good practice to simplify local navigation on hub-connected sites to remove any links that are already in the hub menu.
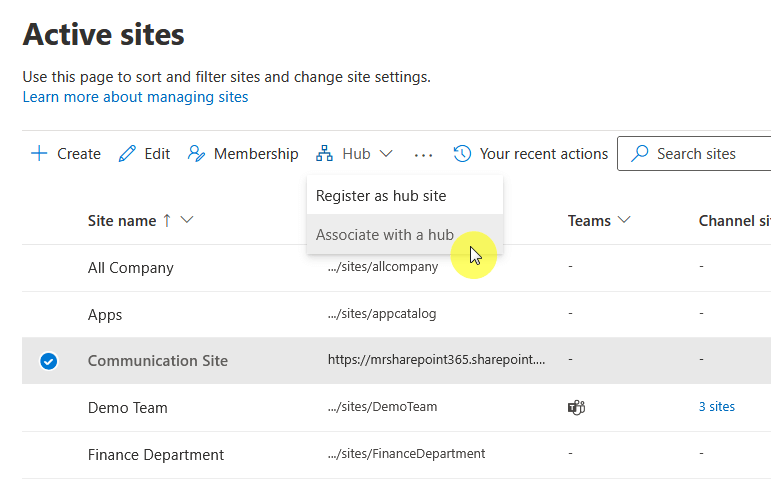
How to Associate a Site with a Hub
Connecting a site to a hub can be done by either the site owner or a SharePoint administrator.
Here are the two main ways to do it:
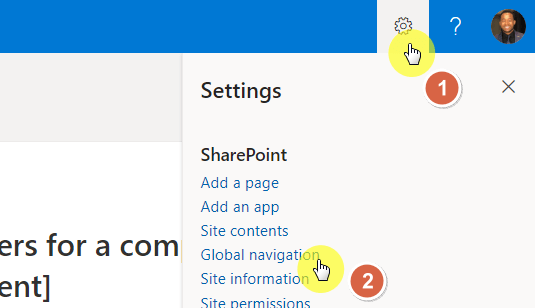
- Site owners: A site owner can request an association by going to Settings > Site information and selecting a hub.
- Administrators: An admin can connect sites to a hub from the SharePoint admin center, which is ideal for bulk actions.
For more advanced setups, hubs can also be associated with other “parent” hubs.
This broadens search, allowing top-level hub searches to find content from all child hubs, creating a strong, interconnected intranet search.
SharePoint provides two other navigation elements: the global navigation and the site footer at the bottom.
The SharePoint app bar, a vertical menu on the left of every modern site, provides constant access to important sites, news, and files.
At the top of the app bar is an icon that opens the global navigation menu for a consistent navigation experience across the intranet.
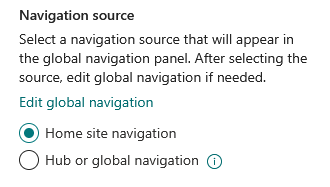
To set this up, you need to select an official communication site for the organization first and enable global navigation.
The owner chooses whether the menu uses the site’s local or hub navigation.
This centralizes control over the organization’s main navigation, allowing the intranet team to curate the top-level user experience.
It’s done from a single, authoritative site without needing high-level admin permissions for every small link change.
The footer is a useful navigation space at the bottom of modern communication sites (not available on team sites).
It’s a good place for links that are important but don’t need to be in the main menu.
To set it up, a site owner can go to Settings > Change the look > Footer.
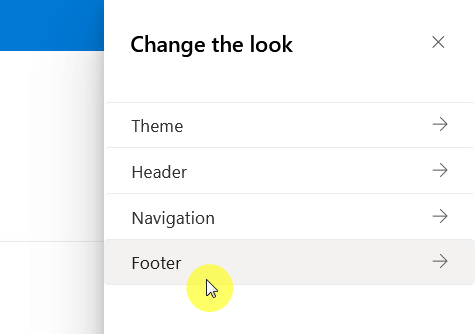
From there, you can:
- Enable the footer
- Upload a logo
- Choose a layout (simple for one row of links or extended for grouped links)
- Add and edit links and labels
The footer is a great spot for utility links, such as “Privacy Policy,” “Terms of Use,” “IT Help Desk,” or “Feedback.”
Advanced Customization Methods
For larger organizations with complex needs, SharePoint offers advanced ways to personalize and automate navigation.
Personalizing Menus with Audience Targeting
Audience targeting is a feature that lets you show or hide navigation links based on a user’s membership in a Microsoft 365 group.
This makes the menu cleaner by hiding links unrelated to certain users, like a “Sales Resources” link only to members of the sales team.
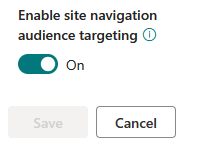
Site owners can enable the feature in the navigation edit pane, allowing them to target up to 10 groups per link in the “audiences to target” field.
Only members of those groups will see the link.
This also helps prevent users from clicking on links that would lead to an “Access Denied” page, creating a much smoother experience.
For tasks that need to be done on many sites at once, you can use PnP.PowerShell, a tool for scripting Microsoft 365 tasks.
As an administrator, you can programmatically add, remove, or update navigation links across hundreds of sites.
Common uses include:
- Applying a standard navigation menu to all new project sites
- Updating a link to a new HR portal across all department sites
- Generating a report of all navigation links to check for consistency
Here is a sample script that adds a new link to a site’s top navigation bar:
# Connect to your SharePoint site
Connect-PnPOnline -Url "[https://yourtenant.sharepoint.com/sites/YourSite](https://yourtenant.sharepoint.com/sites/YourSite)" -Interactive

# Add a new link to the top navigation bar
Add-PnPNavigationNode -Location "TopNavigationBar" -Title "New HR Portal" -Url "[https://yourtenant.sharepoint.com/sites/HR](https://yourtenant.sharepoint.com/sites/HR)"
This scripting capability is a powerful tool for large-scale management.
Automating repetitive tasks helps you enforce navigation standards and ensure consistency across your entire SharePoint environment.
It’s the key to managing an enterprise-level intranet efficiently.
Developers can use SharePoint Framework (SPFx) to build custom navigation components.
A common example is creating a global menu where the links are pulled from a central SharePoint list.
This allows business users to update the global navigation links by simply editing a list, without needing a developer to deploy new code.
This is the modern, secure way to build custom solutions when the built-in features aren’t enough.
Putting It All Together
Customizing SharePoint navigation is a key part of user experience design and information management.
Modern SharePoint provides a powerful system with local, hub, and global options to create a structure that fits your organization.
With good planning, governance, and tools, SharePoint sites can become valuable collaborative workspaces.
Do you have questions about customizing SharePoint site navigation? Let me know in the comments.
For any business-related queries or concerns, contact me through the contact form. I always reply. 🙂


