

Last Updated on August 26, 2023
Are you planning on using SharePoint as your project management office portal?
That’s actually a great plan, especially when your organization mainly uses the Microsoft ecosystem of apps.
In this article, I’ll walk you through creating a project management office portal in SharePoint Online and all the steps you need to take.
Let’s get started.
Table of Contents:
- Why use SharePoint as a project management office portal?
- How to create a project management office portal in SharePoint
- Using SharePoint as a project management office portal
Since you’re here, it’s likely that your organization has its own PMO team that defines and maintains project management standards.
Now, there are many apps out there that can help you create a portal for your team. But SharePoint is one of the best out there.
In fact, here are some advantages of using SharePoint Online as your project management portal:
- The ability to manage different projects in one secure location
- The ability to create one site per project and enroll them in a hub site
Both advantages are related:
Since SharePoint Online can be something like a focal point for your team, it will make it easier to access all documents and information related to the projects.
Furthermore, with recent updates from SharePoint, like the modern experience, you will be able to make use of hubs and other new features.
Later on, I will show you how to configure your hub as well as the permission of the associated sites so you don’t have to do it manually.
Sign up for exclusive updates, tips, and strategies
To get started, follow these steps:
Step 1: Create the portal site first
Naturally, you will have to create the portal site first. This will be the main project management office portal that you will be using.
Now, there are different types of sites in SharePoint Online. But the two types you need to be mainly concerned with are these:
- Team sites with Microsoft 365 group
- Communication sites (no Microsoft 365 group)
Team sites with Microsoft 365 group are the better option here since you can use more apps and the site features to collaborate with your team.
Communication sites are mainly used to share information like reports and statuses. They don’t include apps like Calendar, Teams, Planner, and more.
Notes: If you want to read more on this, check out my article about the different types of sites in SharePoint Online.
To create your portal team site, follow these steps:
- Go to the start page of your tenant through the home button
- Click on the “Create site” button
- Click on the “Team site” box

On the next page:
- Give the site a name
- Choose the “Private” option on the “Privacy settings” to make the site more secure
- Click on the “Next” button to proceed
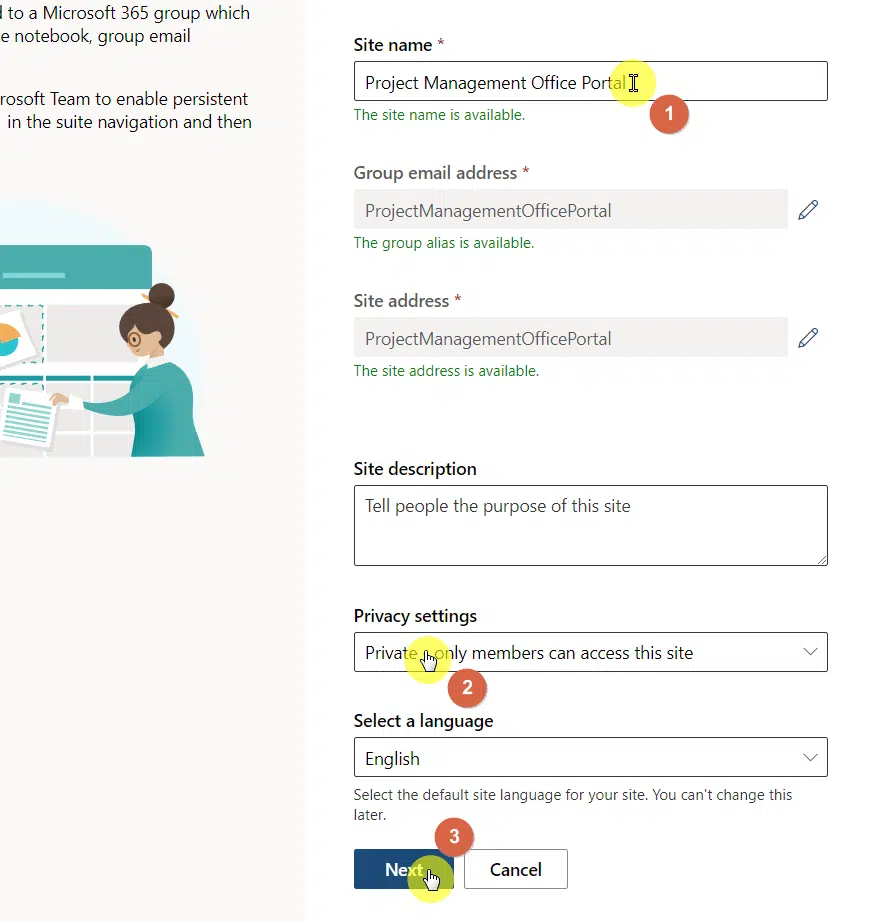
Some notes here:
- The group email address and site address will automatically be filled out
- Site description is only optional
- Privacy settings refer to who can access the site — private (members only) or public (everyone in the organization)
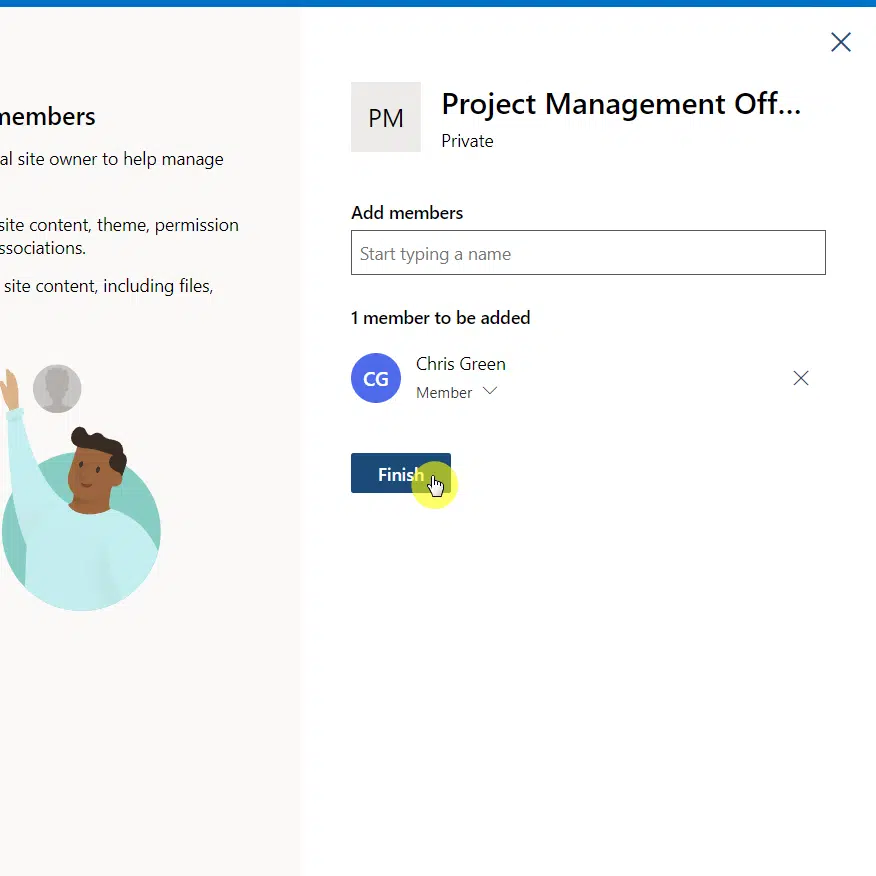
On the next page, you can add members of your team. Just click on the “Finish” button once that’s done.
After that, the system will bring you to the home page of your new site. However, during this part, there’s no need for you to customize the home page just yet.
Note: For creating a site from a template, see here: How to Create a SharePoint Site From Template: Full Tutorial.
Step 2: Create a project tracker list
The project tracker list will work as your main dashboard where you can see all the projects and their progress.
Here’s the good news:
Unlike before, there’s no need for you to start from scratch by creating a custom list (although you can). There’s now a template you can use.
Note: For more information about lists, check out my main guide on lists where I also talked about the different methods of creating one.
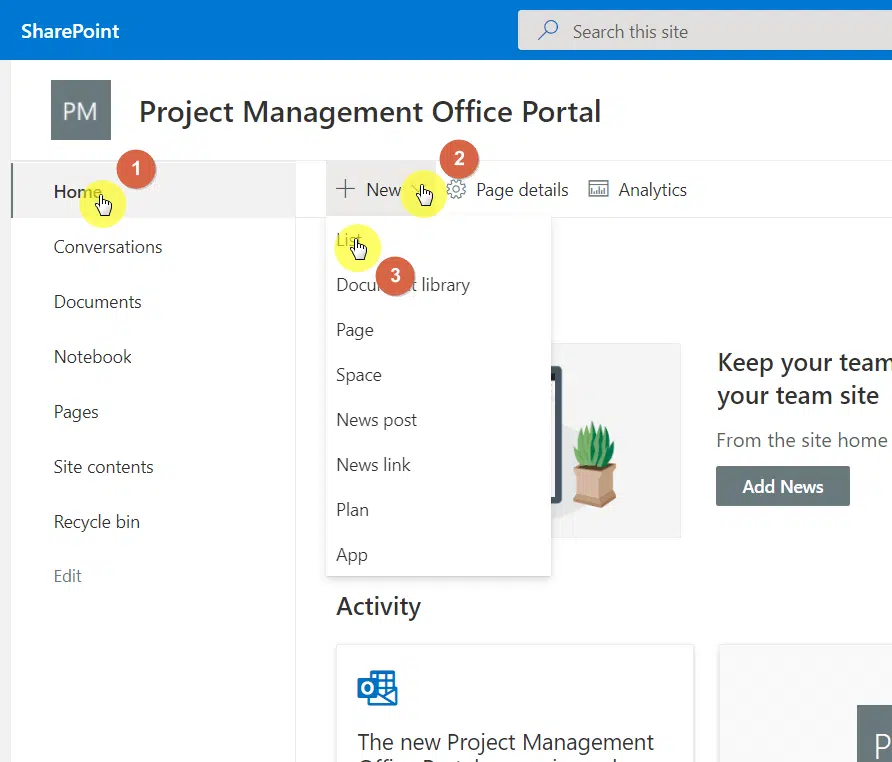
To create the project tracker list, follow these steps:
- Make sure you’re on the home page of your site
- Click on the “New” button in the command bar
- Select “List” from the options
Right after that, you will see various templates available.
From here, click the “Work progress tracker” template.
The window will then show you a preview of this template along with all the columns it comes with by default.
Don’t worry if there are columns you don’t like or you found missing. You can always edit this list later and customize the columns.
For now, click on the “Use template” button at the bottom.
In the next window, you will be able to name the list properly, provide some description (optional), or show/hide the list from the navigation.
Click on the “Create” button to continue:
Right after that, you can then customize the list:
Customizing your project tracker list
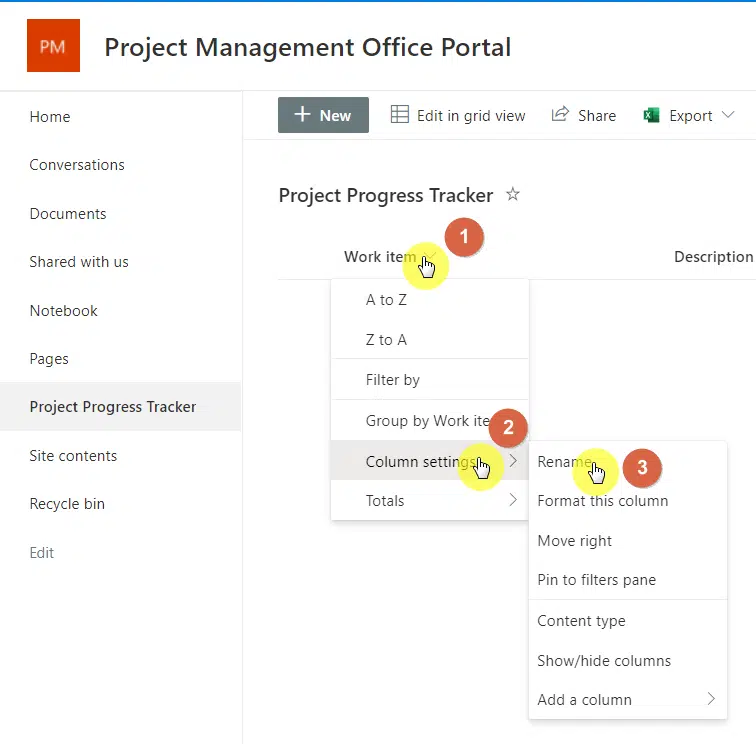
Starting with the most obvious, you may want to rename the item list title column header into one that fits your needs.
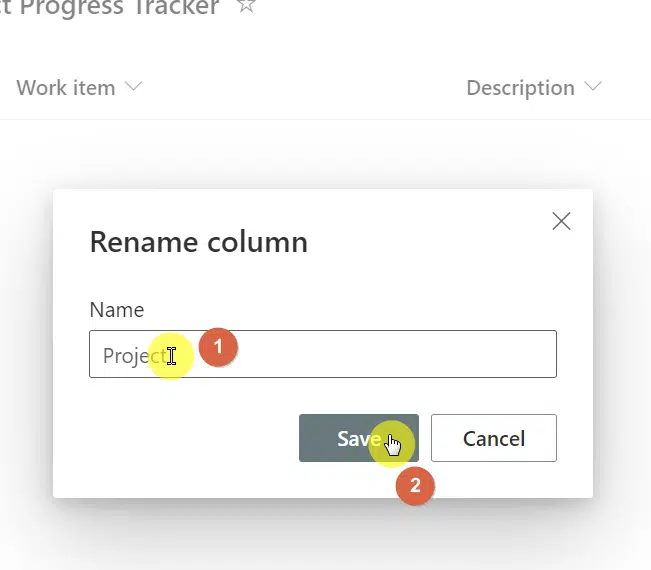
To rename the column header, do these steps:
- Click on that header first
- Hover your mouse over “Column settings”
- Select the “Rename” option
A small window will then pop up:
- Enter the new column name
- Click on the “Save” button
You can also add new columns to the list.
To do that:
- Get to the right-most column in the list
- Click on the “Add column” header button
- Select the type of column you want to add
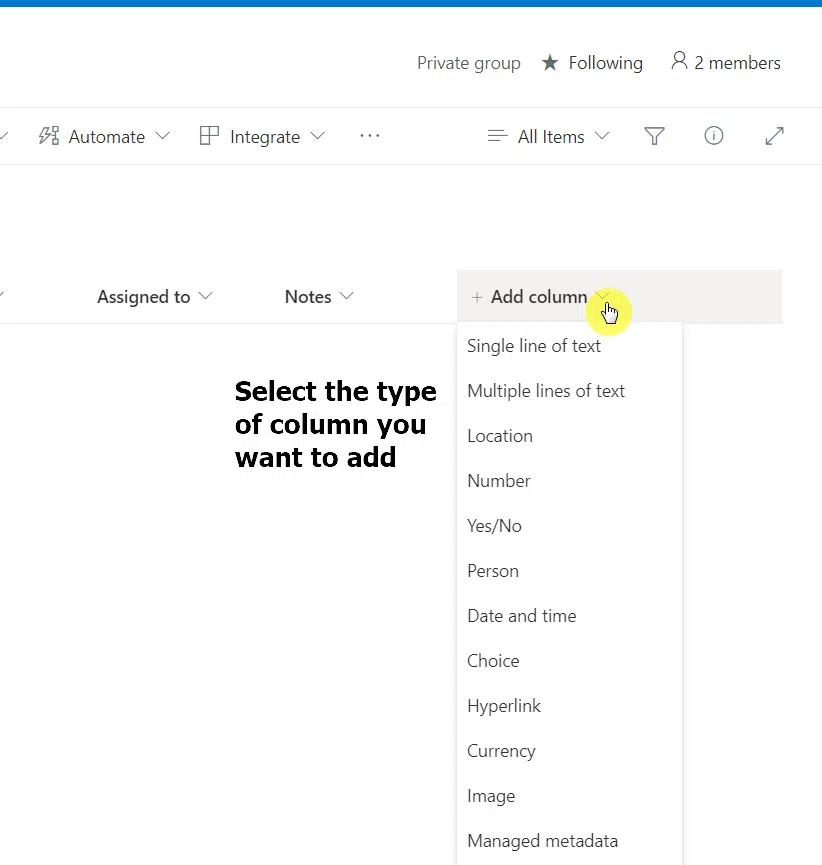
Note: Make sure to include a column where you can insert the site links of the projects.
Here are some ideas on how to further customize your list:
- Create custom views for your list
- Set up email notification alerts
- Create an automation flow
Adding data to your project tracker list
After making the necessary changes to your list, you may also want to enter the current data that you have.
This will also help you visualize the portal page in the next step once you complete the whole page and embed the list.
To enter data into the list, simply click on the “New” button in the command bar:

On the right panel:
- Enter the information for your project
- Click the “Save” button once you’re done
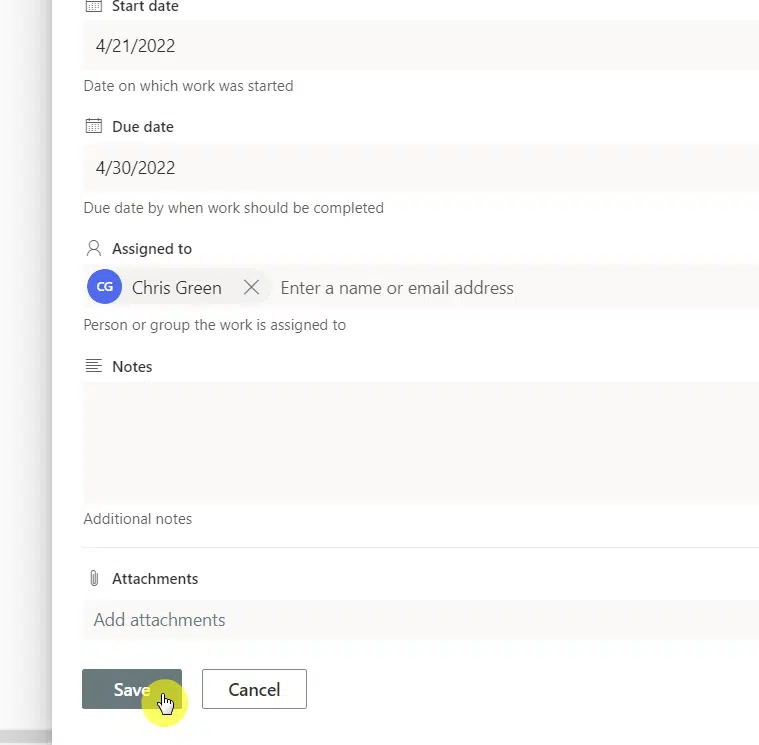
Repeat as many times as needed until you’re able to enter all the projects that you have.
Step 3: Complete the portal site page
Now that you have the project tracker list ready, it’s time to complete the portal site page and enter all the web parts that can help.
By default, team sites have the following web parts on the home page:
- News
- Activity
- Quick links
- Document library
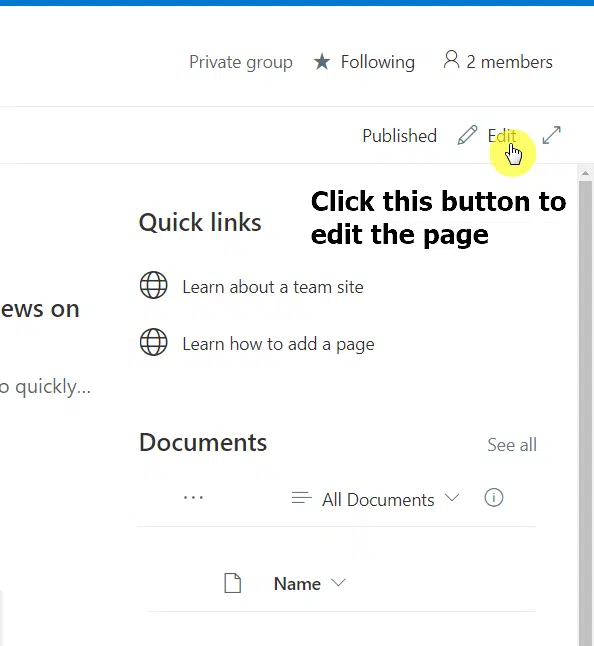
To start editing the page, click on the “Edit” button on the right side of the command bar:
While in edit mode, there are a lot of things you can do:
- Move web parts and sections around
- Add new web parts and sections
- Delete web parts and sections
There are handles and buttons for adding (plus), deleting (trash), and moving (arrow cross) elements around the page.
Here are some customizations I recommend:
Embed the project tracker list
To start:
- Hover your mouse over the place where you want to insert the project tracker list
- Click the plus button that appears
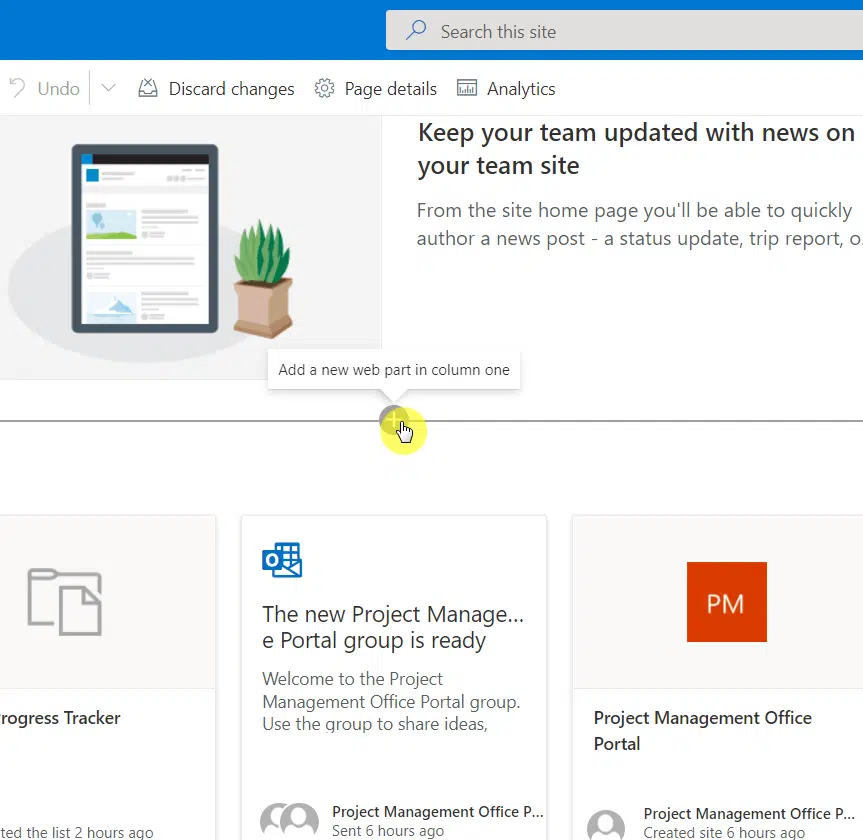
Search for the list web part and click on it:
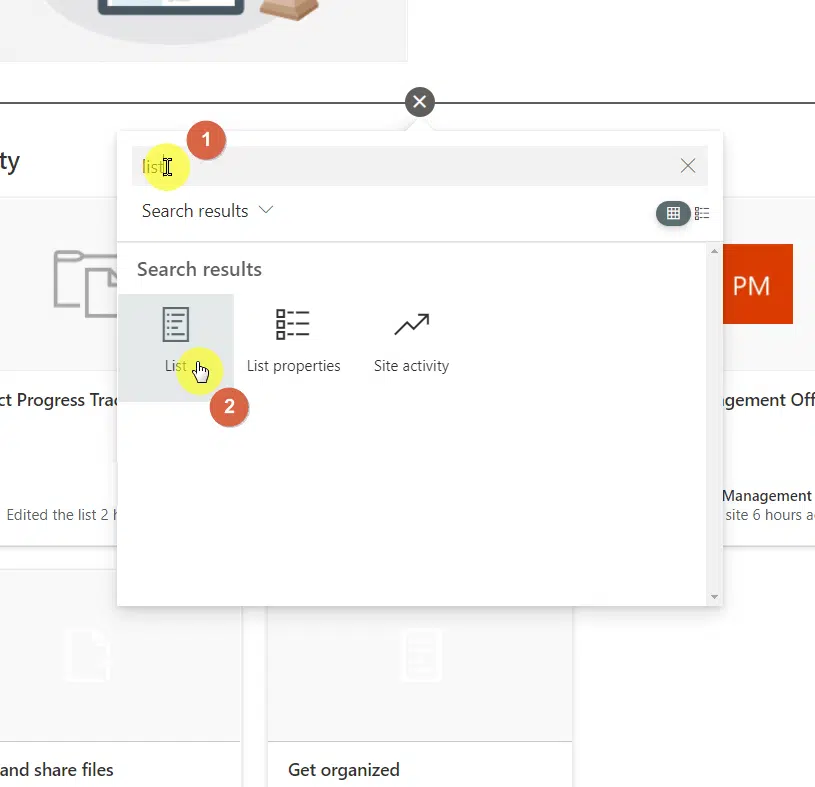
You will then see a list of all the lists that you have on the site. If you followed the earlier step, there will only be one list here.
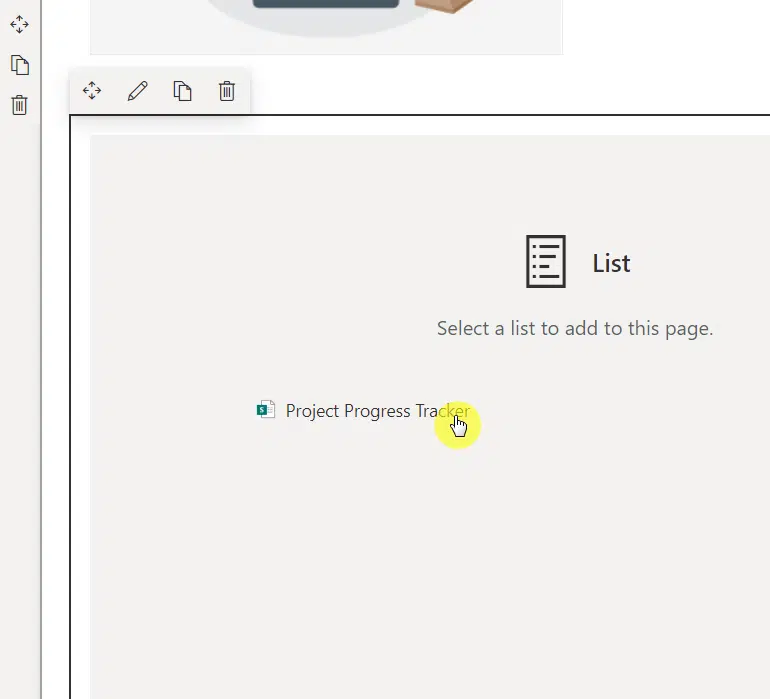
Click on the list that you made earlier:
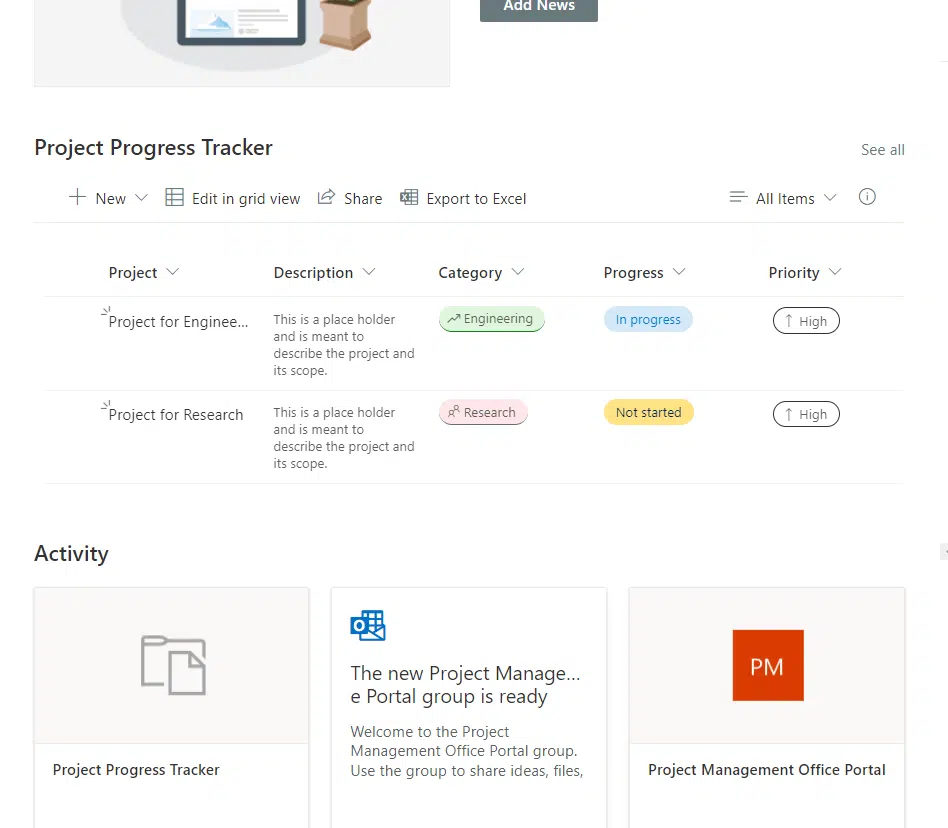
If you republish the page, you will now see the project progress tracker list on the home page:
Add quick links
It’s also a great idea to insert quick links so users can quickly go to certain pages that are important (like external resources).
Now, you have two choices here:
- Edit the existing quick links web part
- Add more quick links web part
To edit the links, simply select the link box and click on the pencil icon:
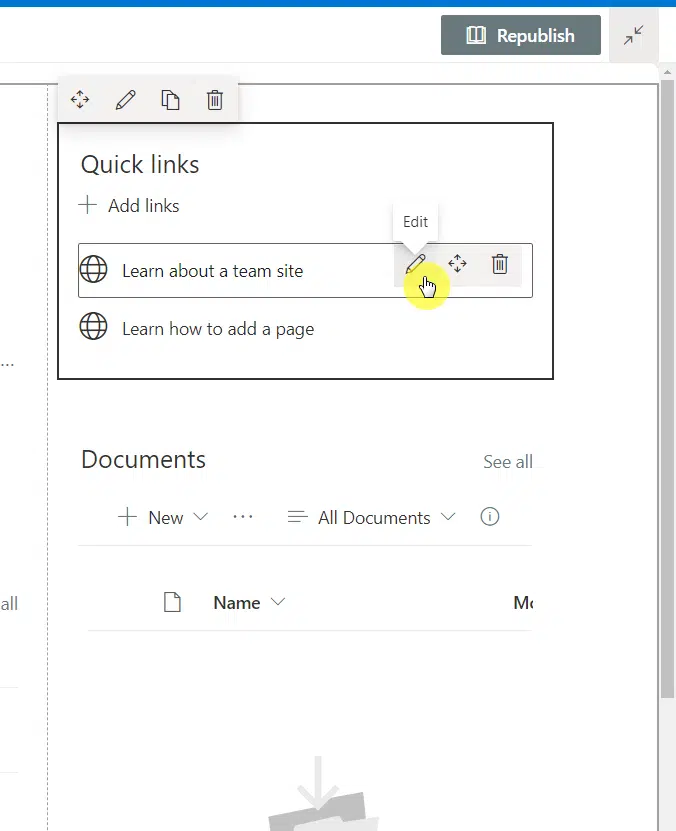
On the right panel, you will be able to change the link, the title, and even insert a thumbnail and its alternate text field.

Changing anything on the right panel will automatically reflect on the web part.
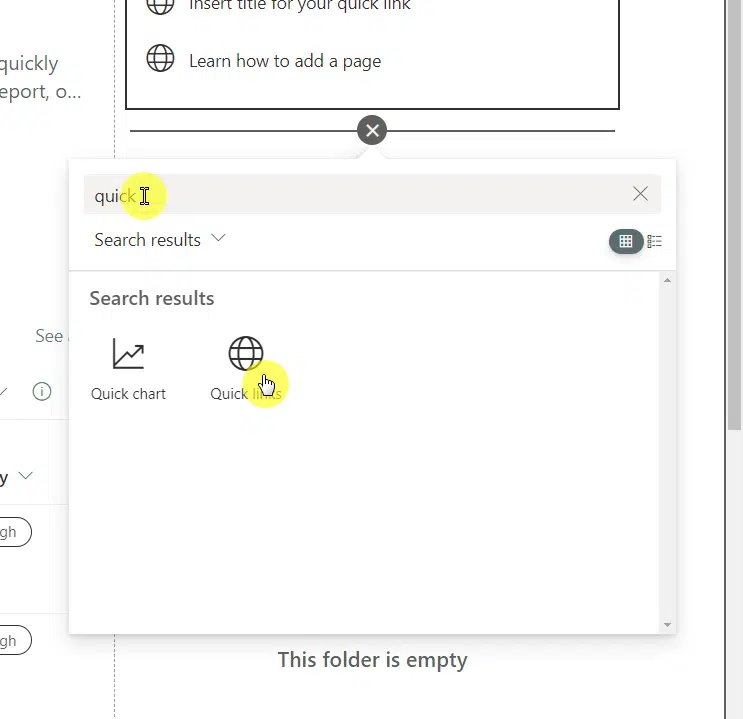
If you want to add a new web part instead, simply search for “quick links” and click on it:
Note: I have mentioned this functionality as one of the ways you can mimic the “promoted links” in the classic experience.
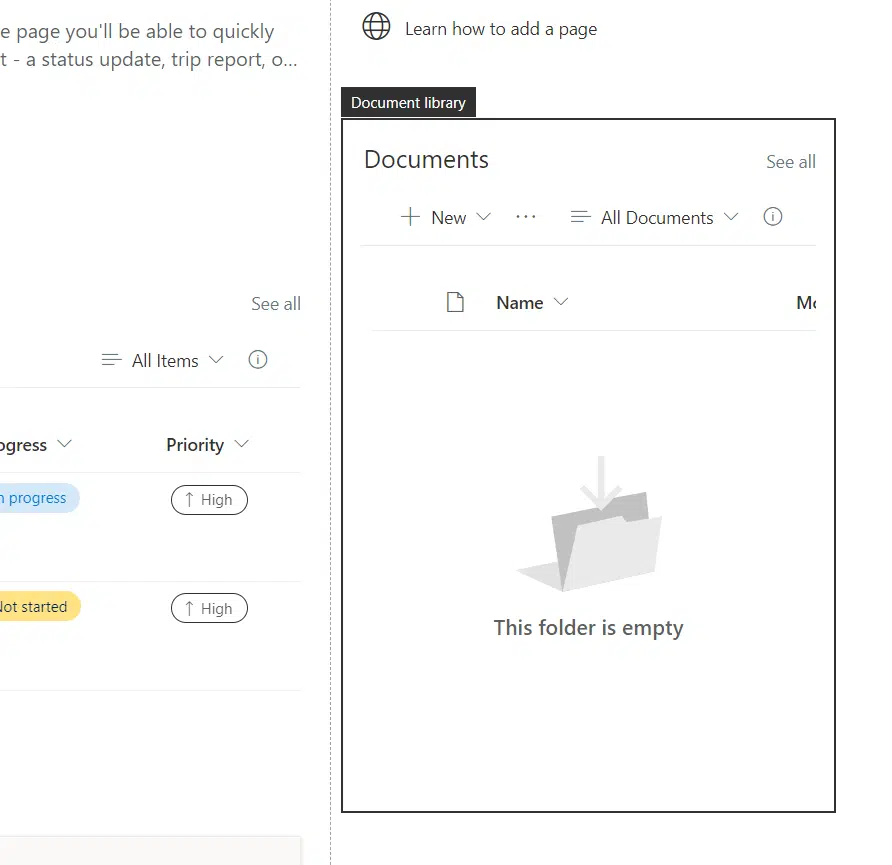
Add relevant document libraries
Similar to quick links, it’s also a good idea to include a web part that will enable you and the users a quick look at a document library.
There’s already an existing web part included in the team site by default. The same with the step earlier, you can either edit this one or create new ones.
Related: Modern SharePoint Document Management System Guide Tutorial
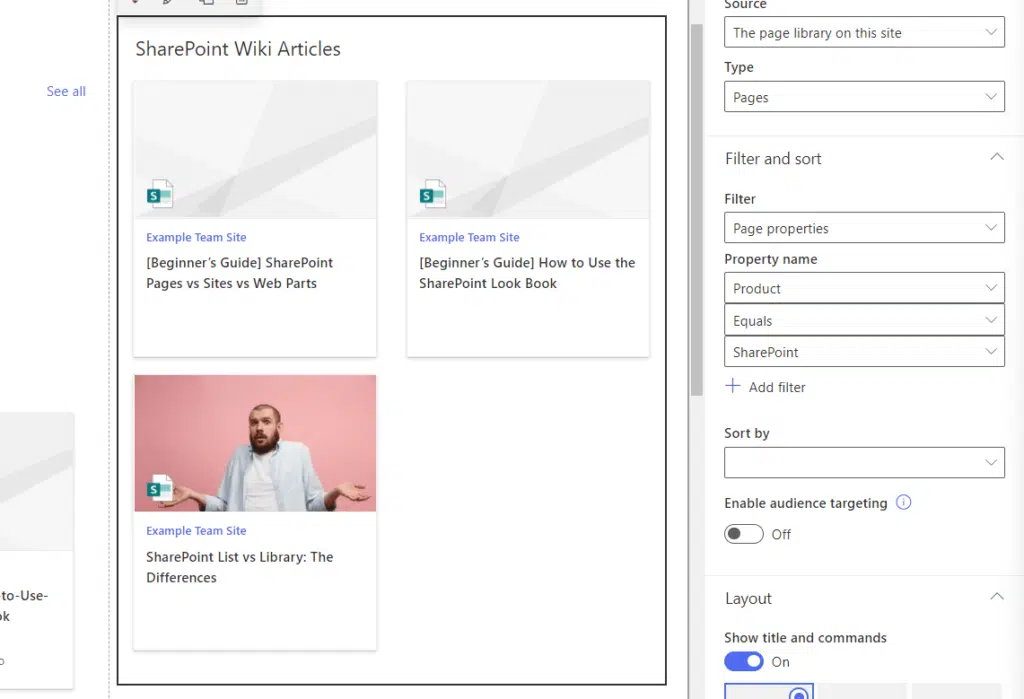
Add relevant wiki or knowledge base libraries
Whether or not your knowledge base lives in SharePoint Online or not, it’s a good idea to include your wiki articles on the home page.
Some scenarios:
- If your wiki articles are outside SharePoint Online, then you may want to create a separate list and embed them on the home page.
- The other choice for external wiki articles is to use quick links and embed them on the home page.
- If your wiki articles are in SharePoint Online, then you can use the highlighted content web part to display them on the home page.
Below is an example of how it might look for internal wiki articles:
Note: If you want to create your own internal wiki, check out my guide on how to create a wiki knowledge base in modern SharePoint.
Step 4: Create your project sites
The next part is to create the individual sites of your projects.
Now, you may be confused about whether it’s better to create a subsite and place it under the main PMO portal site or simply create a new site.
My recommendation here is to create a new site for the following reasons:
- If you create a subsite, you will likely run out of server resources and storage right away.
- There may be times when you need to share content with external guests.
Note: This is an interesting topic so I decided to write a stand-alone article about sites vs site collections in SharePoint.
Now, in the end, the decision lies with you. But regardless, don’t forget to update your project progress tracker with the links:
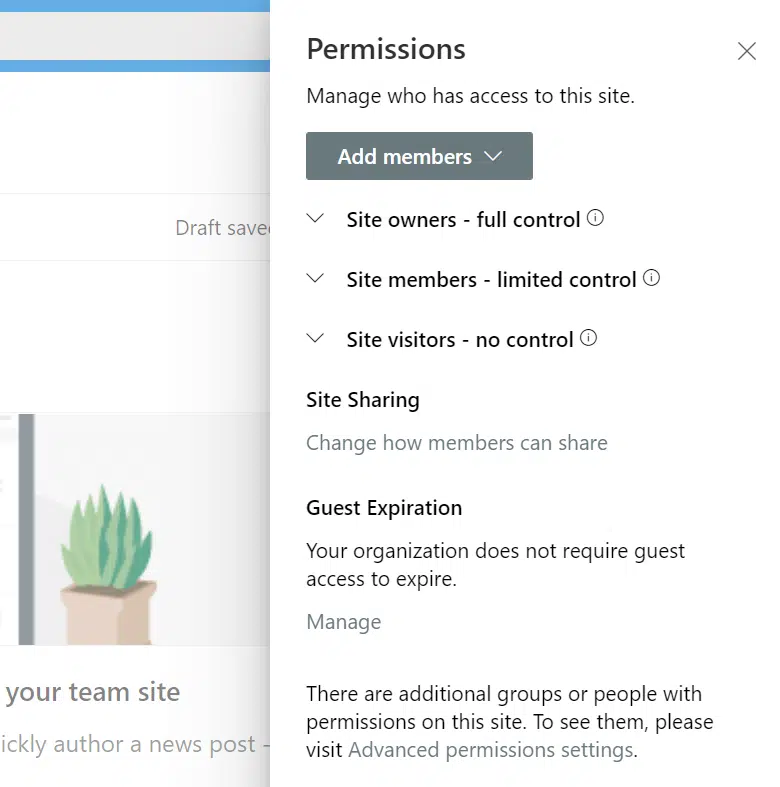
Step 5: Configure the permissions of the project site
Permission levels basically refer to “how much access” you give to a particular user or group to do actions on the site.
To configure your site permissions, follow these steps:
- Click the gear icon on your site
- Click “Site permissions” from the settings panel
On the next panel, you will be able to change the permissions for site owners, members, and visitors of your site.
There’s also a button for:
- Site sharing
- Managing guest expiration
- Advanced permissions settings
Now, permissions and security in SharePoint are topics of their own, so I suggest the following articles for more information:
- SharePoint Permissions Explained: How Permission Levels Work
- SharePoint Security: The Best Practices Guide for 2022
Step 6: Sync permissions in the hub
If you have created different sites for your projects, then you can group them together in a hub — with the PMO portal as the hub site.
To proceed:
- Click the launcher icon on the upper-left side
- Click the “Admin” option
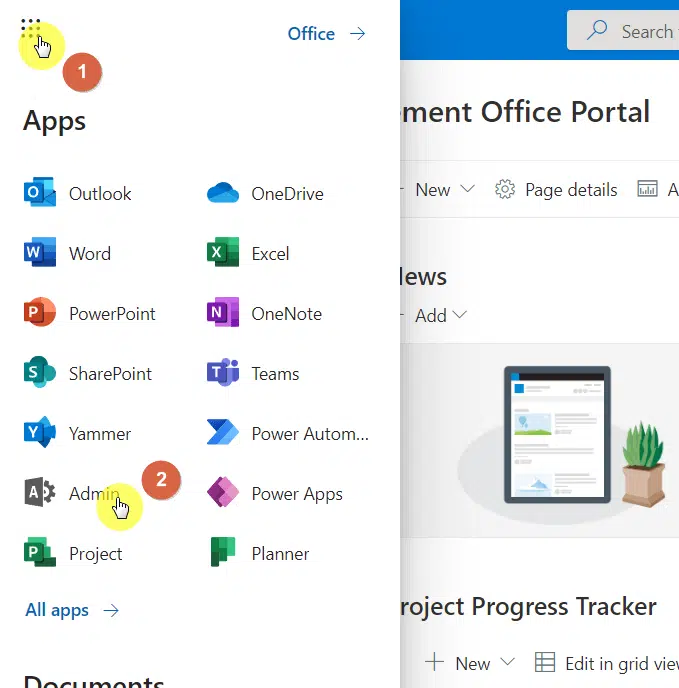
Expand all the admin centers and choose “SharePoint” from the list:

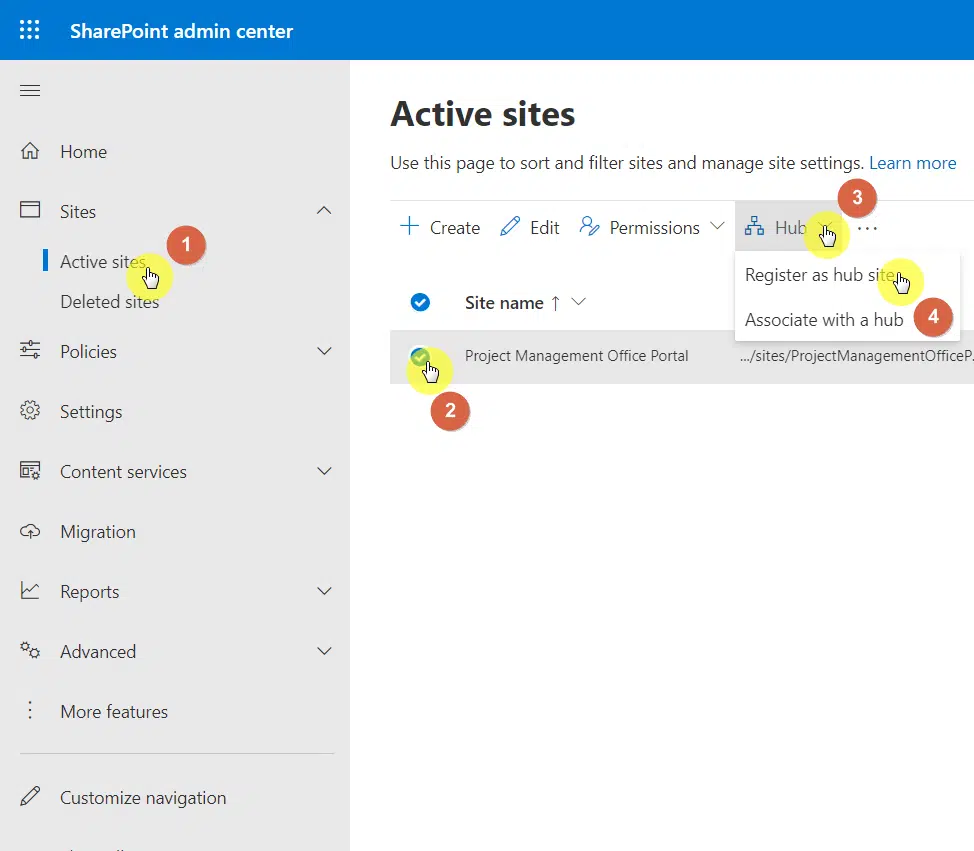
What you need to do now is register the PMO portal site as a hub site.
Follow these steps:
- Go to the “Active sites” page
- Search and select the project management portal site from the list
- Click the “Hub” in the command bar
- Select “Register as hub site” from the options
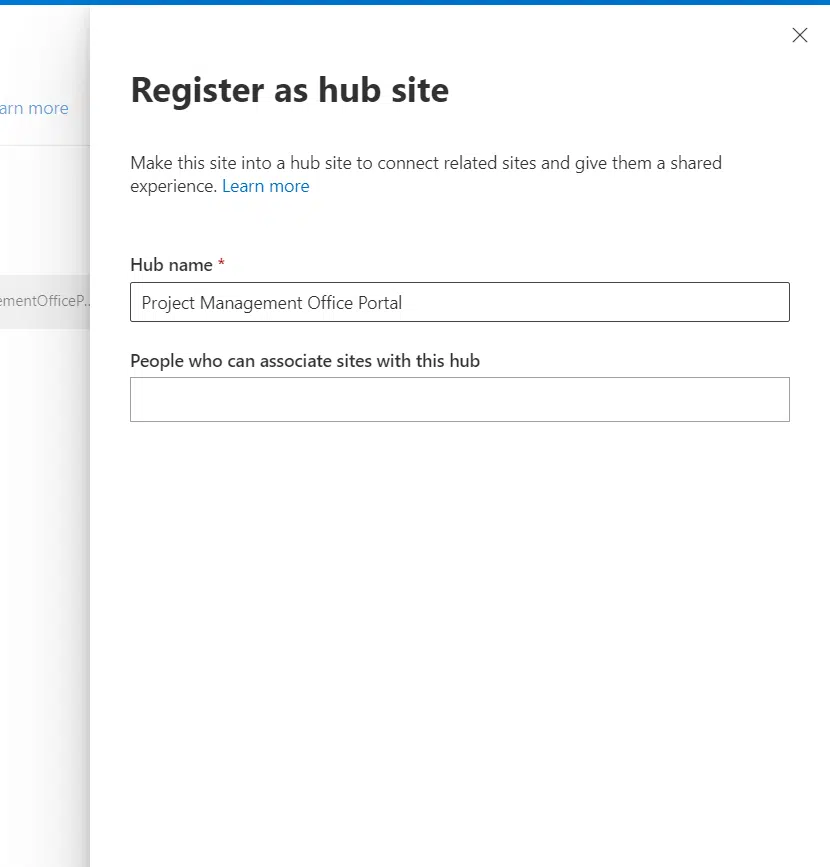
Right after that, the system will ask you to name the hub and those who can associate sites with the hub (optional).
Click on the “Save” button once you’re done:
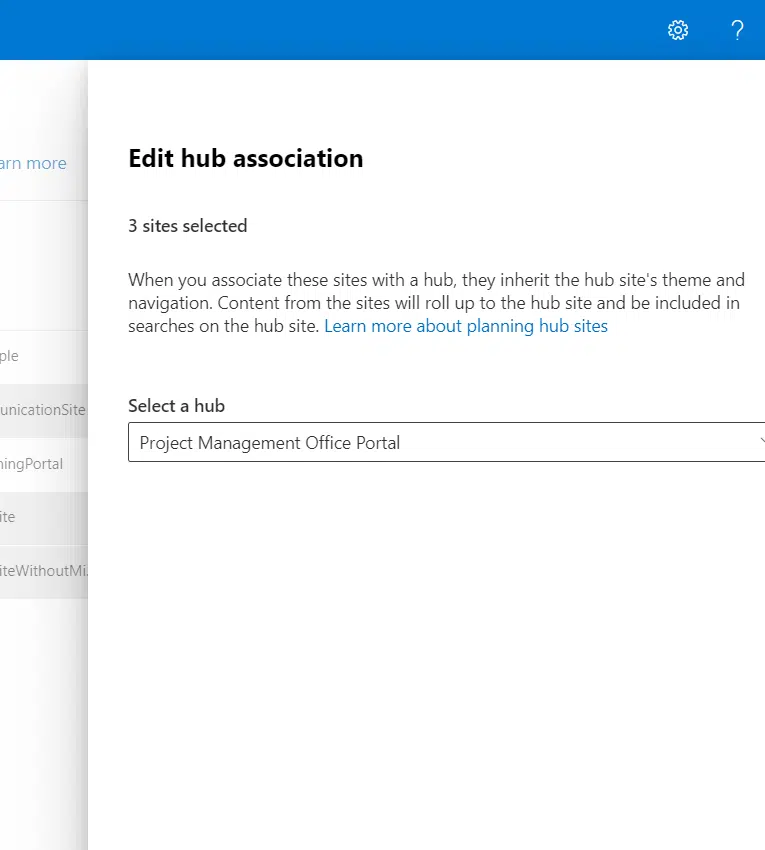
Now, to associate sites to the hub:
- Select those sites to associate (can be in bulk)
- If you selected more than one site, click the “Bulk edit” button on the command bar and then select “Hub association”
- If you selected only one site, click the “Hub” button on the command bar and select “Associate with a hub”
The system will then ask you to select the hub to associate those sites. Select the hub and click the “Save” button at the bottom.
Now, to save time, you can sync hub permissions to associated sites.
Follow these steps:
- Go back to the hub site (which is also your PMO portal site)
- Navigate again to the “Site permissions” panel (instructions in the previous step)
You will now notice a new tab in the panel named “Hub”.
- Turn the sync feature to “On”
- On the “Hub visitors”, enter “Everyone except external users”
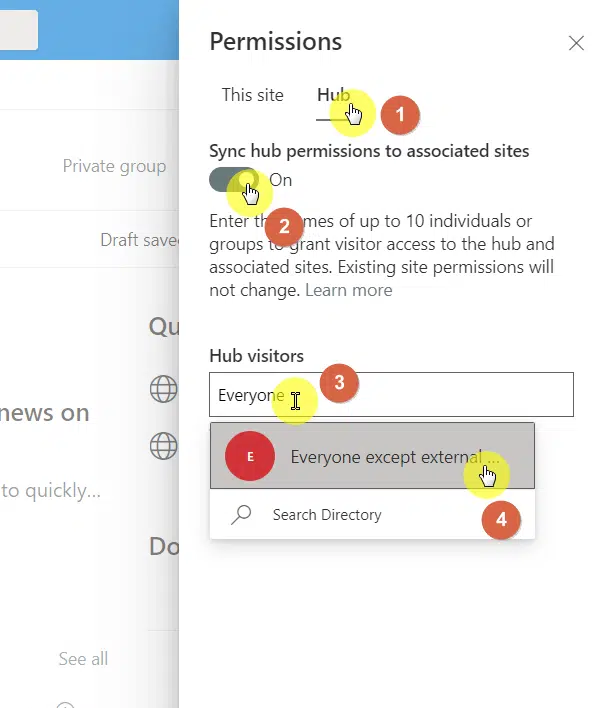
This type of permission will force your project team users to manually invite and share a project site with an external user if there’s a need.
That’s it! This was a bit lengthy article but I hope you were able to set up your project management office portal in SharePoint.
Naturally, I didn’t cover literally all the side steps like further customization and other extra steps you can take.
Those are steps you can take on your own and there’s no one way to outline those steps since what you want for your site matters.
But anyway, do you have any questions? If so, feel free to leave a comment below to start a discussion.
For inquiries and other concerns, kindly use the site’s contact form to reach out and I’ll get back to you as soon as possible.


There are also ways to combine SharePoint, Teams, Power Automate/Outlook, & Power BI for some cool set-ups, like this downloadable template: https://powerusers.microsoft.com/t5/Power-Automate-Cookbook/Project-Tracker-SharePoint-and-Teams/td-p/1788102
I just read your tutorial on SharePoint project management offices (PMOs), and I found it to be a very informative and practical guide for those who are looking to use SharePoint to support their project management practices. Your explanation of the role of SharePoint in supporting project management processes was particularly compelling. One of the points that stood out to me the most was your discussion of the benefits of using SharePoint for project management. As you noted in your tutorial, SharePoint provides a centralized platform for managing project-related documents, tasks, and communication, which can help improve project efficiency and… Read more »