
Table of Contents:
- Tip 1: Use “People you choose” for sensitive files
- Tip 2: Don’t Use the ‘Anyone’ Option — Ever
- Tip 3: Set an expiration date on shared links
- Tip 4: Enable view-only mode when editing isn’t required
- Tip 5: Turn off download permissions when needed
- Tip 6: Review ‘Shared With’ regularly
- Tip 7: Use permission groups instead of individuals
- Tip 8: Avoid breaking inheritance unless absolutely needed
- Tip 9: Use alerts to track changes or access
- Tip 10: Educate your team on smart sharing habits
Last Updated on April 17, 2025
Want to implement a better sharing of documents?
In this guide, I will share a few document-sharing tips that you can apply in SharePoint Online.
Let’s get started.
Tip 1: Use “People you choose” for sensitive files
When you’re sharing a document in SharePoint, you will get different options like:
- Anyone
- People in your organization
- Only people with existing access
If you’re dealing with sensitive files, stuff you really don’t want floating around, “People you choose” is your safest bet.
You can find it in the sharing settings when sharing a document:
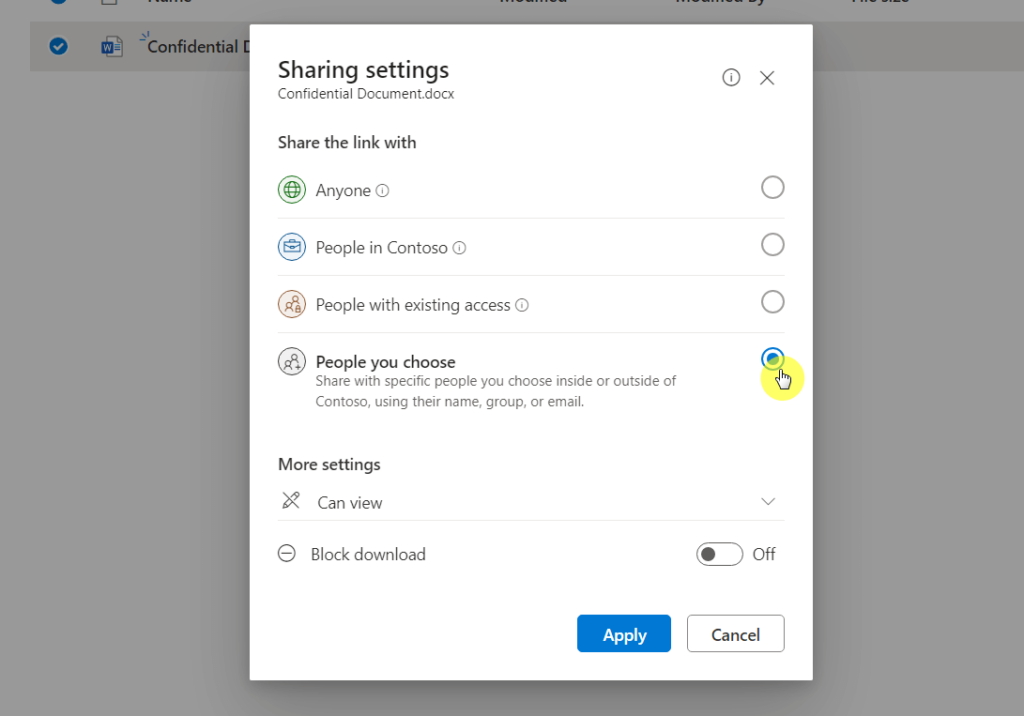
You will then be able to type in the exact names or email addresses of the people who should have access and their permissions.
Once that’s done, only those named people will be able to use the link, even if someone forwards it to someone else.
It keeps your sensitive files locked down but still easy to collaborate on when needed.
Sign up for exclusive updates, tips, and strategies
Tip 2: Don’t Use the ‘Anyone’ Option — Ever
This setting lets literally anyone access your file, no sign-in needed, no way to track who opened it, and that’s a big red flag.
Even if you think, “I’ll just use it this once,” it’s still risky.
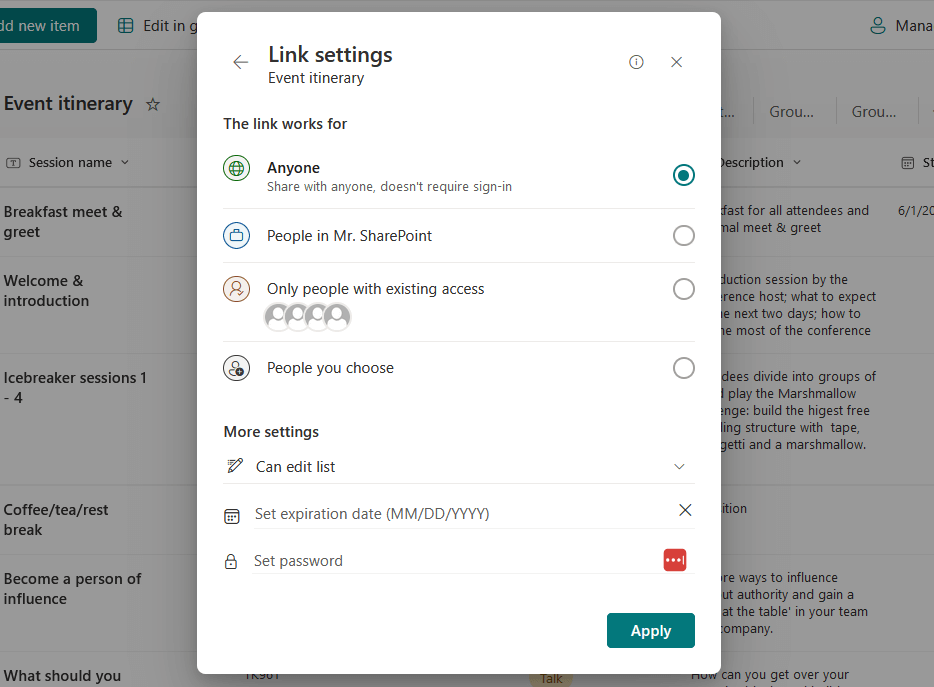
The link could get shared around without your knowledge, and you would have no control over who’s seeing your stuff.
Stick to sharing with people inside your organization or specific external users.
You will be able to manage permissions better, see who’s accessing what, and avoid those “oops” moments.
It’s just not worth the risk to use “Anyone,” even for small things (explained this somewhere, but can’t remember where).
Shared links can hang around longer than you think, so if you forget to remove them, people will still be able to access your files.
That’s not great, especially if the info is time-sensitive or no longer meant to be shared.
Adding an expiration date shuts that link down automatically after a certain day, and it’s nice that it’s the set-it-and-forget-it kind.
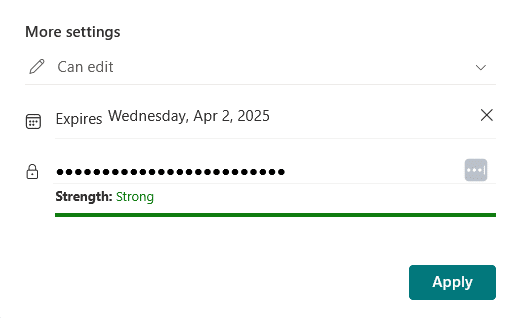
By the way, if you didn’t like my previous tip, and you still prefer to use “Anyone” links, well, expiration dates are your friend.
What’s even great is that you can choose to have expiration dates automatically on all “Anyone” links in the site.
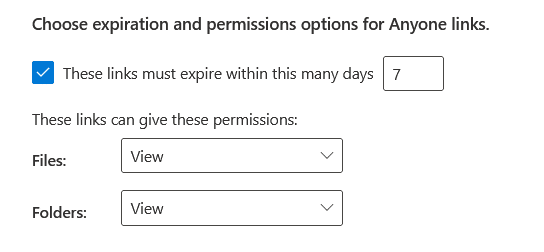
You can set that at the SharePoint admin center. 🙂
But once that date hits, the link goes dead, no one can use it; super handy for things like temporary access for files.
Tip 4: Enable view-only mode when editing isn’t required
View-only mode means the person you’re sharing with can open the file, look at it, but they can’t make changes or mess anything up.
It’s perfect for things like:
- Reports
- Finalized documents
- Anything you just want people to check out without touching
In the more settings section, just change from “Can edit” to “Can view” as shown here:
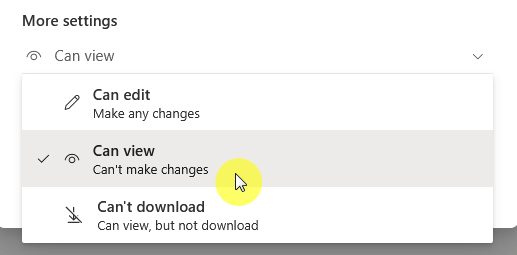
If you’re not sure where it is, this is the one above the set expiration date field. 🙂
After that, they will be able to view the file, but not alter it in any way.
It keeps your work intact, especially when you’re sending it to clients, teammates for review, or anyone outside your editing circle.
It’s a small setting, but it can save you from messy version problems.
Tip 5: Turn off download permissions when needed
Sometimes, you want someone to see a document, but not keep a copy of it, and that’s where this comes in handy.
As you can see, this is the next option available after “Can view”:
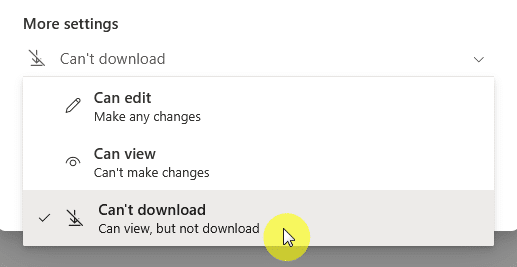
Turning off download permissions means the person can only view the file online; they can’t save it to their computer or print it.
It’s great for things like confidential drafts, pricing sheets, or anything you don’t want floating around beyond the session.
Over time, files get shared with all kinds of people, coworkers, vendors, maybe even folks who don’t need access anymore.
You can check it out per file/folder through the “Manage access” option:
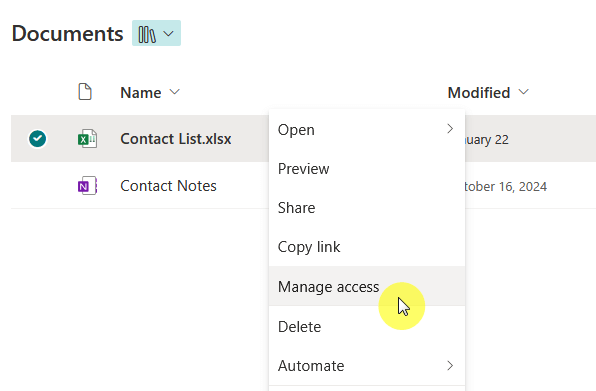
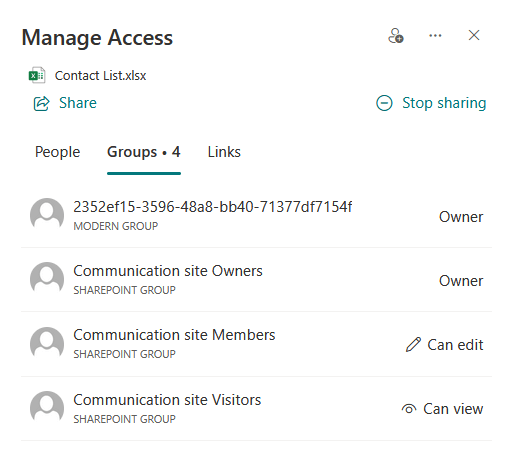
If you never check, those people might still have permission months later, so make sure to do a quick review now and then.
It takes less than a minute, and you will probably find a few people who no longer need to be on the list.
Tip 7: Use permission groups instead of individuals
I always emphasize this one whenever permission is brought up. 🙂
Instead of giving access to each person one by one, SharePoint lets you add people to groups, like owners, members, or visitors.
You give the group permissions, and whoever’s in the group gets the same access, which makes it easier to manage.

If the built-in groups don’t quite fit your setup, you can simply create your own custom SharePoint groups.
Here’s how using groups instead of individuals helps:
- If someone joins a team, just add them to the group, and they get access instantly.
- If someone leaves, remove them from the group. Done!
- No more hunting down 10 different file shares just to update one person.
This helps you stay organized without giving too much access to the wrong people and avoids the mess of one-off permissions.
I have many guides here in the blog about using groups, just search for them 🙂
Tip 8: Avoid breaking inheritance unless absolutely needed
“Inheritance” means a folder or file automatically follows the permissions of its parent, like the library or site it’s in.
When you break inheritance, you’re saying: “Nope, this item will have its own special rules.” Sounds useful, but it can get messy fast.
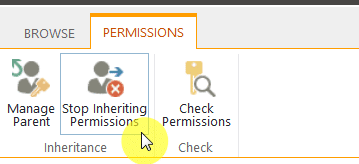
If you do this too often, it becomes hard to track who has access to what.
You will have to manage permissions for each item manually, which gets out of control as things grow.
My tip here is to only do this when you really need something to be locked down differently from the rest.
Otherwise, try sticking with the standard structure and using permission groups to manage access cleanly.
Trust me, it will save you from permission headaches later. 🤕
Tip 9: Use alerts to track changes or access
Alerts let you know when someone does the following on your content:
- Edit
- Delete
- View
It’s like having a little watchdog, super useful if you’re waiting on updates, or just want to keep an eye on sensitive files.
When you right-click on a document, you should see the option “Alert me”, then set an alert on the document as preferred.

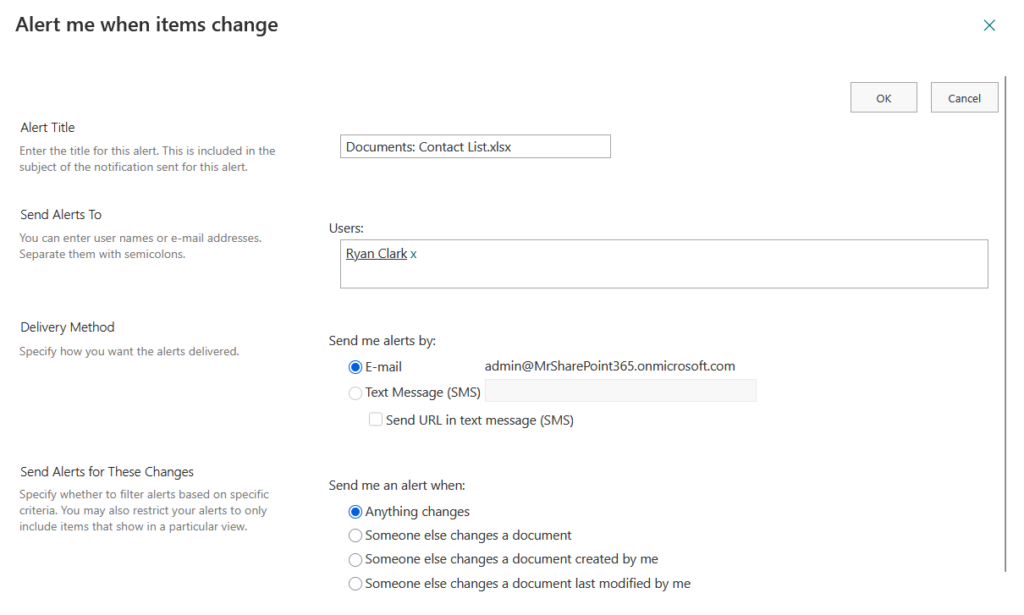
Choose your settings: what to track, how often, and where to send the alert.
You can get alerts by email or text, and you can control how often they show up: immediately, daily, or weekly summaries.
Once it’s on, you will get notified whenever something happens with that item.
Tip 10: Educate your team on smart sharing habits
This makes all the others even more effective, as even the best settings can’t save you if people don’t know how to use them.
Teaching how to share responsibly helps avoid mistakes like sending files to the wrong person or picking the wrong permissions.
Examples of what’s worth covering:
- When to use “People you choose” vs “People in your organization”
- Why “Anyone with the link” is usually a bad idea
- How to spot and fix oversharing
- When to set link expirations or block downloads
- How to review access and clean up old shares
It doesn’t have to be a full training course; just some quick, practical guidance can go a long way.
You could do:
- Short walkthrough
- Share a checklist
- Even make a quick video
Once people get the hang of it, they will be more confident, and your files will stay safer (after all, sharing wisely is a team effort).
Do you have any questions about the tips I gave for sharing documents in SharePoint? Let me know.
For any business-related queries or concerns, contact me through the contact form. I always reply. 🙂





























မဂ္လာပါhttps://www.mrsharepoint.com/wp-content/uploads/2026/05/shape-light-3-1779680287.0805.webp