

Table of Contents:
Last Updated on August 5, 2025
Struggling to maintain content consistency across your SharePoint environment?
In this guide, I’ll show you how to create, publish, and manage global content types for your workflows.
Let’s get started.
At its core, a content type in SharePoint Online is a reusable blueprint that defines a specific category of business content.
For example, an “Invoice,” “Legal Contract,” or “Marketing Report.”
Users create content using predefined types to ensure consistency and adherence to rules.
A content type is assembled from three main components:
- Metadata: A specific set of site columns that define the properties or information to be captured for that content.
- Document Template: A default file (e.g., a Word or Excel document) that provides a consistent starting point for any new document of this content type.
- Behaviors: Associated workflows or information management policies that automate business processes for the content type.
Every new content type you create is built upon a parent content type, inheriting their characteristics.
By the way, it’s important to know the distinction between:
- A site content type (the master blueprint created at the site level)
- A list content type (the local implementation of that blueprint within a specific document library)
The following table summarizes the key differences between these two types of content types:
| Type | Scope | Purpose |
| Site Content Type | Tenant-wide or Site Collection | The master, reusable blueprint for a category of content. |
| List Content Type | Specific Document Library or List | A local instance or copy of a site content type used in a library. |
Sign up for exclusive updates, tips, and strategies
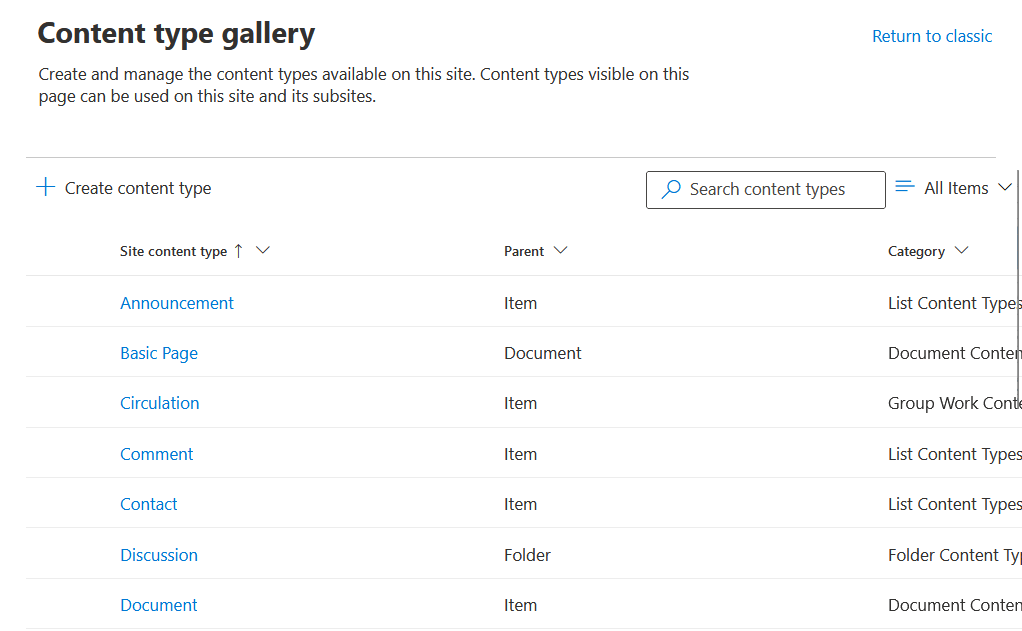
The Content Type Gallery
For enterprise content management, SharePoint’s Content Type Gallery acts as a central hub.
It’s where you can create and manage all enterprise site content types and their building blocks, site columns.
The strategic benefits of this centralized management are profound and far-reaching:
- Maximizes reuse: Component defined once, reused infinitely, reducing effort.
- Simplifies maintenance: Single update propagates to all instances.
- Improves compliance: Standardized metadata aids eDiscovery and retention.
- Enhances search: Consistent tagging improves information discovery.
You can find this content type gallery in the SharePoint admin center.
It uses a better “pull” model, where a content type is only copied to a site when a site owner actively adds it to a library.
Centralized management by a SharePoint administrator is essential to prevent metadata chaos.
How to Create a Global Content Type
This process is broken down into distinct phases, moving from strategic planning to final implementation.
Following these steps ensures your content types created are well-designed and correctly deployed.
Phase 1: Planning Your Global Content Type
Before you click a single button, it’s important to plan it all out first to avoid disorganization
A thorough planning phase should include the following key steps:
- Identify common, high-value document types (e.g., policies, contracts)
- Define only the essential metadata columns for each document type
- Determine the appropriate parent content type
Define only the essential metadata columns needed to classify and find it, resisting the urge to add columns “just in case.”
A key principle here is to start simple. 🙂
For most business documents, the appropriate choice will be the built-in “Document” content type.
Phase 2: Create Reusable Site Columns
With a plan in place, the next step is to create the content type shell and then add its site columns.
In the Content type gallery, click + Create content type.

Provide a singular name (e.g., “Policy Document,” not “Policies”), a clear description, and assign it to a category.
For the parent content type, select “Document Content Types” and then “Document.”
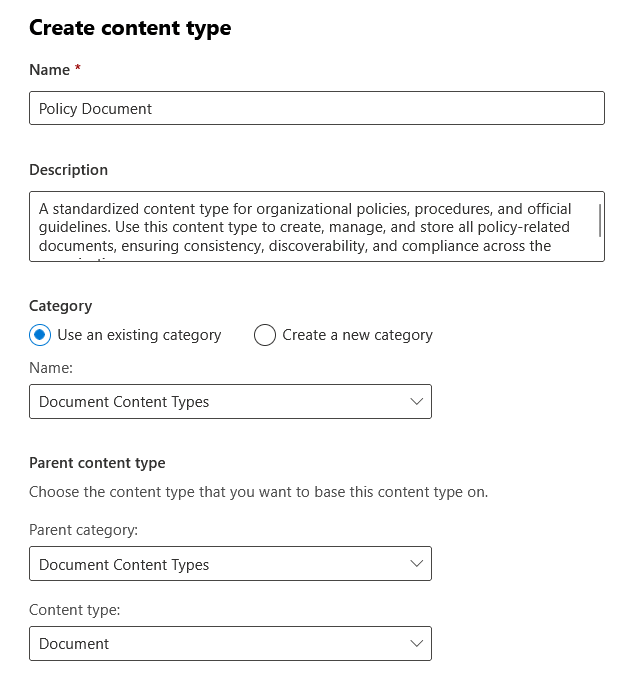
Click create, and you will be taken to the management page for your new content type.
On this page, under the “Site columns” section, click + Add site column.

You have a choice:
- To create a new reusable column
- To use a column that already exists
Select Create new site column and fill in the details (Name, Description, Type, Group).
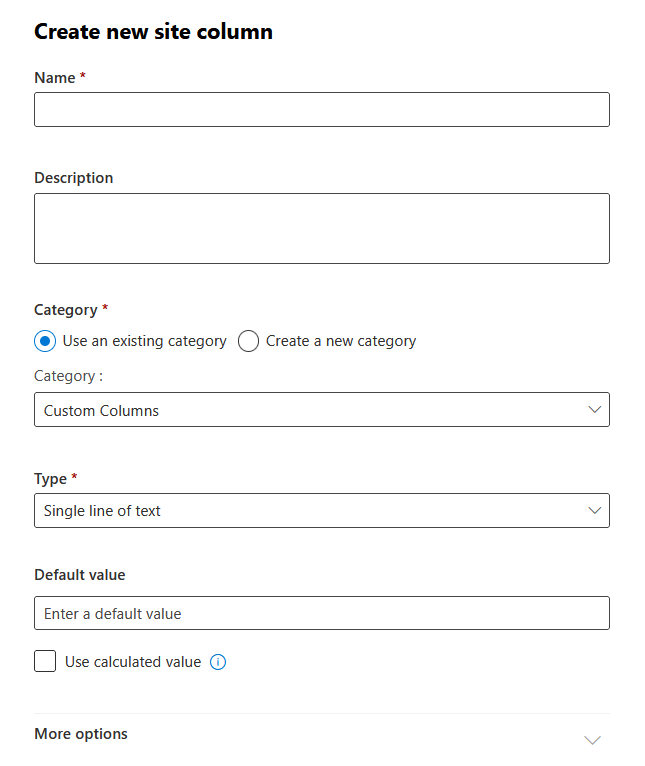
This creates a new site column that can be reused in other content types later.
Repeat this for all the metadata columns you planned for this content type.
To ensure consistency, associate a document template.
Go to Settings > Advanced settings and upload a Word, Excel, or PowerPoint file.

This file will now be the default when a user creates a new document.
Phase 3: Publish the Content Type
A content type created in the gallery isn’t available to other sites until you explicitly publish it.
From the list of site content types in the gallery, select the content type you just configured.
Click the Publish button in the command bar.

A “Manage publishing” dialog box will appear. Review the settings and click Save.

The content type is now published and available to be used by any site owner across the tenant.
If you ever modify this content type, you must repeat this process and choose the “Republish” option.
Once the content type is published from the Content Type Gallery, a site owner can add it to their document library.
Enabling Content Type Management in a Library
This is a mandatory first step for any library that needs to use custom content types.
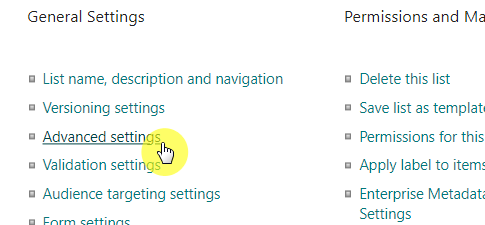
On your SharePoint site, navigate to the target document library.
Click the gear icon > Library Settings > More library settings.
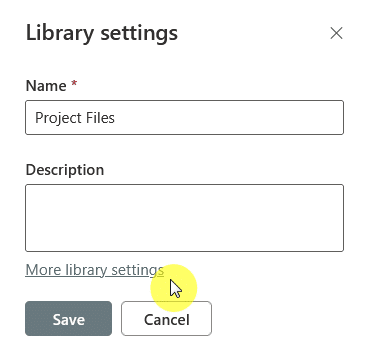
Go to the Advanced settings.
In the “Allow management of content types?” section, select Yes.
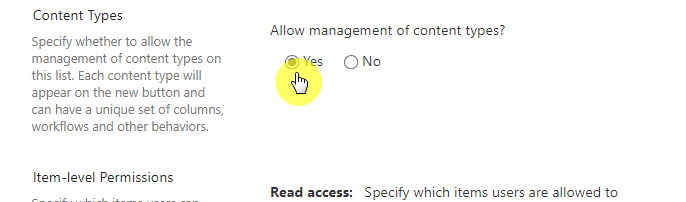
Scroll down and click OK.
Adding the Published Content Type to a Document Library
After enabling management, you can add the published content type.
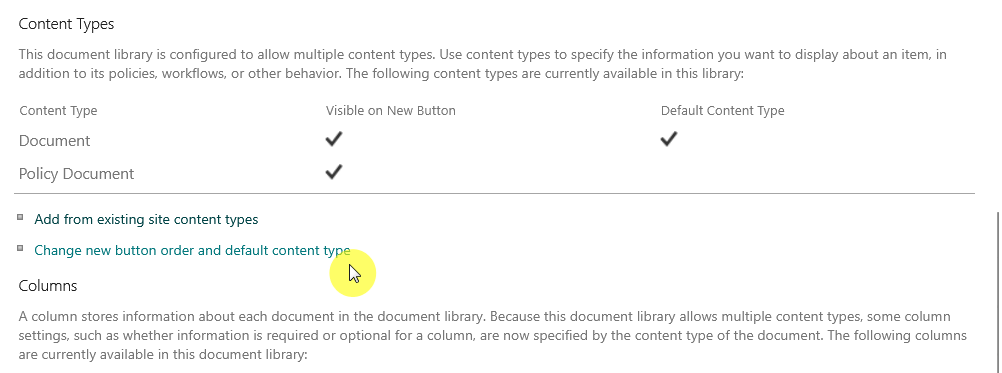
Go back to Library Settings. A new section named “Content Types” will now be visible.
Click Add from existing site content types.

From the list of available site content types, select your newly published global content type.
Click Add.

The content type and all its associated metadata columns are now successfully added.
How to Set the Default Content Type
The final step is to make your custom site content type the default choice to simplify the user interface for your team.
In the Library Settings, under the “Content Types” section, click the link titled Change new button order and default content type.
On this page, use the “Position from Top” column to change the order of your content type to 1.
To prevent confusion, hide the generic, built-in “Document” content type by unchecking the Visible box next to it.
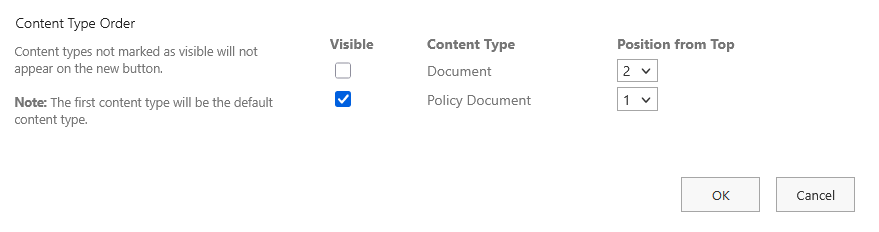
Click OK.
Now, when a user clicks the “New” button, your custom content type will be the default.
Advanced Governance and Best Practices
Long-term success depends on a solid governance strategy to protect your information architecture.
Managing global content types and enforcing organizational standards is the key.
To ensure the long-term health and scalability of your SharePoint environment, here’s what you can do:
- Protect the “read-only” state of a published content type to prevent unauthorized local changes
- Perform all updates exclusively within the central Content Type Gallery
- Always republish a content type after making modifications to distribute the changes
- Establish and enforce clear naming conventions for all site columns and content types
These can help ensure that the enterprise standard for each content type remains intact across all subscribing sites.
All modifications, whether adding a choice column or updating a document template, must be handled centrally.
Global content types and global navigation in SharePoint Online are distinct features.
Here’s a table that summarizes their fundamental differences:
| Feature | Global Content Type | Global Navigation | |
| Purpose | Governs the what: metadata, templates, and behaviors of content. | Governs the where: a consistent set of wayfinding links. | |
| Management | SharePoint admin center > Content Type Gallery. | Settings panel of the designated SharePoint Home Site. | |
| Primary Impact | How documents and items are created, tagged, and governed. | Navigation between sites and pages. |
In short, one governs the content type itself, while the other governs the navigation to find it.
They’re both essential tools in a SharePoint environment, but they’re entirely distinct in their function and administration.
Final Thoughts
Implementing a global content type in SharePoint Online is a strategic commitment to mature information governance.
The centralized Content Type Gallery allows organizations to impose order, intelligence, and consistency on their digital content.
A strong strategy transforms SharePoint from a file repository into a powerful enterprise content management system.
Do you have any questions about creating a global content type in SharePoint? Let me know!
For any business-related queries or concerns, contact me through the contact form. I always reply. 🙂


Good article Ryan. Since the early days of SharePoint content types have been the key feature for managing the life-cycle of documents and content stored in SP. Though less prominent in SP Online, content types still perform the fundamental content classification necessary for implementing retention schedules as part of that content life-cycle architecture. It’s too bad MS has watered down their importance and value with labels and such. These additional labels would have been a valuable augmentation to content types rather than a replacement for them.