

Last Updated on September 23, 2023
Got a subsite you want to transfer?
In this short guide, you will learn the legacy of subsites and how to move a subsite to another site in and outside its parent site collection.
Let’s get started.
Table of Contents:
The Legacy of Subsites
Before I show you the steps, I want to ask this first:
Do you really need that subsite? Will creating a new site collection and moving the files there take a more significant time?
The reason I am asking is that subsite is a legacy feature — and SharePoint Online seems to be moving to a flat structure hierarchy.
The newer site collections today have more features. You can also create a hub if you want to group similar sites together.
Related: How to Create a Hub Site in SharePoint Online (Guide)
Sign up for exclusive updates, tips, and strategies
Moving a subsite within the site collection
The subsite feature enables you to nest sites together.
In case you want to move a third-level subsite to another second-level site (the parent subsite), there is an easy way for that.
The solution is through the content and structure feature. Unfortunately, you will need to enter its link since you won’t find it in the site settings anymore.
Note: This only works if you move a subsite within the same site collection.
Copy and paste the link below — but change the tenant and site collection parameters to the parent site collection of the target subsite:
https://tenant.sharepoint.com/sites/sitecollection/_layouts/15/sitemanager.aspx
You will land on a page that looks like this:
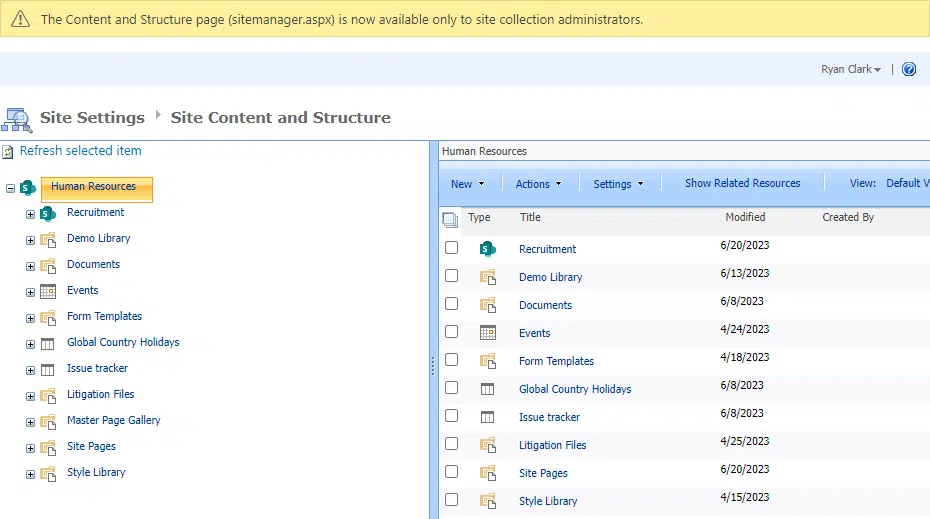
Note: This page is only available to site collection administrators and global administrators.
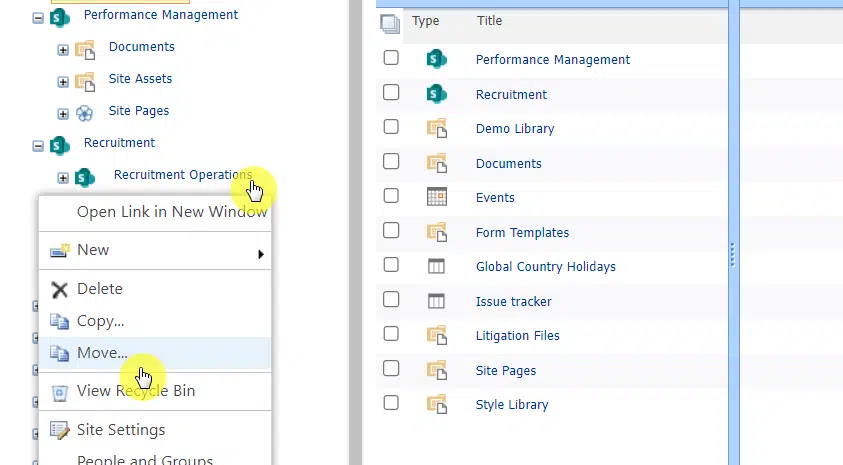
Step #2: Use the move operation
This page shows the sites, folders, lists, and libraries in the site collection and displays the hierarchy using a tree view.
Follow this set of instructions:
- Click the subsite you want to move
- Click the move operation
For example, there is this site named recruitment operations that I want to move to the performance management site.
Step #3: Choose the target location
After you click the move option, another window will show up.
Do these:
- Select the target SharePoint site
- Click the ok button
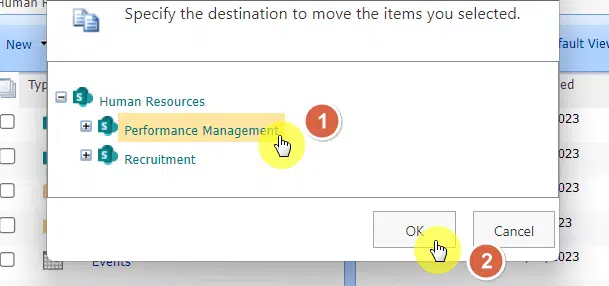
That should move the subsite to the site you specified.
If you encountered an error, that means you have to activate the publishing features first in the site collection.
There are a lot of steps here though that require you to:
- Visit the SharePoint admin center
- Allow the custom script in the tenant and site collection
- Activate the SharePoint Server Publishing Infrastructure
- Activate SharePoint Server Publishing
I will leave a link below to the site that talks more about the publishing feature:
Related: SharePoint Server Publishing Infrastructure (For Beginners)
Alternative: Use PowerShell
A good alternative to the steps above is to use PowerShell (credits here).
Copy and paste the command below and change the parameters that apply:
#Change the parameters here
$SiteURL  = "https://tenant.sharepoint.com/sites/sitecollection/subsite1/subsite2"
$NewSiteURL = "/sites/subsite3/subsite2"

#Connect to PnP Online
Connect-PnPOnline -Url $SiteURL -Interactive

#Get the Web
$Web = Get-PnPWeb

#Move the site to New URL by Setting relative URL
$Web.ServerRelativeUrl = $NewSiteURL
$Web.Update()
Invoke-PnPQuery
A little explanation here:
This will move subsite2 inside subsite3 (subsite2 is the name of the subsite you want to move).
There is another method you can use that works if you want to move a subsite to a different SharePoint site collection.
Note: You can still use this to move a subsite to the same site collection.
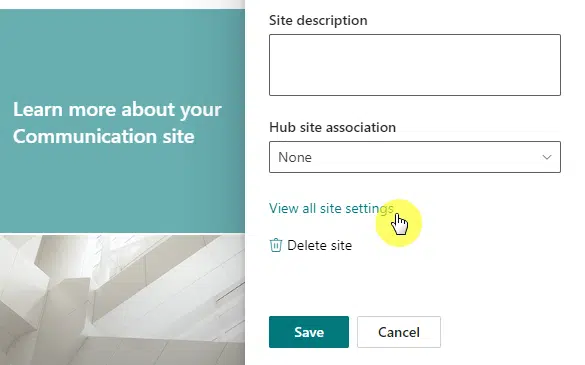
This time, go directly to the subsite and visit the site settings.
Here’s how to find it:
- Click the gear icon
- Click site information
- Click view all site settings
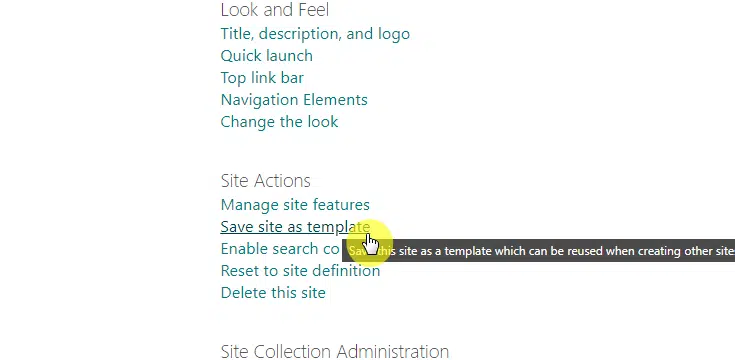
Step #2: Save the site as a template
Under the site actions group, click the save site as template link:
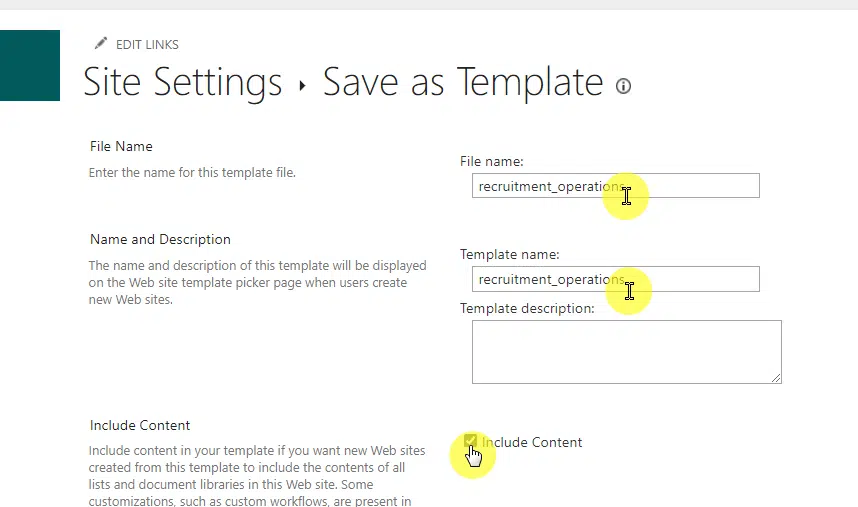
This classic feature will allow you to save the site as a template so you can create a site just like it in another location.
Follow these steps:
- Fill out the file name and template name.
- Check the include content button since you want to duplicate the site.
- Click the ok button.
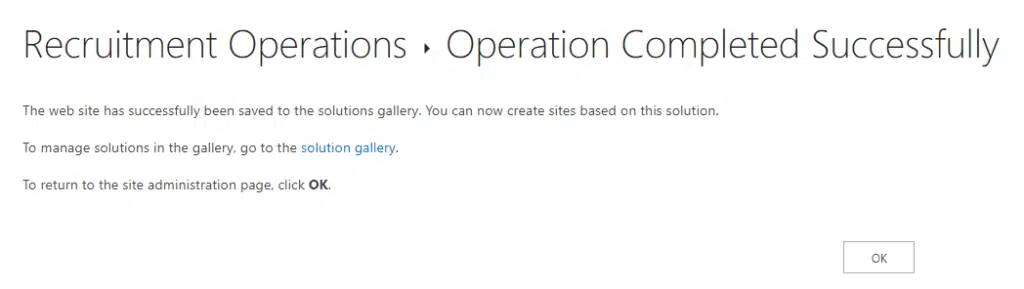
Give it a few minutes to complete the operation.
After the site template has been created, you will see something like this:
Related: How to Create a SharePoint Site From Template: Full Tutorial
Step #3: Create a new subsite
Go to the destination site where you want to move the subsite.
You need to create a new subsite here. If you’re not sure how to do it, it’s like this:
- Go to the site contents page
- Click the new button
- Select the subsite option

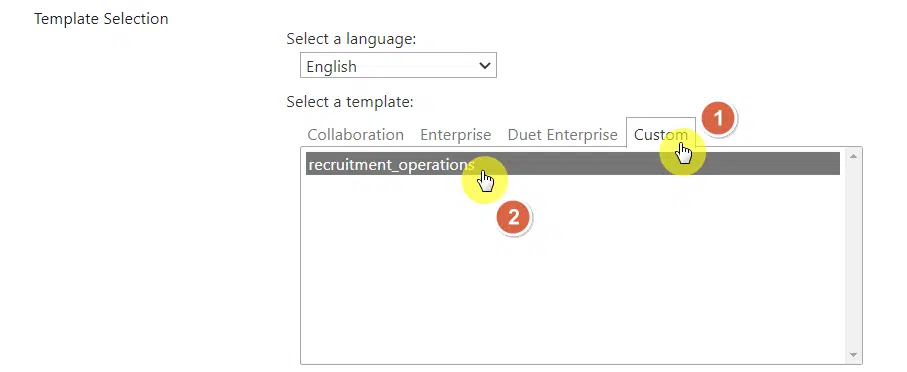
Fill out all the details as usual.
But on the template selection part, go to the custom tab and select the site template you just created:
That’s it!
Since the content was included in the template file, that will also copy all the contents of the subsite when the template was created.
Stuck up somewhere? If that’s the case, feel free to leave a comment and tell me where you got stuck.
For business-related questions and concerns, you can send me a message through the contact form here.


😪