

Table of Contents:
If you’re on Microsoft 365 and paying for a separate ticketing tool, I’d ask one question before your next renewal.
What are you actually buying that you don’t already own? M365 Business Standard already includes everything this system needs:
- SharePoint
- Microsoft Forms
- Power Automate
- Microsoft Teams
Zendesk Suite Team runs $55 per agent per month on an annual plan. Freshdesk Pro is priced identically.
Spin that out to a 10-person IT team and you’re looking at $6,600 a year or more for software that overlaps with tools already in your tenant.
I’ve built this exact system for clients more than once. The incremental licensing cost is exactly zero.
What This System Looks Like
My setup rests on four pieces you already have. Each one does a single job, and they hand off to each other cleanly.
| Layer | Tool | What It Does |
|---|---|---|
| Intake | Microsoft Forms | Captures the request from the end user |
| Database | SharePoint Lists | Stores every ticket as a structured item |
| Automation | Power Automate | Routes, assigns, and notifies, no manual steps |
| Management Interface | Microsoft Teams | Where technicians work the queue day to day |
The flow is simple once you see it. Here’s the path a ticket takes from submission to assignment:
- A user submits the form and Power Automate catches the response.
- The flow writes a new item to your SharePoint list with a generated ticket ID.
- A second flow reads the category or priority and assigns the ticket to the right person.
Your technicians never touch the form or the raw list if you don’t want them to.
They live in Teams, where the list is pinned as a tab and notifications land as cards. That’s the part most teams underestimate.
Sign up for exclusive updates, tips, and strategies
I’d start here, because the list is the spine of the whole system. Don’t build it from a blank list.
Microsoft ships a purpose-built IT Help Desk site template that pre-populates a Tickets list, a Devices list, an FAQs page, and a Documents library.
Provision it through Teams and every SharePoint component gets pinned as a tab in the General channel automatically. That saves you a setup step right out of the gate.
From there, shape your Tickets list columns to match how your team actually works. Here’s the schema I use as a starting point:
- Ticket ID (single line of text, populated by automation)
- Issue / Title (single line of text)
- Description (multiple lines of text)
- Requester Name (single line of text)
- Requester Email (single line of text)
- Submitted By (single line of text or Person)
- Category (choice)
- Priority (choice: Low, Medium, High, Critical)
- Status (choice: New, In Progress, Waiting on User, Resolved, Closed)
- Assigned To (Person or Group)
- Created On (date and time)
- Resolution Notes (multiple lines of text)
- Closed On (date and time)
That “Submitted By” column is not optional: Power Automate runs as a service account, so SharePoint’s built-in “Created By” shows the automation account, not your user.
Here’s what that column setup looks like in SharePoint:

Capture the requester’s identity from the form into a dedicated column, or every ticket looks like the robot filed it.
Last thing: build your filtered views for Open Tickets, Assigned to Me, High Priority, and Overdue; they’re free and turn a flat list into something a tech can actually triage.
Step 2: Create the Intake Form
Now the front door.
Build a Microsoft Form with the fields your flow needs to populate the list:
- Requester name
- Issue title
- Description
- Category
- Priority
Here’s what that looks like in the form builder:
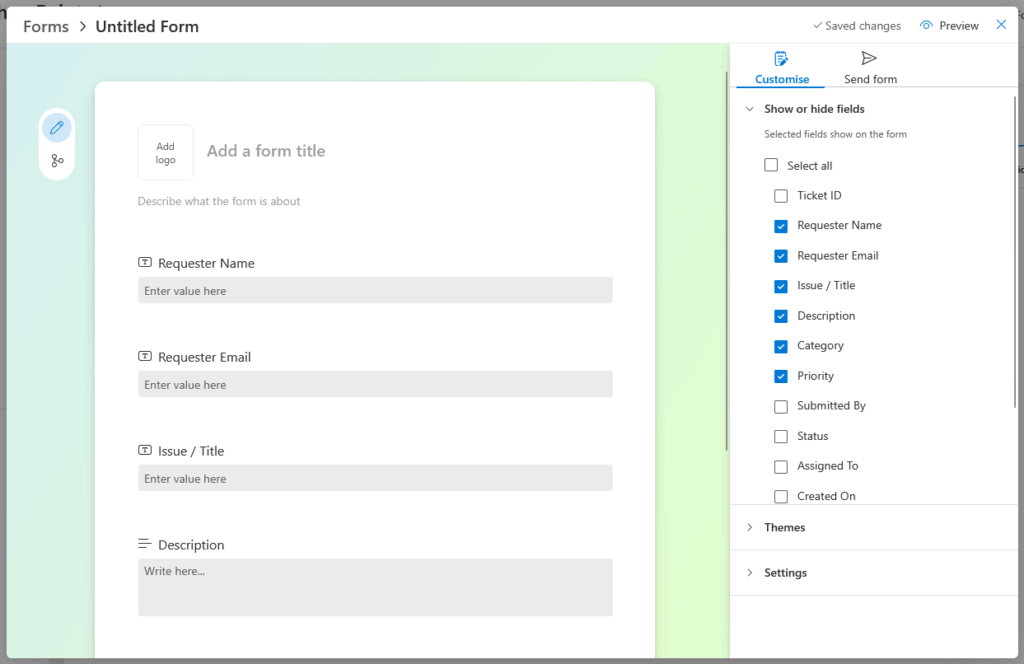
Keep it short. A form nobody can find is a form nobody uses, and that’s where most internal help desks quietly die.
Drop the form’s URL into the M365 Admin Center as a custom app tile (Settings → Org settings → Organization profile → Custom tiles for Apps).
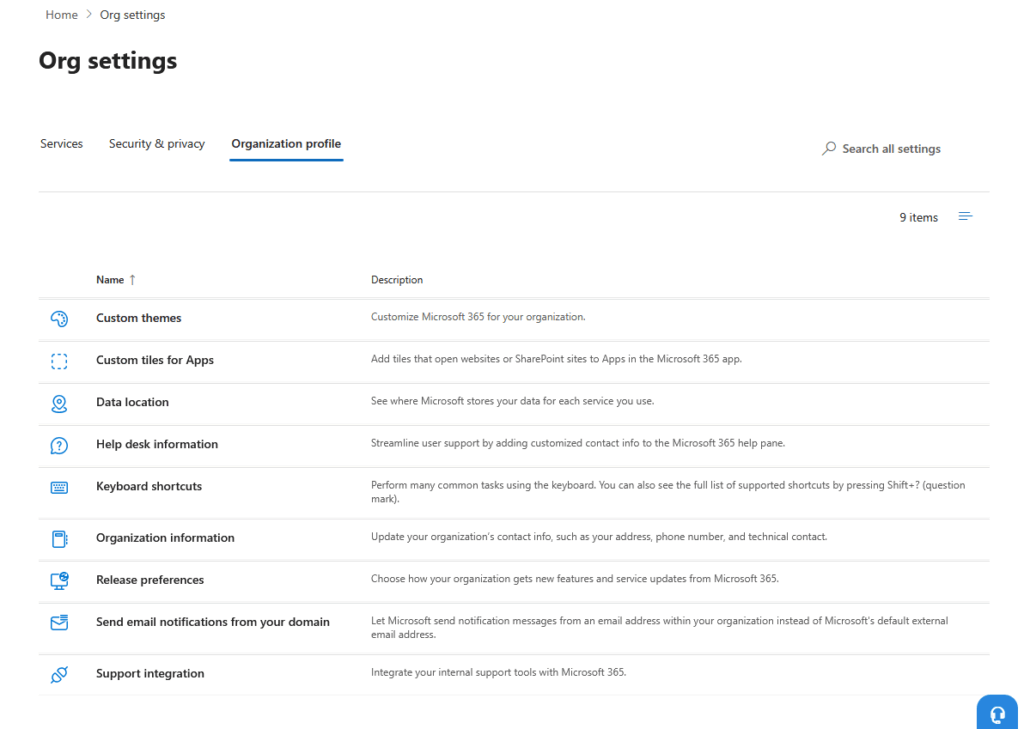
It shows up in everyone’s MyApps portal, right next to the apps they already open daily. Give it up to 24 hours to appear.
For the end user, that’s the whole experience. They open one tile, fill out a few fields, hit submit, and get a confirmation email with their ticket number.
No new login, no new tool to learn.
Step 3: Build the Intake Automation
This is Flow 1, and it’s the workhorse.
Before building it manually, there’s a shortcut: Copilot in Power Automate can scaffold this entire flow from a single prompt.
When a new response is submitted to a Microsoft Form, get the response details, then create an item in a SharePoint list called "Tickets" with the requester's name, email, issue title, description, category, and priority from the form. After the item is created, update it to add a Ticket ID using the format TCK-[current year]-[item ID]. Finally, send a confirmation email to the requester with their ticket number.
It generates the right skeleton: trigger, get response details, create item, update item, confirmation email.
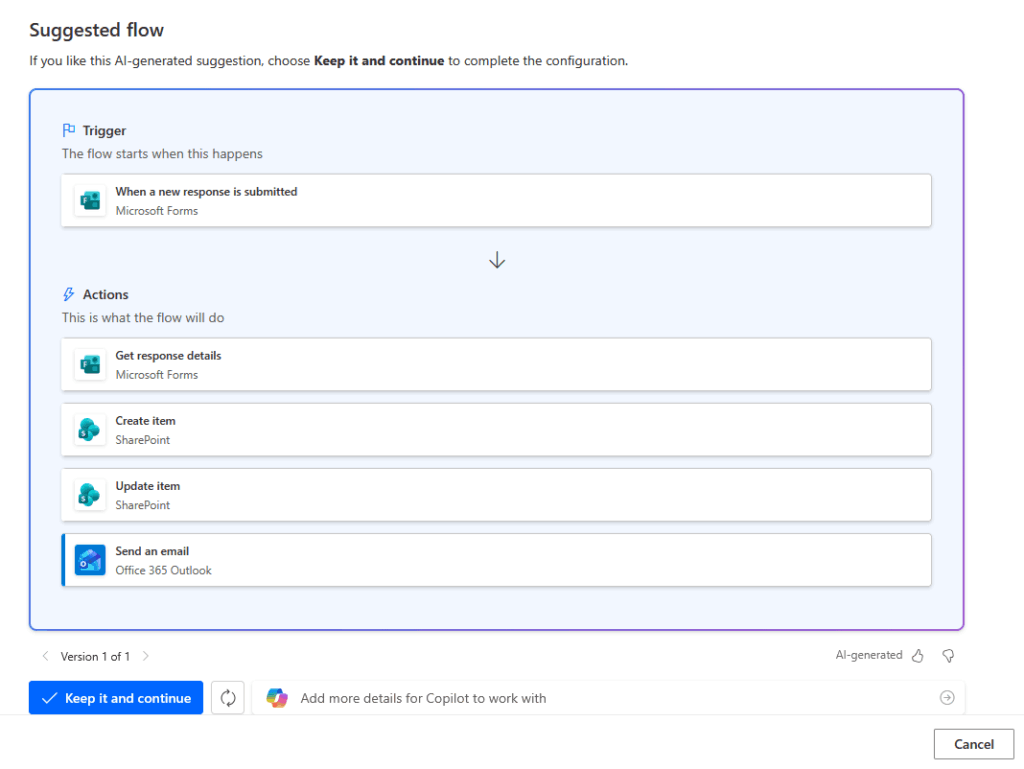
You still need to map the fields and add the ticket ID expression, but the structure’s there. Here’s how I set it up in Power Automate:
- Trigger: “When a new response is submitted” on your form
- Action: “Get response details” to pull the field values
- Action: SharePoint “Create item,” which writes the form data into your Tickets list
- Action: SharePoint “Update item,” which stamps the ticket ID (the item’s record number isn’t available until the item is created, so this step always runs second)
The expression I use for the ticket ID:
concat('TCK-', formatDateTime(utcNow(),'yyyy'), '-', outputs('Create_item')?['body/ID'])That produces clean, readable ticket IDs like TCK-2026-104. Finish the flow with an Outlook action that emails the requester their confirmation and ticket number.
Remember the “Created By” problem from Step 1? This is where you fix it.
When you map the form fields in your “Create item” action, push the requester’s name and email into your Submitted By column explicitly.
Don’t rely on SharePoint’s automatic author field. It’ll only ever show the service account, and you’ll lose all visibility into who actually opened each ticket.
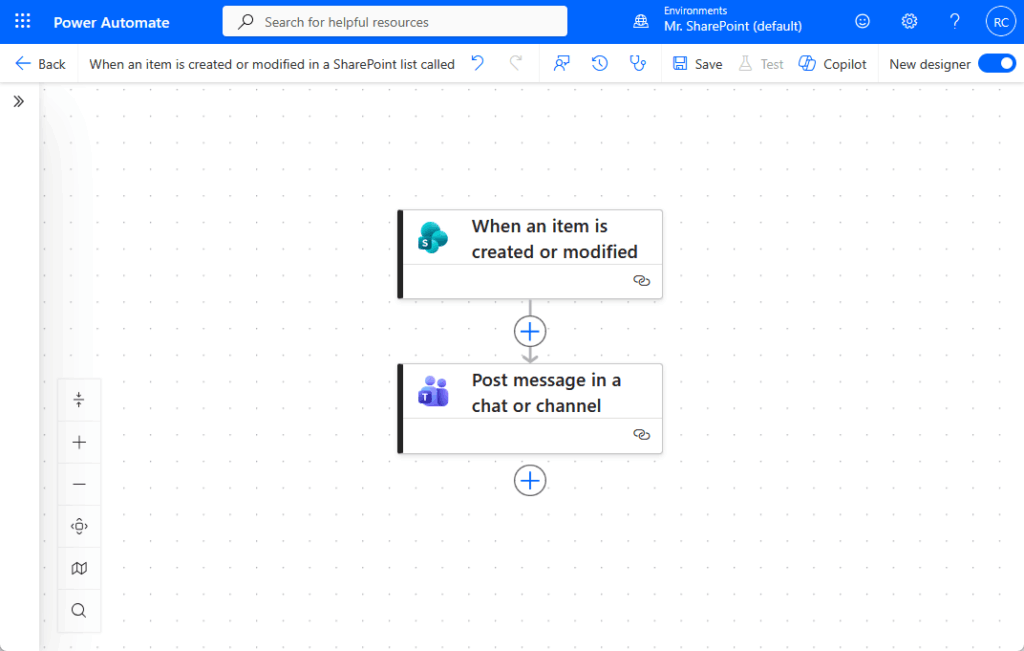
Step 4: Set Up Routing and Notifications
Flow 1 captures tickets. Flow 2 moves them.
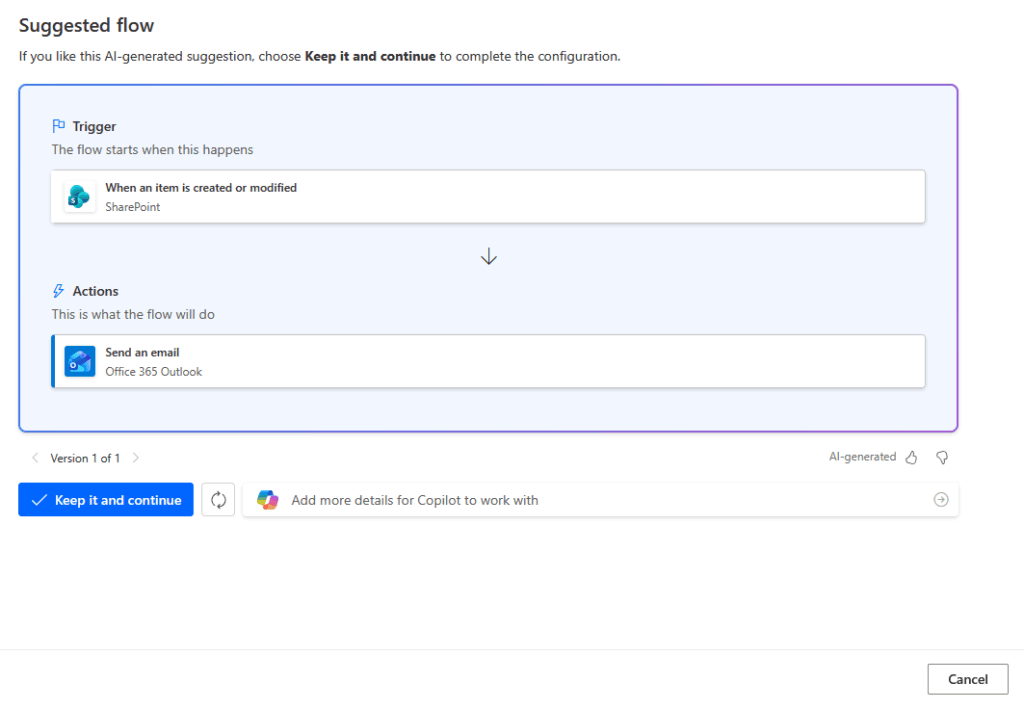
Copilot can’t scaffold this one fully: the conditional branching is outside what the preview handles today. A simplified prompt still gets you a workable starting point:
When an item is created or modified in a SharePoint list called "Tickets", send an email to a technician with the Ticket ID, issue title, priority, and category from the list item.
That generates the trigger and a basic email notification.
From there, you’ll add the Status = “New” condition to prevent over-firing, the category branching for routing, and swap the Outlook email for a Teams Adaptive Card.
Here’s the full setup:
This second flow uses the SharePoint trigger “When an item is created or modified,” then branches on a condition.
I route by Category (network issues to one tech, access requests to another) or by Priority, set the Status, and assign the technician.
Then notify them. I push these through Teams as Adaptive Cards rather than plain email, and the difference in response time is real.
A card shows the Ticket ID, Title, Priority, Category, and a direct link straight to the SharePoint item.
One gotcha will bite you here if you skip it.
The “When an item is created or modified” trigger fires on every edit, so the flow re-runs every time a technician updates a ticket, looping endlessly.
Add a trigger condition limiting it to Status equals “New” and the over-firing stops.
For anything that needs sign-off (software access, hardware purchases, elevated permissions), drop in the standard “Start and wait for an approval” action. No premium connector required.
Approvers can respond right from Outlook, a Teams card, or the Power Automate approvals hub. It’s one of the most underused free features in the whole stack.
Step 5: Bring It Into Teams
Teams is where your technicians should live. Pin the Tickets list as a tab in your IT channel, one click from where they already work.
I’ll say it again because it matters: use Adaptive Cards, not plain email, for notifications.
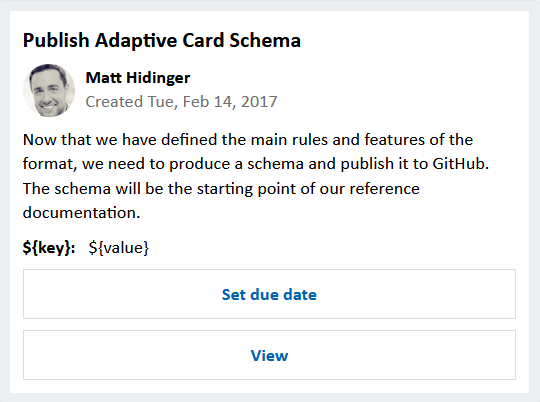
Source: adaptivecards.io
A card is interactive and self-contained, so a tech can read everything they need and jump to the ticket without leaving the conversation. Plain emails get buried.
On channel strategy, I keep it simple for smaller teams. One IT channel with the list pinned and cards posting to it is usually enough.
Split into multiple channels only once volume genuinely demands it, otherwise you’re just adding places to check.
What This System Won’t Do
I’d be doing you a disservice if I pretended this setup matches a dedicated platform feature for feature. It doesn’t.
Here’s the honest accounting:
| What You Get | What You Don’t |
|---|---|
| Structured ticket capture and storage | Native SLA tracking and escalation |
| Automated routing and assignment | A self-service status portal for end users |
| Teams-native notifications via Adaptive Cards | AI-based ticket routing |
| Approval workflows at no extra cost | Unlimited automation runs on the free tier |
A few of these have workarounds:
- No native SLA management: a scheduled flow with a due-date column and Power BI gets you most of the way.
- No self-service portal: a SharePoint view filtered to the requester’s email, or a Power Apps canvas app, fills that gap.
- Volume ceiling: the free tier gives you roughly 750 flow runs a month on standard connectors. Plenty for a 20-person company, tight for a busy 100-person one.
Consolidate flows where you can, or move to Power Automate Premium at $15 per user per month if you outgrow it.
So who’s this right for? In my experience, it’s a strong fit for teams under roughly 50 people with moderate ticket volume and someone comfortable in Power Automate.
Processing hundreds of tickets a day, or need contractual SLA reporting and AI triage out of the box? That’s the point where a dedicated tool earns its price tag.
Build It This Week, Or Have It Done Right
Most smaller teams can stand this up in three to five days. A fuller build with custom routing and Teams integration typically lands inside two weeks.
That said, no code doesn’t mean no expertise, and a few specific spots trip up most DIY builds:
- The “Submitted By” column: Power Automate creates tickets as a service account, so you need a dedicated column for requester identity or every ticket shows the automation account as the creator
- The over-firing trigger: “when an item is created or modified” fires on every edit until you add a condition limiting it to Status equals “New”
- The run-count ceiling: roughly 750 flow runs a month on the free tier is comfortable for small teams but tightens as volume scales
If you’ve got the time and patience, this guide covers all three. Work through them in order and you’ll have a functioning help desk by week’s end.
Still routing IT requests by email and tired of paying per agent for something you may not need? Skipping the trial and error is a reasonable call.
I help teams build Microsoft 365-native help desks on the licenses they already own, configured to hold up from day one. Reach out and let’s talk.


