
Last Updated on May 24, 2025
Want to get more from your libraries but not sure where to start?
In this guide, I’ll walk you through the most useful library settings in SharePoint Online.
Let’s get started.
Table of Contents:
SharePoint library settings are the options and features you can configure to control your library’s behavior.
You can think of them as the “settings menu” or control panel for all your files and folders in SharePoint.
With library settings, you can:
- Change how your documents are displayed
- Set permissions for different people and groups
- Enable features like versioning and approval
- Manage columns and metadata
- Control document retention and compliance
- Add automations, alerts, or rules
- Customize the look and feel of the library
Almost every part of how you use a SharePoint library connects back to these settings.
For example, versioning lets you recover files if someone overwrites them, and unique permissions keep sensitive documents private.
Even something as simple as customizing the columns can make it much easier to sort and find documents in your daily work.
Sign up for exclusive updates, tips, and strategies
Finding library settings in SharePoint Online is straightforward once you know where to look.
To open library settings:
- Go to your document library
- Click on the gear icon (⚙️)
- Click the library settings option
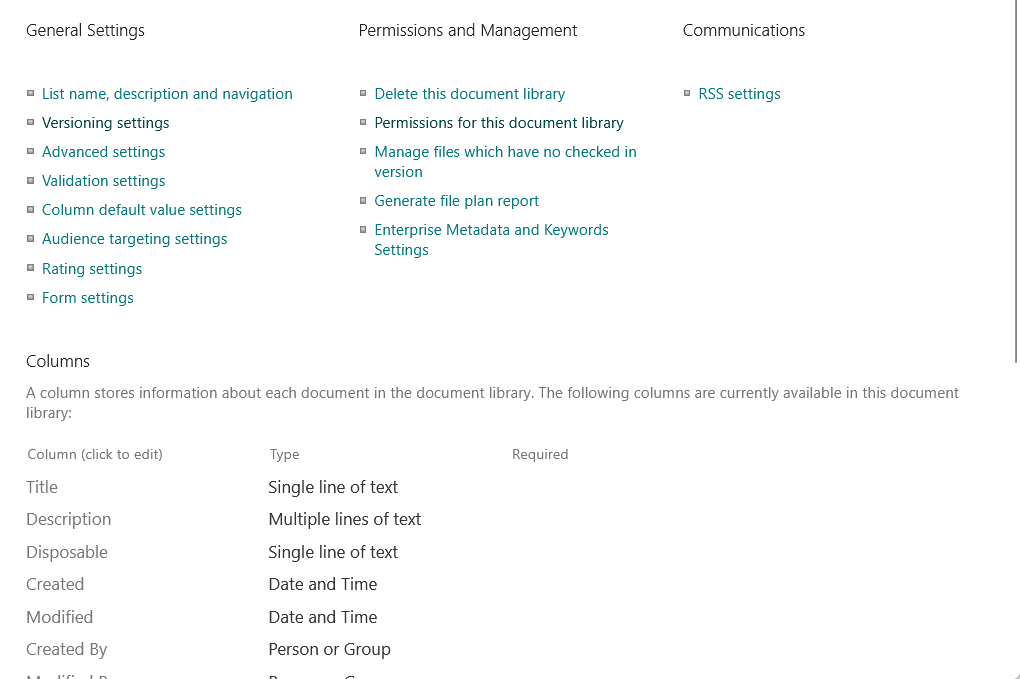
The library settings page opens, and you will see all available configuration options, grouped into sections.
Each section lets you adjust different parts of your library.
Note that you may not have permission to change the settings if you don’t see these options.
Contact your site admin if you need more access.
Some organizations limit access to prevent mistakes, so it’s always a good idea to check.
Document Library Customization
SharePoint lets you customize libraries in lots of ways.
You can change the columns, the default view, add metadata, and make the library look and work just the way you want.
How to add or remove columns?
Columns let you add extra information to your documents, like tags, owners, dates, statuses, or project names.
They’re a powerful way to organize files and make them easier to find.
To add or remove columns:
- Go to your document library
- Click add column at the top (or the “+” symbol)
- Pick the type of column you want

Column types include text, date, choice, person, yes/no, number, and more (through the see all column types button).
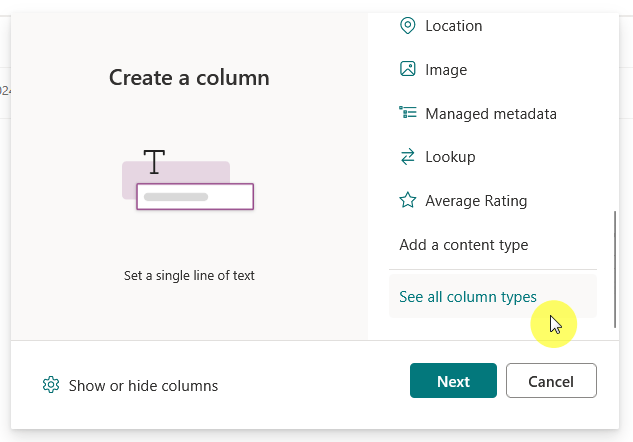
Name your column and set any options, such as choices for a drop-down menu or requiring the column.
Click save and your new column will appear right away.
To remove a column, click the column header, select column settings, and then edit.
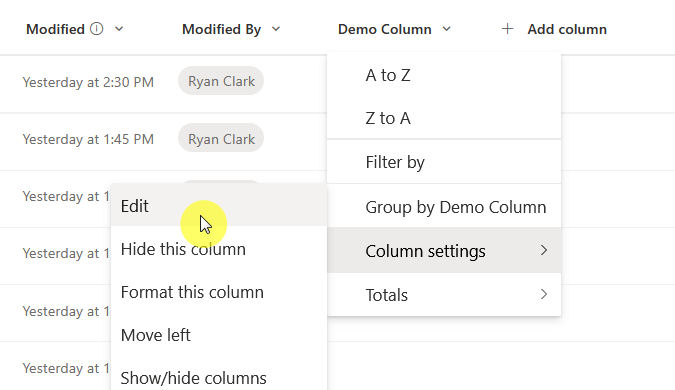
This will bring you back to the panel where you created the column, and there you will see the delete button.
Columns can also help you filter, sort, and group documents quickly.
For example, you can group by project or filter by status with just a click, to make file organization much easier.
How to change the default view?
The default view controls how users see your library:
- What columns show
- How it’s sorted
- Which filters or groups are applied
A well-designed view helps everyone find what they need faster.
Click all documents (or your current view) at the top of your library.
Then choose the format current view to adjust the layout or save view as to create a new custom view.
You can also pick from existing views like grid, list, or tiles.
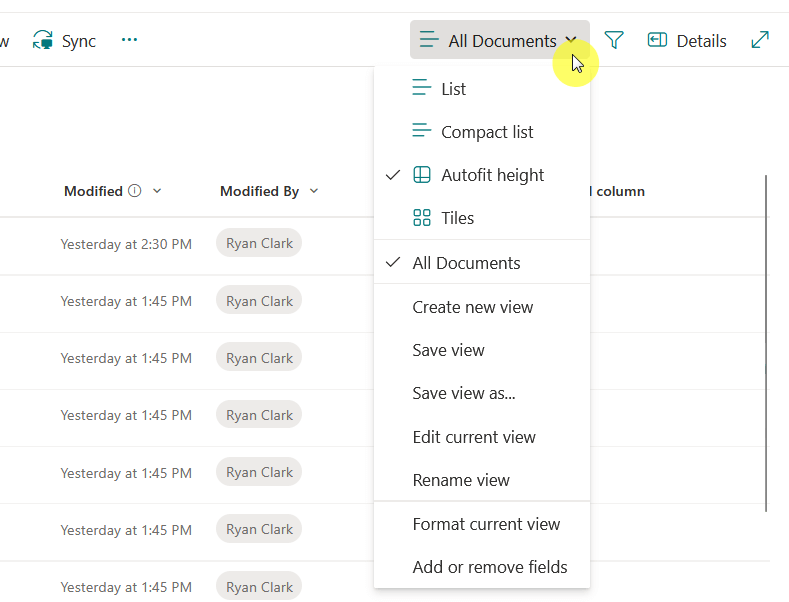
You can add filters to show only certain files, group documents by columns, and rearrange which columns are visible.
Save your view (still from the dropdown), then set it as the default if you want everyone to use it.
But note that only users with permissions can change the default for all.
Managing Access and Security
One of the biggest strengths of SharePoint is how granular you can get with permission settings.
You can control exactly who sees what, who can edit, and who can just view.
How to set/assign unique permissions for a document library?
By default, libraries inherit permissions from the SharePoint site collection.
But sometimes, you want tighter control, like maybe only certain people should see sensitive files.
For that to happen, you need to break permissions inheritance first:
- Go to library settings.
- Under permissions and management, click permissions for this document library

From there, click stop inheriting permissions so changes you make only affect this library.
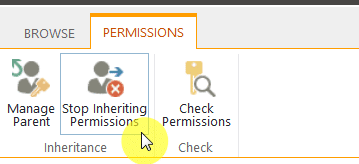
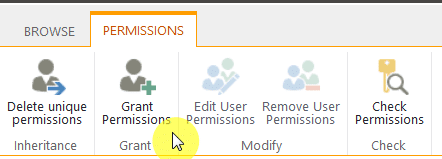
Now, you can add or remove users or groups and give them specific access levels (read, contribute, edit, full control, etc.).
Be careful: making permissions too complicated can cause confusion or lock people out.
Always document changes and let your team know.
Can you require check-out before editing documents?
Requiring check-out means people have to “check out” a document before making changes.
This prevents multiple people from editing the same document at the same time and helps avoid conflicts.
But the answer is yes:
- In library settings, click versioning settings
- Set the require documents to be checked out before they can be edited to yes.
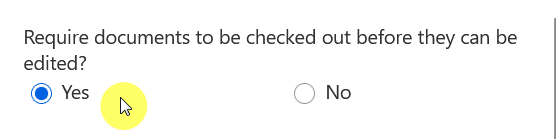
Then save your changes.
When check-out is on, other users can’t edit the file until it’s checked in again.
This is great for important documents, but can slow down teamwork if you have lots of quick edits, so use it only when needed.
Managing Document Versions
SharePoint versioning is a lifesaver. 🛟
It keeps a record of all changes, helps you recover old versions, and lets you see who changed what and when.
How to enable versioning in a document library?
Go to the versioning settings page once again (the one you opened above).
Choose whether to keep major versions only (for published changes) or both major and minor (drafts).
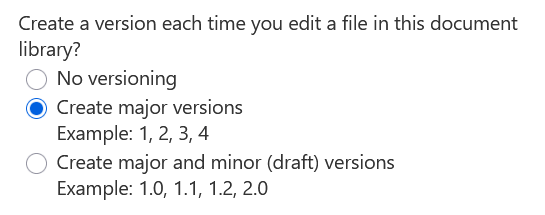
You can also set how many versions to keep (older versions are deleted once the limit is reached).
Then click the ok button to save the changes.
With versioning on, every change creates a new version you can go back to if needed.
What’s the difference between versioning and content approval?
When we say versioning, it keeps a history of document changes (who, when, what).
Anyone with access can see or restore previous versions, depending on user permissions.
Content approval, on the other hand, requires documents to be approved before they’re visible to everyone.
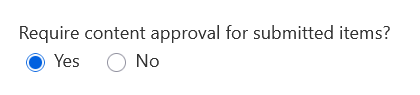
Turn this on in versioning settings as it’s useful for libraries with draft processes or sensitive info.
What’s nice is that you can use both together for tight control, or just versioning for basic tracking.
Content approval is especially handy in libraries with lots of contributors or public-facing content.
How to restore deleted documents from a library?
Deleted files go to the site’s recycle bin.
You have a safety net if someone accidentally deletes a document.
- Go to the site (not just the library)
- Click recycle bin in the upper-left corner
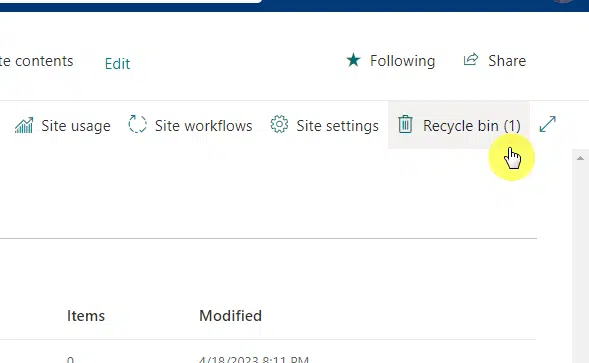
Find your file and click the restore button.
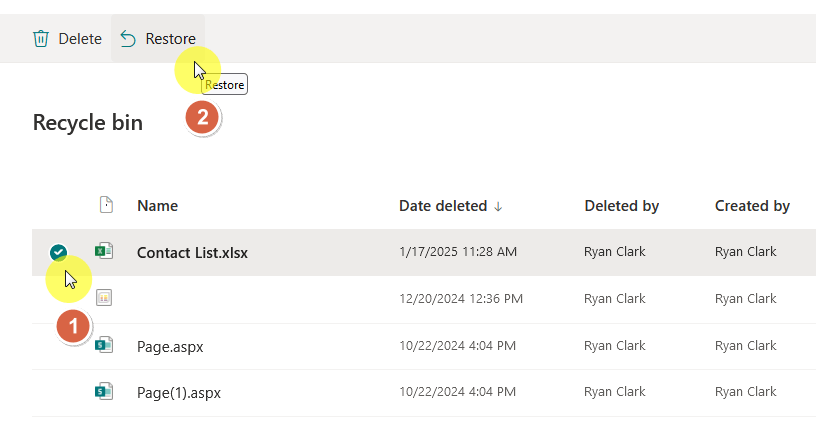
Files stay here for 93 days by default before permanent deletion.
After that, they’re gone for good, unless your admin has backups.
Automate Tracking and Activity
SharePoint can alert you or your team about changes, helping you stay up to date without constantly checking the library.
Can you set alerts for document changes?
Yes! You can get emails when files are added, edited, or deleted to keep you in the loop and help spot changes right away.
- In your document library, select a file (or the whole library)
- Click the three dots (…) next to the file, or from the command bar
- Select alert me

Set your alert options:
- Choose how often to get alerts (immediately, daily summary, or weekly
- What changes to get notified about
- Where to send alerts

Click OK to finish.
You can also manage and turn off alerts from the manage my alerts section in your profile.
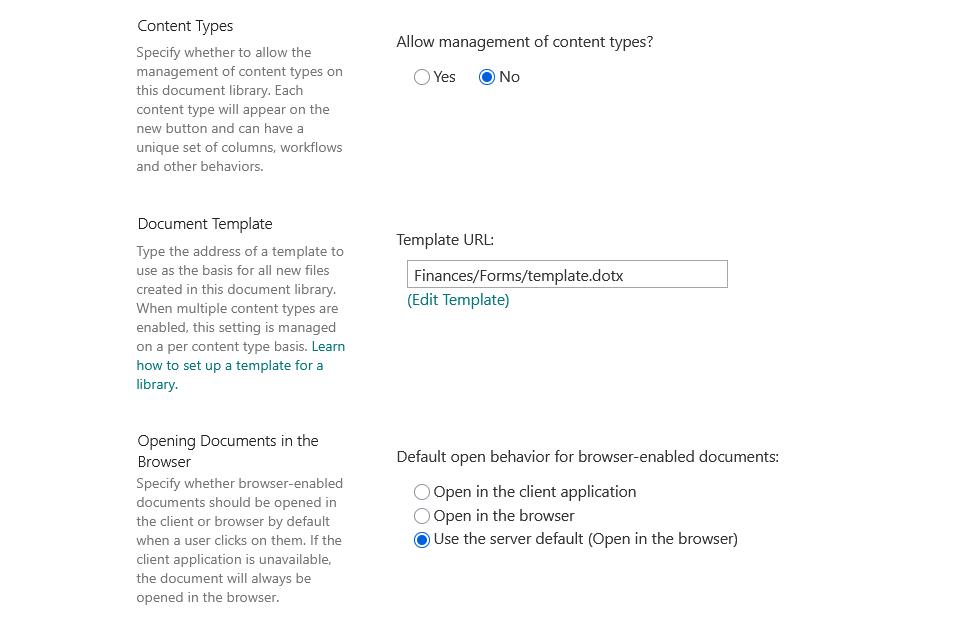
What advanced settings to consider?
Some settings are hidden under “advanced settings” in library settings.
These options can unlock more features for power users or special situations:
- Allow management of content types (lets you use different templates or metadata for different files)
- Choose whether documents open in browser or desktop apps
- Set up custom templates (so new files use your format)
- Enable or disable folder creation (great for flat libraries)
- Manage item-level permissions (let users see only files they added)
Most people only need the basics, but admins or advanced users may want to experiment here.
Take note: Always test changes before rolling out to your whole team to avoid any unfortunate situations. 😅
Settings for Compliance or Retention
SharePoint helps with record-keeping and compliance, which matters if your business has strict rules.
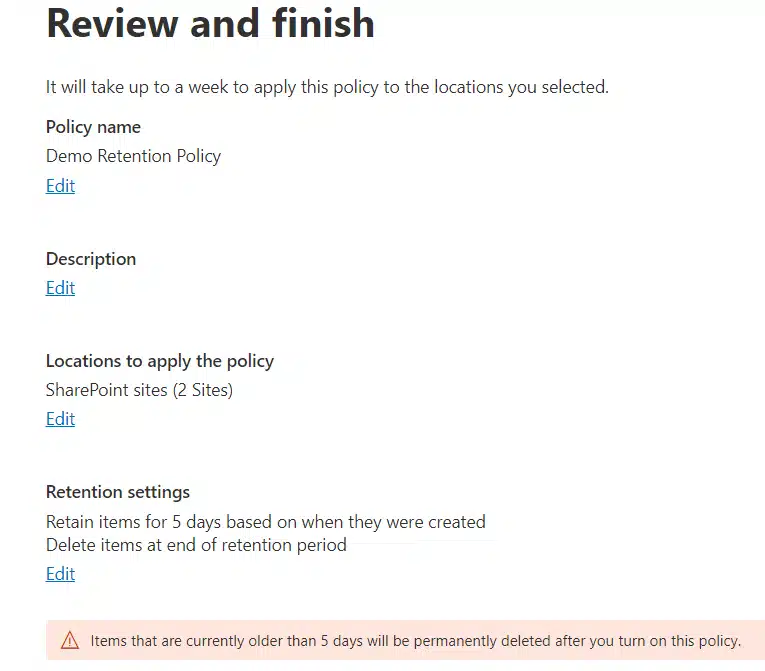
Are there settings for document retention or compliance?
Yes, there are settings for:
- Retention policies for auto-delete or archiving
- Information Management Policies for auditing, labeling, or workflows
- Auditing to track and report file actions
But take note that many of these, like retention policies, require admin setup and may connect with Microsoft Purview.
Talk to your SharePoint or compliance admin to configure these.
They often require higher permissions or setup outside the library itself, especially in large organizations.
Can you reset all settings to default?
Unfortunately, there’s no single button to reset everything, but you can manually:
- Remove custom columns
- Reset views
- Revert permissions
For big resets, sometimes it’s easier to create a new library and move your files over.
If you’re unsure, check with your admin before deleting or resetting anything.
What are the most common mistakes to avoid?
Some settings can cause headaches if you’re not careful (and unfortunately, it can still happen).
Here’s what to watch out for and what to do:
| Issues | Solutions |
| Removing columns used in views or workflows | Double-check before deleting columns |
| Overcomplicating permissions | Keep permissions as simple as possible |
| Forgetting to turn on versioning | Always enable versioning |
| Using check-out for fast-paced teams | Avoid check-out unless necessary |
| Making too many custom views | Limit the number of custom views |
| Not documenting your changes | Record all changes for easy rollback |
| Ignoring alerts or compliance policies | Review alerts and compliance regularly |
Keep things simple and document any changes you make so you can undo them if needed. 🙂
Anyway, do you have any questions about the library settings I showed you here? Let me know.
For any business-related queries or concerns, contact me through the contact form. I always reply. 🙂


