

Table of Contents:
Last Updated on August 4, 2025
Struggling to figure out the best way to share your Microsoft Form?
In this guide, I’ll show you everything you need to know about how to share Microsoft forms for responses?
We’ll cover everything from basic permission settings to advanced strategies for enterprise-level collaboration.
Let’s get started.
Understanding Sharing Permissions and Roles in Microsoft Forms
Before you share a form, it’s essential to understand the foundational concepts that govern who can see and interact with it.
The permissions available to you are directly tied to your role and the type of Microsoft account you’re using.
Getting this right from the start is the key to avoiding most common sharing issues.
Owner, Collaborator, and Respondent
Microsoft Forms projects have three defined roles, each with different access and control levels.
Understanding these roles is the first and most critical step in setting up your sharing permissions correctly.
The three primary roles are:
- Owner: The main creator with full control
- Collaborator (Co-author): A team member with editing permissions
- Respondent: The end-user who fills out the form
The form or quiz creator, as the owner, has complete control over its content, settings, and collected response data.
A co-author can help build a form and analyze responses, but cannot delete it or change sharing settings.
Finally, the respondent is the person who simply fills out and submits the form.
Their experience is entirely dictated by the permissions the owner has configured.
Personal vs. Work or School Accounts
Microsoft Forms features vary based on whether you use a free personal account (e.g., Outlook.com) or a paid work/school Microsoft 365 account.
Using a work or school account for Microsoft Forms offers several key advantages:
- Advanced sharing: Enhanced options for distributing forms and results.
- Security: Robust features to protect your data.
- Integration: Seamless connection with other business tools.
- Organizational use: Designed for streamlined business workflows.
Here is a quick comparison of the key features available for each account type:
| Feature | Personal Account | Work or School Account |
| Restrict to “People in my organization” | No | Yes |
| Group Forms | No | Yes |
| File Upload Question | No | Yes |
| Shorten URL | No | Yes |
| Microsoft Teams & SharePoint Integration | No | Yes |
These differences are crucial for data control and robust workflows within a corporate or academic environment.
Business accounts allow restricting quizzes to an organization and creating team-owned group forms.
Personal accounts lack these powerful sharing options, so the type of account matters in terms of sharing capabilities.
Sign up for exclusive updates, tips, and strategies
Once your form or quiz is ready, the primary goal is to distribute it to your audience.
Microsoft Forms offers detailed controls for who can respond and various ways to share it.
First, open the form you want to share.
In the upper-right corner of the screen, you will see a green “Collect responses” button.

Clicking this opens the main sharing pane where all distribution settings are managed.
Step 2: Choose Who Can Access Your Form
This is the most critical setting for controlling access.
From the drop-down list, you have three main options:

| Access Level | Description | Best For |
| Anyone can respond | Creates a public, anonymous form link. No sign-in is required. | Public surveys, event sign-ups, external feedback. |
| Only people in my organization can respond | Requires respondents to sign in with their work or school account. Automatically records their name and email. | Internal surveys, departmental polls, staff feedback. |
| Specific people in my organization can respond | The most secure option. You must enter the specific names or group names of people who are allowed to respond. | Targeted quizzes, confidential team feedback, access-controlled registrations. |
Step 3: Pick Your Distribution Channel
After setting permissions, Microsoft Forms offers a few different ways to deliver the form to respondents.
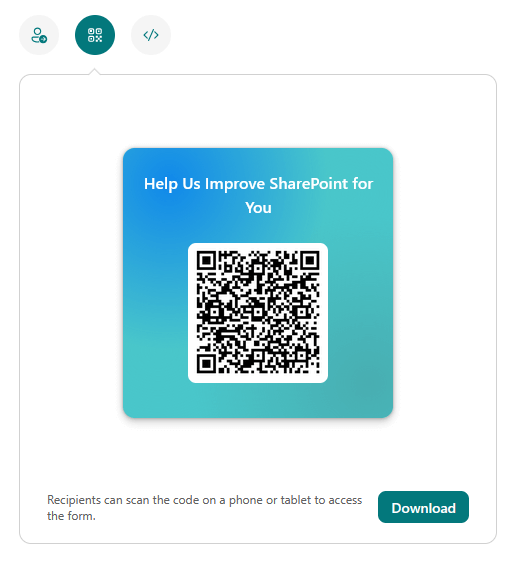
Here are the primary distribution methods available:
- Copy Link: The most common and direct method
- Invitation: Send a formal invitation via Outlook or Teams
- QR Code: Generate a code for physical media like posters
- Embed: Get HTML code to place the form on a website
The most common method is to simply copy the form link and paste it into an email or chat message.
Meanwhile, QR codes on posters or flyers professionally bridge physical and digital environments.
The embed option offers HTML code to integrate your form directly into a webpage, enabling users to respond on-site.
Sharing to collect responses is different from sharing to collaborate on the creation of the form itself.
For any form or quiz that requires team input, understanding the collaborative sharing model is essential.
This is where you add collaborators.
Co-authoring allows the form owner to invite other users to help build the form and analyze its data.
When you grant these permissions, your invited colleagues become co-authors and can perform several key actions:
- Edit and add questions
- Change the form’s theme and design
- View and export response data
When you share to collaborate, you are giving them permission to view and edit the form’s structure.
This is different from sharing a form to collect responses, as it provides backend access.
Essentially, you’re bringing team members into the design and analysis phase of your form’s lifecycle.
To invite co-authors, follow these steps:
- From your form, click the three dots (…) in the top-right corner.
- Select Collaborate or Duplicate.

- Under “Share to collaborate,” click the button to get a link to view and edit.

You will be presented with collaboration permission options that determine who can use the link.
You can typically restrict it to people in your organization or even specific colleagues.
The original creator always remains the sole owner of the single form.
Using Group Forms for Teamwork
While individual collaboration is useful, it presents a risk for any form tied to a long-running business process.
If the owner leaves the company, the form can become orphaned and inaccessible.
Fortunately, the enterprise-grade solution is the Group Form.
Why Group Forms Are Superior for Business
A Group Form is not owned by an individual but by a Microsoft 365 Group (the same entity that backs a Microsoft Team).
This model is the definitive best practice for any form that serves a departmental function or supports a project team.
- Business continuity: The form isn’t lost if the owner leaves.
- Centralized data: Response data is stored in a shared team location.
- Automatic permissions: All team members are automatically co-authors.
This model fundamentally mitigates the risk of data loss and ensures the form’s longevity.
Aligning form ownership with the team’s lifecycle integrates it as a reliable collaborative tool.
For any form that’s critical to a department or project, using the Group Form model is the definitive best practice.
How to Move a Personal Form to a Group
If you initially created a personal form but need to convert it to a more robust Group Form, the process is simple:
- From the Microsoft Forms home page, find the form under the “My forms” tab.
- Click the three dots (…) on the form’s tile.
- Select the Move option and choose the desired destination Group or Team.
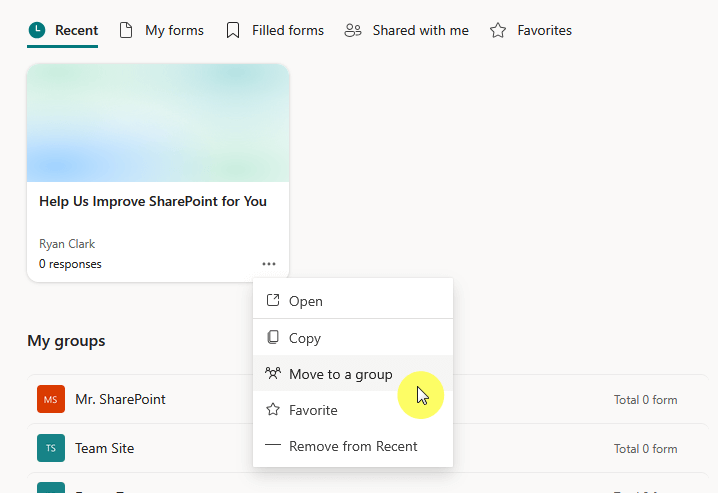
Note: This action is permanent and cannot be undone.
This action transfers ownership from your personal account to the selected Microsoft 365 Group.
The original sharing link for collecting responses will continue to work seamlessly, so you don’t need to send out a new one.
All new responses will now be routed to the Excel file located in the Group’s shared document library.
Microsoft Forms provides several ways to conduct data analysis and share the results with stakeholders.
Real-Time Data Analysis on the “Responses” Tab
The Responses tab is your primary hub for real-time analytics.
It provides an immediate summary view with several key metrics:
- Total number of responses
- The average time to complete
- Current status of the form (e.g., active)
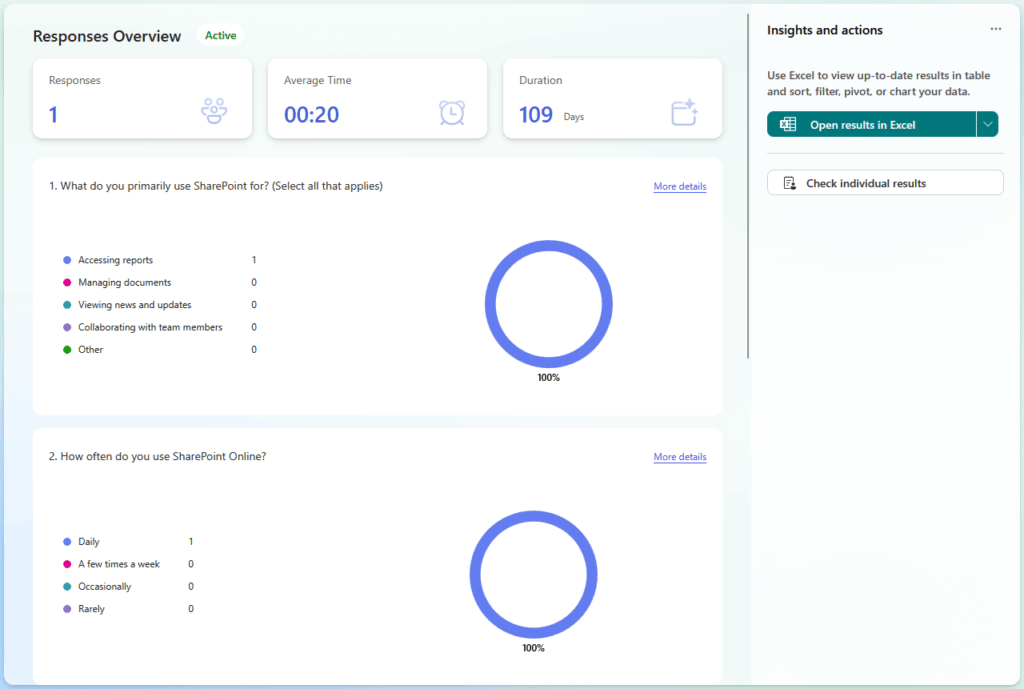
The tab also displays automatically generated charts and graphs for each question for a quick visual summary.
For a more granular look, the “View results” option lets you step through individual responses one by one.
This combination of summary and detailed views makes it a powerful tool for initial data analysis.
For sharing high-level findings without giving away raw data, you can share a visual summary.
- Go to the Responses tab.
- Click the three dots (…) for more options.
- Select Share a summary link.
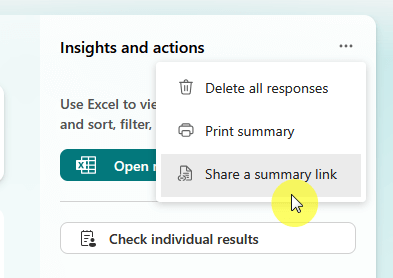
Anyone with the link can view a read-only webpage with the same charts and graphs from the Responses tab.
To revoke access, you can remove the link from the same menu.
Exporting Responses to Microsoft Excel
For in-depth analysis, exporting your data to Microsoft Excel is the best approach.
Microsoft Forms offers two distinct methods for this:
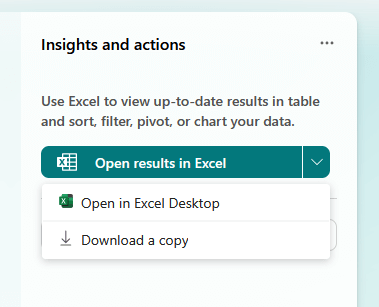
| Export Method | How It Works | Best Use Case |
| Open in Excel | Creates a live, cloud-based Excel file that is automatically saved to OneDrive or SharePoint. | Ongoing surveys where you need an always-up-to-date dataset. New responses sync automatically. |
| Download a copy | Creates a static, offline Excel workbook that is saved to your local device. | Creating a point-in-time report or an archival copy of the data. This file will not update with new responses. |
Advanced Tips and Security Best Practices
Using Microsoft Forms responsibly requires an understanding of data governance and security.
Adhering to best practices ensures your data is protected and that your forms remain valuable assets.
Sharing a Form as a Reusable Template
For standardized forms that need to be used repeatedly (e.g., a project intake form), sharing it as a template is highly efficient.
- Click the three dots (…) and select Collaborate or Duplicate.
- Under “Share as a template,” click Get a link to duplicate.
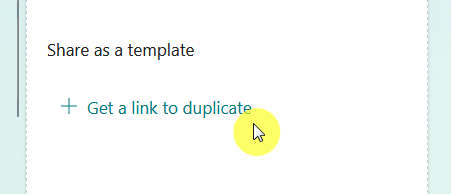
When a user clicks this special link, a brand-new form is created in their own account.
This process only duplicates the form’s structure — the questions, logic, and theme.
No existing response data from the original is carried over.
Note on Sharing with Specific External Users
To collaborate on a form with external users, you must:
- Use the “Share to Collaborate” link
- Set the permission to “Anyone with an Office 365 work or school account can edit and view result.”

Note that your organization’s administrator must allow this type of external sharing.
Security When Collecting Sensitive Data
When you collect sensitive or personally identifiable information, security must be your paramount concern.
Here are the non-negotiable best practices to follow:
- Mandate group ownership: Never use a personal form for sensitive data.
- Forbid “Share to Collaborate” links: Manage access only through Group membership.
- Include a data purpose statement: Clearly explain why you are collecting the data.
The most critical rule is to always use Group Forms for sensitive information.
That will ensure the data is stored in a secure, centralized location and not tied to a single person’s account.
This prevents data loss if an employee leaves the company and provides better administrative oversight.
Do you have questions about using Microsoft Forms, especially in sharing them? Let me know.
For any business-related queries or concerns, contact me through the contact form. I always reply. 🙂





























Hey Ryan, thanks for the article. How do add additional emails to receive notifications of when a MS Form is submitted?
Does anyone know if you can share an entire collection to collaborate with someone on? Not just an individual form?