

Table of Contents:
Last Updated on July 6, 2024
Feeling anxious about the potential issues in Teams?
In this guide, I will share some tips on how to avoid lifecycle management issues and challenges in Microsoft Teams.
Let’s get started.
Why do lifecycle management issues in Microsoft Teams matter?
Before everything else, let’s start with the basics…
Lifecycle management refers to the process of understanding and monitoring teams from their creation to their archival.
It involves creating rules and processes to ensure that teams are managed properly throughout their entire lifecycle.
⚠️ Note: More info on the phases of lifecycle management here: Exploring Lifecycle Management Tools in Microsoft Teams.
As for the why…
Microsoft Teams lifecycle management is an important part of maintaining a healthy and productive environment for collaboration.
By having clear policies and procedures, organizations can ensure that teams remain organized and efficient while avoiding pitfalls like inactive teams or data loss.
Sign up for exclusive updates, tips, and strategies
What are the common challenges to avoid in Microsoft Teams?
Lifecycle management is an important part of ensuring that your organization’s collaboration environment is secure, efficient, and up-to-date.
However, there are several common challenges that organizations must be aware of to successfully manage their Microsoft Teams environment.
Challenge #1: Microsoft Teams Sprawl
There are two ways to describe sprawl in Microsoft Teams:
- When teams are created and left untouched, resulting in large amounts of unused or irrelevant resources clutter the work environment
- When users are overly enthusiastic about creating teams and end up creating too many of them
This leads to a cluttered workspace with redundant channels and unnecessary documents, making it difficult for users to find what they’re looking for.
Three reasons why sprawl happens in an organization:
- There are no governance policies related to creating teams
- No clear admin policies regarding data management
- No training for users on using Microsoft Teams
⚠️ Note: More information about sprawl here: The Definitive Guide: How to Manage Microsoft Teams Sprawl.
Challenge #2: Findability in Teams
The lack of findability in Microsoft Teams is caused by several factors:
- Teams sprawl
- Inadequate search capabilities
- Poor naming conventions
Without effective naming conventions and user awareness, users may have difficulty locating the right resources within Teams.
This can lead to confusion and frustration among users who are unable to find the information they need quickly.
Challenge #3: Governance in Teams
There are a few reasons why governance is a challenge:
- Requires organizations to control user access and data
- Compliance with business standards
- Ensure the security of the environment
👉 Related: Microsoft Teams Security Best Practices: Compliance & Governance
This involves setting up standardized team creation processes, managing external access, and implementing approval processes to prevent chaos.
Organizations must consider stakeholder groups who understand the laws and regulations that need to be followed.
Clearly, there are a few more challenges like an uncontrolled increase in content. But these three are the most common ones.
How to avoid Microsoft Teams lifecycle management issues?
With the basics out of the way, let’s get into the specifics of what I recommend so you can get ahead of those challenges.
Let’s start with the first one:
1. Decide if a team is needed
Do you really need a new team or not? Maybe a channel can suffice…
You need to ask the question above as the first step as it ensures that teams are only created when necessary so resources are used efficiently.
When you decide on a team, you must consider:
- The purpose of the team
- Who will be using it
- How long will it stay active
This makes sure that teams are created with a clear purpose in mind and monitored throughout their lifespan.
It also helps to identify any inactive teams so they can be deleted or archived if no longer needed.
In some instances, a channel might suffice.
Here are examples of such cases:
- The requirement is only for a designated area or a conversation thread, which are all related to an already existing team.
- The users who will be using the designated space are already members of a team and can simply open a channel in the team.
⚠️ Note: Read more on teams vs channels here: When to Create a Team vs Channel: Microsoft Teams.
2. Create provisioning guidelines
In relation to my recommendation above, it helps if you create provisioning guidelines first so users can create and manage teams more efficiently.
The guidelines can include the following:
- Setting up team owners, members, and roles
- Creating channels
- Managing access permissions
- Configuring settings
By having clear guidelines in place for creating teams, organizations can make sure their teams are set up properly from the start.
How does that help?
There are a few reasons I can think of:
- This reduces the risk of data breaches or other security issues due to improper setup or configuration.
- It ensures that all members have the right access permissions to the resources they need.
- This makes it easier to manage existing teams over time.
Not to mention, organizations can use these guidelines to ensure that their teams remain secure and compliant with company policies.
They can also use them to make sure that all members have the right access permissions as roles change or new members join the team.
⚠️ Note: For beginners, check this out: Microsoft Teams Tutorial: Become a Teams Expert Quickly.
3. Set up a naming convention
There are three reasons why it’s a good idea to set up a naming convention:
- Easier to search for and identify teams
- Understand the purpose of each Microsoft Teams team quicker
- Ensure that team names are not too long and get truncated
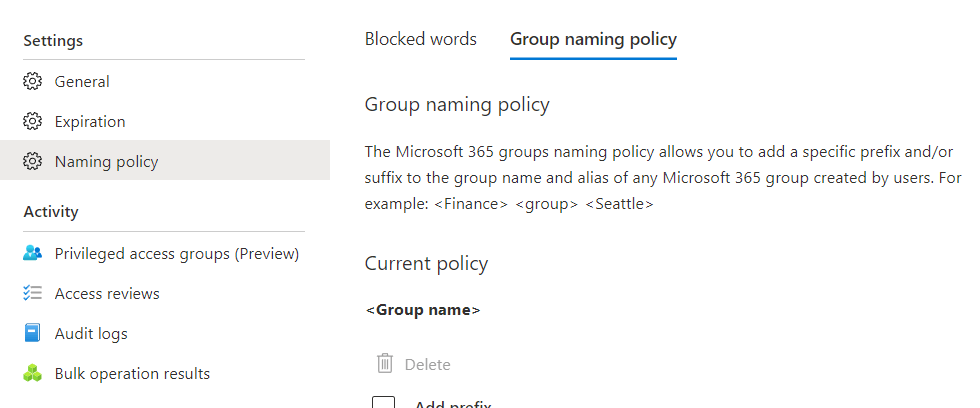
To make this easier, you can easily create a group naming policy by adding a specific prefix and/or suffice to the Microsoft 3665 group.
For this, you will have to get to Azure AD > Groups > Settings > Naming policy and you will see the following screen:
This can ensure that team owners will name their teams consistently and adhere to the same standards — no playing favorites here.
The exercise associated will also solve sprawl since the rules here indicate that the user agent has to be healthier.
By the way, the naming policy will be applied to the group as the team name and group name are one and the same.
⚠️ Note: For more about groups in Microsoft, read here: How to Create a Microsoft 365 Group: The Ultimate List.
4. Create a guide for using templates
This is only a suggestion — but you can also include a guide for using templates in your provisioning guidelines.
Clearly, using templates is an efficient way to quickly create teams and get started with collaboration.
👉 Related: Microsoft Teams Best Practices Guide: Focus and Management
But did you know that there are now pre-built templates that you can use?
It was announced in May 2020, with 15+ pre-built templates available for various uses such as the following:
- Project management
- Event management
- Onboarding employees
- Organizing help desk
- Patient care and hospital
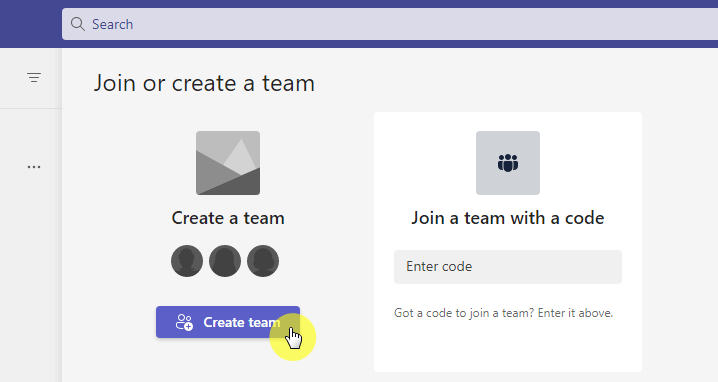
If you want to check it out, simply go with the usual creation process of creating new teams in Microsoft Teams.
Click the join or create a team in the Teams app:

One of the tiles in the center view is for creating a new team.
Click its button:
You will then see a window containing all the available templates that you can use.
If you want to use a template, simply click on it:
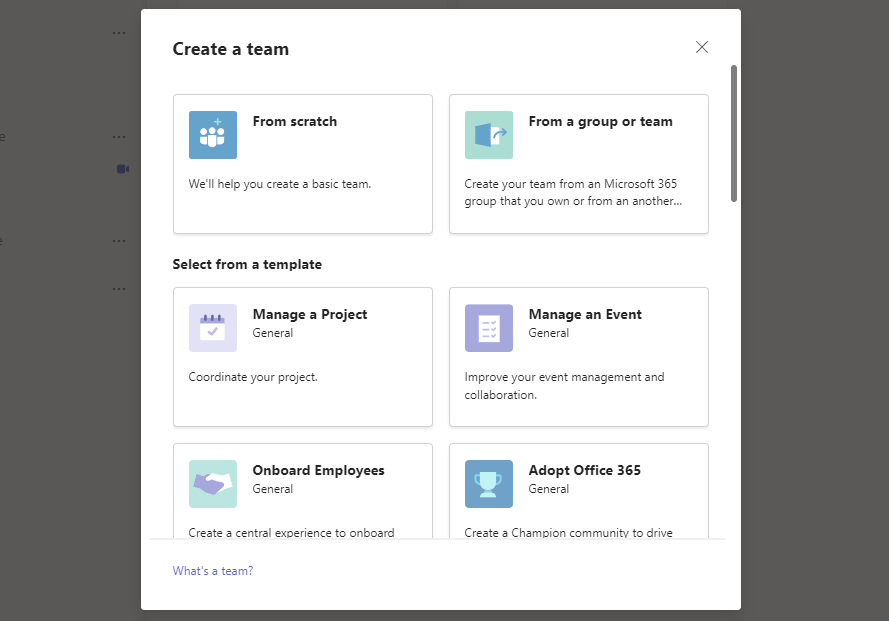
One thing note to here is that the template you use will also affect the SharePoint site the system creates.
For example, if you use the template for project management, the system will automatically install related apps to the site.
Here are some benefits when you take advantage of such a feature:
- Standardize team structures across your organization
- Easier navigation even with different teams
- Use pre-configured settings like channels, tabs, and apps
- Streamline the setup process and reduce the time for onboarding members
⚠️ Note: For more on the pre-built templates, check here: Microsoft Teams Pre-Built Templates: The Beginner’s Guide.
5. Regular team audits
There are necessary reasons why you must do team audits regularly:
- Identify any potential issues or risks related to teams
- Review team membership, permissions, content, and other settings
- Make sure settings are being used appropriately and by the policies
- Identify teams that aren’t active anymore as well as ownerless teams
Auditing teams regularly make sure that teams are used effectively and securely while getting on top of changes or updates.
This helps maintain control over how teams are being used and that users follow the same set of guidelines for collaboration within Microsoft Teams.
Fortunately, Microsoft Teams has a review and monitoring tool you can use right in the admin center.

If you want to go deeper, you can also get usage reports on the settings panel, site contents, and the Microsoft 365 admin center.
You will find information regarding:
- Unique viewers
- Site visits
- Average time spent per user
- Popular content
- Usage insights by device and by time
- Items shared with external users
Regular team audits help you stay on top of any potential team-related issues or risks while also ensuring that all teams are being used effectively and securely.
⚠️ Note: For more on usage reports in Microsoft Teams, check here: How to Check Your SharePoint Online Usage Report.
6. Define when to sunset a team
Defining when to sunset a team relates to providing an end date for the team.
Now, when this date comes, it doesn’t always mean that you will have to delete the team right away regardless of what the situation is.
However, having an end date will allow IT administrators to plan ahead of time and ensure teams are only active for as long as needed.
If you want to do this yourself, there is a tool that will allow you to set an expiration date quite easily for the group.
You simply have to go to Azure AD > Groups > Expiration:

Using this tool, you can configure the options to:
- Specify the lifetime in days
- Contact person for groups without owners
- Which groups does the policy apply
Team owners, if the Microsoft 365 group was created in the MS Teams environment, team owners will get an email and a notification for team renewal.
If you can’t do this yourself, you can depend on IT administrators.
This is why they must have a date so they can archive any important documents or conversations from the team.
👉 Related: Types of Groups in Microsoft 365: Comparing Groups
7. Create archival policies
Speaking of archiving documents, the last part of lifecycle management is archiving teams.
When you have policies in place, it helps ensure that data and information in that team are protected and tracked.
Here are reasons why it’s important to have archival policies:
- Keep track of team data and maintain compliance standards
- Review content and activity that took place within the team
- Manage inactive teams more efficiently
- Free up resources and avoid unnecessary clutter in the teams environment
- Preserve content for future reference or review if needed
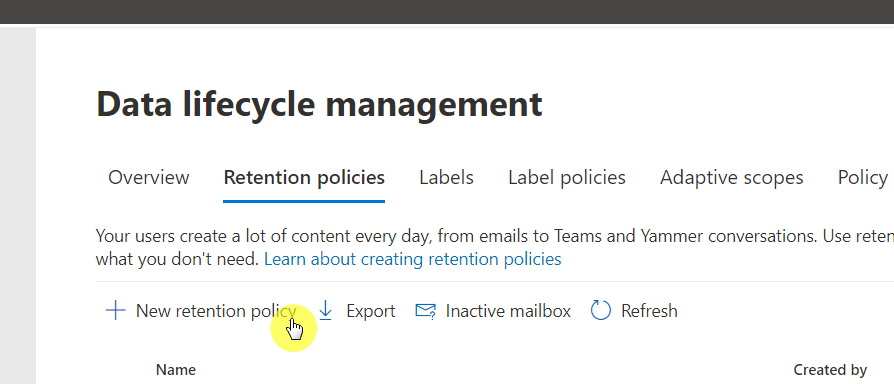
In relation to this is creating retention policies in the compliance center.
Simply go to data lifecycle management > Microsoft 365 > retention policies and click the new retention policy button:
There will be a few steps you need to do to complete the policy.
Further down, you will be able to set up the specific actions of the policy:

⚠️ Note: For more on the actual steps, go here: Exploring Lifecycle Management Tools in Microsoft Teams.
Start great lifecycle management in Microsoft Teams
Lifecycle management in Microsoft Teams is essential for organizations to stay organized and to ensure that teams are only active for as long as necessary.
There are certainly a few more you can do. But the ones I shared above can help you efficiently manage the lifecycle of teams.
Anything I missed on how to avoid issues related to lifecycle management? If so, kindly comment below.
For business inquiries, kindly send me a message using the form on this page — I’ll get back to you as soon as possible.


